Showing posts with label Sassy January Layout Series (2021). Show all posts

Saturday, February 27, 2021

SJLS #31 Complete Admiration Layout

Sassy January Layout Series #31:  Complete Admiration Layout

Welcome to the 31th segment in a series of 31 that will be shared during the month of January/early February.    Click here to find out about the Sassy January/February Layout Series.

Today I am sharing the final layout in my series.  It took me longer than expected to share all 31 layouts, however, I hope you have enjoyed these postings.  The final layout is in honor of International Polar Bear Day and will be used by me to share some photos of my son's pilgrimages to see his beloved polar bears.

The paper has a masculine or outdoorsy feel, yet is delicate enough to use with a baby etc.  I used the Thin Cuts from the Aurora card making workshop for the worlds which I truly loved!  I have had these Thin Cuts since the summer and hadn't used them yet...now I am addicted to them and have been making lots of cards with them!  Love, love, love!


Stamped details and pattern details.


How fun is it to mix pattern papers?  As these are smaller prints, they work well to mix and match as one doesn't overpower the other.


The title was cut with Close To My Heart's Artisrty Cricut Collection.

The worlds, and their bases, are cut with our retired Aurora Card Kit Thin Cut which is quickly becoming one of my faves!  Such a cool design! 


Supplies used:  (retired) Aurora Paper and Card Making Thin Cuts.  (X5957) Sapphire cs, (X6045) Sage cs, (X5978) Glacier cs, (1385) White Daisy cs, (Z2831) Charcoal Exclusive Ink Pad, (Z2848) Sapphire Exclusive Ink, (Z4191) Silver Glitter Gems.

SJLS #30 Smitten by you layout

Sassy January Layout Series #30:  Smitten By You Layout

Welcome to the 30th segment in a series of 31 that will be shared during the month of January/early February.    Click here to find out about the Sassy January/February Layout Series.

This layout was created with our fantastic Artbooking Cricut Collection.  The collection is filled with over-the-top overlays and patterns that were designed to partner together and of course are interchangeable to meet your own needs.  

For this particular layout, I used a combination of Cricut cuts, inks, metals, sparkles and several other mediums to create a layout where there is no patterned paper, but stands alone beautifully without it.  The original design was showcased in a Close To My Heart publication and I problem solved how to then create the layout.  I am delighted with my finished project.


The combination of the metals with the neutral papers pair so well together!

So many fun stamping details!

Details of the embellishing:  shimmer trim, Cricut cutting, sparkles and stamping.

The Thin Foam Tape makes such a difference!  Love the alternating letters.


Supplies used:  (retired) Crush embellishments, flowers, Sky cs, Whisper & Slate cs..  (X5985) Smoothie cs, (1385) White Daisy cs, (retired - but could use (Z3239) Silver Glitter Paper) Silver Shimmer Trim, (Z3274) Clear Sparkles.

Thursday, February 25, 2021

SJLS #29 Charlotte Layered Flip Flap Layout

Sassy January Layout Series #29:  Charlotte Layered Flip Flap Layout

Welcome to the 29th segment in a series of 31 that will be shared during the month of January/early February.    Click here to find out about the Sassy January/February Layout Series.

The soft, yet neutral, colors make this layout perfect for so many photo possibilities!  My layout, as you will see below, was used to showcase some very cherished photos from a choir loft in Florence, but my mind immediately thinks how perfect this layout would be for a wedding or baby photos.  

The layout highlights our 8" x 12" Flip Flaps, which are stacked to overlap on the left page.  I did not photograph with the Flip Flaps as they tend to create too much of a glare.  There are five 8" photo spaces within the flip flaps and the left page which allow many photo options.  I have chosen to use all 8" x 8" photos but you could do bordered photos or even a photo collage.  The photo space on the right page is an 8" x 10" photo.  This of course could be altered to any size of your choosing.

Two 8" x 12" Flip Flaps are used on this layout.  They fold over each other on the left page.


Sequins details:  the Rose Gold Sequins paired beautifully with the Charlotte paper.  Here they are shown cascading down the floral paper.


Make sure to check back to see how I used my personal photos with this layout.

Supplies used:  (retired) Charlotte paper.  (Z4065) Rose Gold Loose Sequins, (Z341) Mini Glue Dots, (1385) White Daisy cs, (Z3443) 8" x 12" Flip Flaps, (Z2060) Thin Foam Tape, (Z3372) Adhesive Runners.  Current supplies can be ordered at:  www.tonyasheridan.ctmh.com.

Wednesday, February 24, 2021

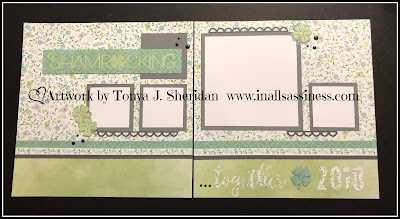
SJLS #28 Shamrocking Together Layout

 Sassy January Layout Series #28:  Shamrocking Together Flip Flap Layout

Welcome to the 28th segment in a series of 31 that will be shared during the month of January/early February.    Click here to find out about the Sassy January/February Layout Series.

This layout was quite a delight to create!  It features the Chelsea Gardens paper collection which had such a fresh spring feel to it!  One of the unique things that I love about this layout is how the titles, and shamrocks are cut from the patterned papers!  They really pop with the pattern close up!


The Shamrocking was cut out with the Cricut.  The font is from CTMH's Flower Market.


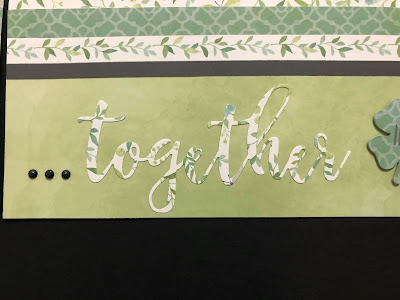
The title was cut with a now-retired Thin Cut set.  The detail is extraordinary.  The zip strip (with the vine) is one of several selections that is in the kit.  These might slightly vary.


The year/date was cut with Thin Cuts and can be custom cut in the year of choice.  Or, as a different option, the title could simply be "Shamrocking Together" and leave out the "in XXXX".


Supplies used:  (retired) Chelsea Gardens paper, Sweet Leaf cs, Scalloped Border Thin Cut, Together Thin Cut.  (X5953) Charcoal cs, (Z3234) 3" Flip Flaps.

Tuesday, February 23, 2021

SJLS #27 Lollydoodle Adorable Hybrid Flip Flap Layout

 Sassy January Layout Series #27:  Lollydoodle Hooray Flip Flap Layout

Welcome to the 27th segment in a series of 31 that will be shared during the month of January/early February.    Click here to find out about the Sassy January Layout Series.

This layout is a hybrid layout which was so much fun to create!  The pages were created on photo paper in Studio J (may she rest in peace) and then were configured using our classic 6" x 12" Flip Flaps and our 4" x 6" Flip Flaps to make an interactive layout worth it's title!  

Supplies used:  (retired) Studio J print.  (Z3231) 4" x 6" Flip Flaps, (Z3268) 6" x 12" Flip Flaps.

Monday, February 22, 2021

SJLS #26 Lollydoodle Hooray Flip Flap Layout

Sassy January Layout Series #26:  Lollydoodle Hooray Flip Flap Layout

Welcome to the 26th segment in a series of 31 that will be shared during the month of January/early February.    Click here to find out about the Sassy January Layout Series.

Lollydoodle.  Such a fun, and whimsical paper suite and the stickers...oh my cuteness!! LOVE!  As pink is by far my favorite color (even more so than Scarlet and Grey if you can imagine that!) the addition of our now retired Cotton Candy pink just makes me happy!!  This layout was designed around the stinkin' cute flip flaps and includes a 4" x 12" Flip Flap on the left side - you can see in the photo below the flip flap open and closed.  Using a variety of photos and sizes makes the interactive elements event more fun - it includes additionally a 4" x 6" and a 3" x 3" Flip Flap as well.  An entire sheet of stickers is included so there are extras to play around with.  A few of the squares are pre-embossed to also add texture to the layout.

Supplies used:  (retired) Lollydoodle paper and stickers.  (Z3274) Clear Sparkles, (Z1799) Silver Shimmer Trim, (Z3234) 3" Flip Flaps, (Z3231) 4" x 6" Flip Flaps, (retired) 4" x 12" Flip Flaps, Featured colors:  Cotton Candy, Slate, Whisper, Juniper.

Sunday, February 21, 2021

SJLS #25 Charlotte Stripes Layout

Sassy January Layout Series #25:  Charlotte Stripes Layout

Welcome to the 25th segment in a series of 31 that will be shared during the month of January/early February.    Click here to find out about the Sassy January Layout Series.

Charlotte is such a timeless paper collection.  I absolutely adore it!  The possibilities that it provides for photo options are endless as to the neutral colors and tones in the layout.  I adore that not only does it have the classic Whites, blacks and greys, but there is also a touch of tans and peaches which brighten up the papers as well.  For myself, this collection is perfect to scrapbook my photos from Florence as there are so many ivories, and neutral tones in my photographs.


I really like this design of this layout as it creates balance and simplicity without being too busy.  It comes from the Make It From Your #2 , design #4. .  Of course, I tweaked it to work with my photos which is one of the awesome things you can do with these books!  I really wanted a layout design that worked, or could be adapted to work, with vertical 4" x 6" Flip Flaps. For the photos I intended to use, this was perfect.  I didn't want the artsy-ness of the layout to take away from the focal point.  I chose to use a small and simple time for the same reason.

The patterns of the paper were carried through to the pennants to continue the patterns throughout the layout.

A combination of strips of patterned paper and zip strips create the design behind the photographs.  The patterns compliment each other quite well.  Dark Grey (almost Slate) Dots are used to embellish the layout.


Here is the layout with my pictures:


Supplies used:
  (retired) Charlotte paper, Chelsea Gardens Dots.  (X6047) Black cs, (Z3231) 4" x 6" Flip Flaps, (Z2060) Thin Foam Tape, (Z3372) Adhesive Runner, (9042) Make it From Your Heart Vol. 2.  The featured colors are: Sorbet, Black, Whisper, Slate, Champagne and White.

Friday, February 19, 2021

SJLS #24 Gnome Love

Sassy January Layout Series #24:  Gnome Love Layout

Welcome to the 23rd segment in a series of 31 that will be shared during the month of January/early February.    Click here to find out about the Sassy January Layout Series.

Layout #24 celebrates everything gnomie!  I have fallen in love with these cute little guys this last year so I wanted to share a layout that was created with our original "gnome" stamp set: Gnome Matters.  This set does come as a stand alone stamp set, but it is so worth adding the Thin Cut set if you have the ability to cut them.  


Here are the details of one of the little gnomes and of the intricate Thin Cuts. 


I incorporated the Thin Cuts that pair with the Shaker cards.  I love this stitched rim!  It just blends perfectly with any, and every, project!  To make this circle even more perfect, I traced the stitched details with the Clear Shimmer Brush.  While it does pick up on the camera very well, it indeed pops!  It is then popped up with the Foam Rim from the Shaker elements with makes popping up the circle so quick and easy!


Here are the title details:


Although not included in the kit, the Clear, Wisteria, Julep and Charcoal Shimmer Brushes were used to color the pieces and accent the layout.

Supplies used:  (retired) Mix in papers, (Z2831) Charcoal Exclusive Ink,  (X6041) Lilac cs, (X5946) Linen cs, (X6045) Sage cs, (Z3509) Charcoal Shimmer Brush, (Z3511) Wisteria Shimmer Brush, (Z3508) Julep Shimmer Brush, (Z3293) Clear Shimmer Brush, (Z3741) Gnome Matters Stamp and Thin Cut, (CC5218) (for the mask) On Repeat stamp set,  (Z4309) Shaker Window & Confetti, (Z3566) Julep Sequins, (Z3563) Diamond Stickles, Z4310 Shaker Window Foam & Acetate (Z2060) Thin 3-d Foam tape, (Z3341) Thin 3-d Foam Dots, ((Z3372) Adhesive Runner, (Z341) Mini Glue Dots, (Z3340) Dual Tip Permanent Glue Pen.   All of the current items may be purchased on my Close To My Heart website at: www.tonyasheridan.ctmh.com.

Tuesday, February 16, 2021

SJLS #23 Love Lives Here

Sassy January Layout Series #23:  Love Lives Here

Welcome to the 23rd segment in a series of 31 that will be shared during the month of January/early February.    Click here to find out about the Sassy January Layout Series.

For layout #23, we are re-visiting Charlotte.  This paper pack is timeless and the neutral colors lend to endless possibilities.  I must admit, it also lots awesome with black and white photos as well.  The sketch for this layout is one that I have fallen in love with as it highlights different pieces of patterned papers in random order.  It has become a go-to sketch for me!  I equally adore the angle of the two photos - I think that this adds a twist of fun to the project.


The title for this layout was cut out with Thin Cuts, and then stamped, with our special edition Cherished Blossoms that is available just until the end of February and is apart of our Bring Back My Back Blossom Collection.  It is available with, and without, the Thin Cuts but I have to tell you the Thin Cuts are awesome for this particular stamp set!    


The floral piece is a PML card popped up on foam tape.  This is a part of a 3" x 4" Flip flap ensemble so the card can be on top, or under the photograph.  

PML cards were cut and pieced back together to create this journaling piece.  The square photo is indeed a flip flap to add the opportunity for additional photos.  I adore how this piece turned out!


Supplies used:  (retired) Charlotte Paper Collection and embellishments, (CC122011) Cherished Blossom Stamp and Thin Cuts, (1385) White Daisy cs, (Z2805) Black Exclusive Ink Pad, (Z3234) 3" Flip Flaps, (Z3230) 3" x 4" Flip Flaps, (Z2060) Thin Foam Tape, (Z3372) Adhesive Runner.  Current supplies are available at: www.tonyasheridan.ctmh.com.

Monday, February 8, 2021

SJLS #22 Charlotte Extended Flip Flap Layouts

Close To My Heart does a Bring Back My Pack every few months, so today I thought I follow suite, and share a Bring-back-my-layout from my past.  I designed and taught this layout several years ago, and while going through some inventory, recently found that I had a few kits left.  I love the Charlotte paper - it is so timeless and the neutral colors enable it to coordinate with so many photo possibilities.

The layout uses a variety of flip flap sizes to create an interactive arrangement.


You can click here to see my original post about this layout and how I incorporated my own photos onto the layout.

Sunday, February 7, 2021

SJLS #21 U Are My Why Layout

Sassy January Layout Series #21:  U Are My Why

Welcome to the 21th segment in a series of 31 that will be shared during the month of January/early February.    Click here to find out about the Sassy January Layout Series.

This layout was created with our brand new In This Together Collection that is available for a short time.  The collection features beautiful, and quirky, artwork that is perfect for documenting our stay at home time/quarantine time from the last year and I will certainly being using that - but today I wanted to show how it could be used for other purposes as I like to see the many possibilities of our collections - both inside and outside of the box - to speak.


The bright and cheerful patterns blend so well together in this collection!  They remind so much of my daughter and by chance purple is her favorite color!

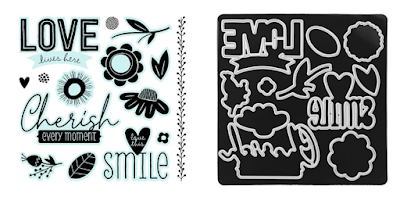
The "love this smile" image was cut from a Thin Cut Stamp from our Bring Back My Pack Blossom Collection.  This is  quickly becoming one of my faves.  


Fun Cricut cut daisies with the cute little dots just add to the charm!


The title was cut from the New Market Digital collection.  I love the flair of this font!


Supplies used:  (CC2211) In This Together Paper Collection, (CC2214) In This Together Dots, (1385) White Daisy cs, (X6054) Grape cs, (X5968) Lagoon cs, (Z2060) Thin Foam Tape, (Z3341) Thin Foam Dots, (CC122011) Cherished Blossoms Stamp and Thin Cuts.

Friday, February 5, 2021

SJLS #20 Jingle Joy Artwork Bundle

Sassy January Layout Series #20:  Jingle Jolly Artwork Bundle 

Welcome to the 20th segment in a series of 31 that will be shared during the month of January/early February.    Click here to find out about the Sassy January Layout Series.

This artwork was created for my Joys of the Seasons event in the fall.  It includes a two-page layout, a mini album and 6 cards.  I have shared before that I enjoy creating a layout, and use the extra materials that I have already pulled together, to then create cards and other projects.  That is what I did with these supplies.  I designed the layout (which I adore), then created the cards and book to maximize my remaining supplies.  The stickers in these projects are so bright and jolly - they truly had to be used and I incorporated almost every one of them.


SJLS #19 Cherish every moment - Thistle Layout

Sassy January Layout Series #19:  Cherish the Moments Layout

Welcome to the 19th segment in a series of 31 that will be shared during the month of January/early February.  

Click here to find out about the Sassy January Layout Series.  

This layout was inspired by a floral float that I had the opportunity to see in Thailand.  It was absolutely beautiful.  I loved the shades of Thistle that were throughout the float.  My pictures turned out truly beautiful and I didn't want to lose the focus of the pictures by an over-busy patterned paper or layout and the polka dot paper was the perfect middle ground.  

Layout with 6" x 12" Flip Flap closed.


Layout with 6" x 12" Flip Flap open.


For this layout, I used a retired color and paper suite and blended it with a current Stamp and Thin Cut set that was designed around our Bring Back My Pack:  Blossom.  I adore this stamp.  The flowers are just precious and definite bonus is having the Thin Cuts to go with them!  Makes life so easy!  


Title details: I really like the white on white effect so I cut out the title and flower images out of White Daisy, stamped them with Thistle ink and then adhered them to the White Daisy cs.


Stamped floral spread left side:  this was so much fun to create!  The flowers are popped up on foam and flat, overlapping and distant!  Love it!

Inter-dispersed are the iridescent sequins from the Silver Loose Sequins.  Once each was adhered, I added a dot of Diamond Stickles to the center of each sequin.  Next, I added little dots of the Stickles directly to the base surrounding the stamped images.  This brings the focal point all together.


Spread floral cluster - right side


So let's talk flip flap possibilities!  First, this was designed for a 6" x 12" photo in the inside of the 6" x 12" Flip Flap on the left page - a great way to showcase a vertical photo.  You could of course substitute with 4" x 6"s or 3" x 3"s or 3" x 4"s.  Then on the right page, it was designed for a 8" x 12" photo on the top of the Flip Flap and underneath with space for smaller pics if desired.  Again, as these are all standard sizes, these could easily be tweaked to fit other standard sizes.  I absolutely love the possibilities!  There are also two 4" x 6" Flip Flaps on the outside of the 6" x 12" Flip Flap (optional).

Check back to see my layout with my pictures early next week.

Supplies used:  (retired) Thistle Exclusive Ink, Thistle cardstock, Thistle Fundamentals Papers, (Z4304) Silver Loose Sequins, (Z3563) Diamond Stickles, (Z3268) 6" x 12" Flip Flaps, (Z3443) 8" x 12" Flip Flaps, (Z3231) 4" x 6" Flip Flaps, (1385) White Daisy cs, (CC122011) Cherished Blossom Stamp and Thin Cuts, (Z3440) Tombow Liquid Glue.  The products that are current can be ordered on my site at: www.tonyasheridan.ctmh.com.