Showing posts with label mix in. Show all posts

Saturday, September 2, 2023

Silly Old Bear - creating with Irresistibles

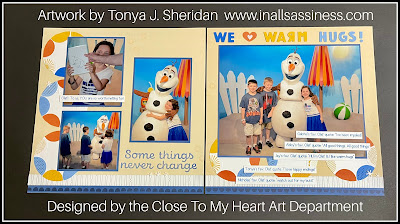
Irresistibles can be a little intimidating at first, but once you start inking, distressing, and splattering you just can't stop right?  What about layering those distressings and inks?  That is exactly what I did when creating this layout. 

To start, I lightly added Periwinkle Ink to the floral irresistible cardstock with a Blending Brush in a circular pattern.  Next, I added Sapphire Ink in a "swooshing" pattern to the paper being careful to make sure I blotted off the blending brush first on scrap paper so that the Sapphire ink didn't overpower the Periwinkle.  Next, I came back with the Periwinkle and added more ink while blending the two colors together.  Once this was complete, I gave the cardstock a little time to completely dry.  Finally, I went over the entire paper with the Periwinkle Shimmer Brush - for this I used the side of the brush and slowly brushed the shimmer until the paper was completely covered.  

Giving complete coverage of the cardstock with the Shimmer Brush lended the cardstock to bow slightly, or give a warped look.  I covered the cardstock with a piece of wax paper and laid a heavy book on top of the paper for about an hour.  This flattened the paper back out while it dried.  Once the paper was dry, I adhered it to White Daisy cs and continued to create my layout.

For a larger view of the layout, click on the layout and it will open in a new window.
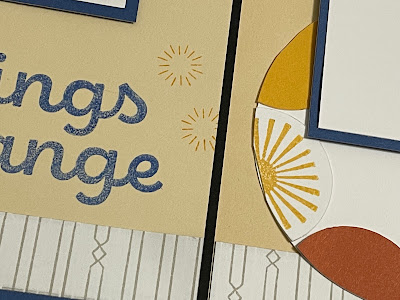
Hive details 

Irresistible title details

Bee details


glitter floral detail


Supplies used:  (X9050) July-August 2023 Mix-ins, (retired) Blue Belle Glitter Paper, (Z4662) Periwinkle Shimmer Trim, (X6067) Periwinkle cs, (1385) White Daisy cs, (Z4675) Irresistibles cardstock, (retired) Deep Water Liquid Pearls, (retired) Bisque Liquid Pearls, (Z4674) Irresistibles Alphabet Stickers, (Z4584) Periwinkle Shimmer Brush, (Z4583) Honey Butter Shimmer Brush, (Z6537) Periwinkle Exclusive Ink Pad, (Z2848) Sapphire Exclusive Ink Pad, (Z4189) Intense Black Exclusive Ink, (S2307) July 2023 Stamp of the Month: The Bee's Knees, (Z2060) Thin Foam Tape, (Z7010) Adhesive Runner, (Z4572) Blending Brushes.  The supplies that are current can be purchased in my shop at: www.tonyasheridan.ctmh.com.

Have a sassy day!

Tonya

Monday, May 16, 2022

Black & White Flower Elegance


This layout was created for the Chantilly expo and features the Layered Flowers Thin Cut sets and lots of helpful hands to cut out all of those flowers x 400 sets!  The work, and woman-power aside, the layout turned out absolutely stunning!  I love it!!!  And this Thin Cut set made the layout absolutely beautiful.  The set has so many possibilities to mix and match the flowers and centers.


It is also noteworthy to point out the numerous shaker elements on the layout which add that extra special touch.


This class kit is available in my shop with all of the pieces pre-cut for you!  You can check it out, by clicking here.

 Supplies used:  (X9036) Mix-In Paper Pack, (Z4324) Layered Flowered Thin Cuts, X6047) Black cs, (1385) White Daisy cs, (Z4304) Silver Loose Sequins, (Z4310) Circle Shaker Windows Foam & Windows,  (Z4309) Circle Shaker Window Thin Cuts, (Z3293) Clear Shimmer Brush, (Z3563) Diamond Clear Stickles, (Z3234) 3” Flip Flaps, (Z4220) Anti-Static Pouch, (Z4325) Pick-Up Tool, (Z2060) Thin 3-d Foam tape, (Z3341) Thin 3-d Foam Dots, ((Z3372) Adhesive Runner, (Z341) Mini Glue Dots, (Z3340) Dual Tip Permanent Glue Pen, Current supplies may be ordered on my website at: www.tonyasheridan.ctmh.com.  

Sassfully yours,
Tonya

Sunday, January 30, 2022

Some Things Never Change Layout

OLAF!  Such a fun character needs a fun-filled layout right?  My thoughts exactly!  I have been holding onto these pictures for years now (yes, literally) just waiting on the perfect papers to go with them and then came the January Album Retreat!  The Album Retreat is an entirely new level of awesomeness let me tell you!  

Anyway, I saw the sample of this layout and knew right away that this was the layout for my pictures!  Creating the circles was such fun and learning a new technique always delights me!  Each of those 1/2 circles with designs was hand stamped before being assembled into the circle that is now showcased.  LOVED it!  Quite the stress releaser in my book!


And details!! There are so many details -- sort of like hidden Mickey's at Disney - there are just little bursts of delight all over the layout!  Note the acrylic stars that were turned into snowflakes in Olaf's honor (all in the eye of the beholder) - or you could also see them as a geometric design.  Also note the little stamped Sundance Sunburst throughout the layout. 
 

For my personal layout, I remembered that I had noted my kids favorite catch phrases, at the time, on my phone and I thought that would be perfect for my journaling.  I typed each on the Cricut and adhered with Thin Foam Tape to my layout.

So of course, the layout could be used for non-Olaf celebrations should you desire.  So to give that option in my class kit, I have added three pieces of Shortbread cardstock - one has the title "some things never change" pre-stamped and the other two are blank.  In addition, the "we (heart) warm hugs" (with the letter "r" correctly & written backwards) is Cricut Cut and included to use if you wish.  Two sheets of Sapphire cs are included so that the mats can be customized to your photo size and orientation.  Additionally, there is a full pack of White Acrylic Stars included, all of the circle pieces pre-cut and pre-stamped, detailed instructions and a color photo are included as well.  The link to order this kit can be found by clicking here.  

Supplies used:  (X9036) Mix-In Paper Pack, (X6059) Shortbread cs, (X6033) Paprika cs, (1385) White Daisy cs, (X6039) Carolina cs, (X5957) Sapphire cs, (X6051) Sundance cs, (X6037) Bluebird cs, (Z6521) Sundance Exclusive Ink Pad, (Z6533) Harbour Exclusive Ink Pad, (Z6016) White Acrylic Stars, (Z341) Mini Glue Dots, (Z3440) Dual Glue Pen, (Z3372) Adhesive Runner, (Z2060) Thin Foam Tape.  All of the supplies that are current, may be ordered on my CTMH website by clicking here.

Sassfully yours,

Tonya

Friday, February 19, 2021

SJLS #24 Gnome Love

Sassy January Layout Series #24:  Gnome Love Layout

Welcome to the 23rd segment in a series of 31 that will be shared during the month of January/early February.    Click here to find out about the Sassy January Layout Series.

Layout #24 celebrates everything gnomie!  I have fallen in love with these cute little guys this last year so I wanted to share a layout that was created with our original "gnome" stamp set: Gnome Matters.  This set does come as a stand alone stamp set, but it is so worth adding the Thin Cut set if you have the ability to cut them.  


Here are the details of one of the little gnomes and of the intricate Thin Cuts. 


I incorporated the Thin Cuts that pair with the Shaker cards.  I love this stitched rim!  It just blends perfectly with any, and every, project!  To make this circle even more perfect, I traced the stitched details with the Clear Shimmer Brush.  While it does pick up on the camera very well, it indeed pops!  It is then popped up with the Foam Rim from the Shaker elements with makes popping up the circle so quick and easy!


Here are the title details:


Although not included in the kit, the Clear, Wisteria, Julep and Charcoal Shimmer Brushes were used to color the pieces and accent the layout.

Supplies used:  (retired) Mix in papers, (Z2831) Charcoal Exclusive Ink,  (X6041) Lilac cs, (X5946) Linen cs, (X6045) Sage cs, (Z3509) Charcoal Shimmer Brush, (Z3511) Wisteria Shimmer Brush, (Z3508) Julep Shimmer Brush, (Z3293) Clear Shimmer Brush, (Z3741) Gnome Matters Stamp and Thin Cut, (CC5218) (for the mask) On Repeat stamp set,  (Z4309) Shaker Window & Confetti, (Z3566) Julep Sequins, (Z3563) Diamond Stickles, Z4310 Shaker Window Foam & Acetate (Z2060) Thin 3-d Foam tape, (Z3341) Thin 3-d Foam Dots, ((Z3372) Adhesive Runner, (Z341) Mini Glue Dots, (Z3340) Dual Tip Permanent Glue Pen.   All of the current items may be purchased on my Close To My Heart website at: www.tonyasheridan.ctmh.com.

Sunday, February 14, 2021

Happy Birthday Hippo Card

The power of a splattered shimmer brush!!!  I love using this technique and for this card, I  splattered three different colors behind the adorable little hippo!  When shimmer-splattered (is that even a word??) they look like confetti!  Such a fun idea for a background! 


Supplies used:  (X5954) Pewter cs, (Z2832) Pewter Exclusive Ink Pad, (Z2812) Raspberry Exclusive Ink Pad, (Z3606) Raspberry Shimmer Brush, (Z3607) Lagoon Shimmer Brush, (Z3293) Clear Shimmer Brush, (retired) Mix-In Papers & Stamp set.

This card is the newest addition to my card buffet and may be purchased on line or at my live events.

Sassfully yours,
Tonya

Sunday, January 17, 2021

SJLS #11 Good Stuff

 Sassy January Layout Series #11

Welcome to the 11th segment in a series of 31 that will be shared during the month of January. Click here to find out more about the Sassy January Layout Series.

This layout was designed by the Close To My Heart art department and shared during the January Album retreat this past weekend.  I love the color combination - Grape and Avocado - certainly not one that I would have put together myself. The layout features using Texture Paste with our stencils to create your own unique designs.  The texture design, partnered with the patterned paper and the Gold Foil accents all pulled together just really attract my eye and I hope yours too!  This layout inspired me to go outside of my box and pull mediums together that were out of my comfort zone and I am so glad that I did.


The title is hand stamped with Black Ink.  (The kit does include this pre-stamped but also a second piece in case you prefer a different title).


Detail photo of the stamped flower and Gold accents on the speciality paper.


Stamped floral cluster.


This is the texture paint on a dark cs shade.


And the texture paint on a light colored cs.


Supplies used:  (Z4245) Textured Paste, (Z4247) Palette Knives, (X9023) January-February Mix Ins, (X6054) Grape cs, (X6032) Wisteria cs, (X6047) Black cs, (X5953) Charcoal cs, (X5955) Pebble cs, (Z2805) Black Exclusive Ink,  (Z3676) Blue Belle Loose Sequins, (X8019) Gold Foils Patterned Papers, (D1966) Simple Serif Uppercase Stamp Set, (D2008) Count My Blessings Stamp Set, (Z3698) Stitched Florals Stamp and Thin Cuts, (Z3831) Peeled Paint Distress Oxide Ink Pad, (Z2060) Thin Foam Tape.

Here is how I used my pictures on the layout.  I took some liberties and altered a few of the photos and then replaced one of the photo spaces with my journaling.  A photography note:  the purple tones in my photos were a little more purply that I wanted for my layout, so I used a photo editing program to soften the colors a little - this is a tip to keep in the back of your mind when you too come up against this dilemma.  To see more details of the layout, click on the photo and it will open up in a larger window.


---------------------------------------------------------------

Today's partnering special features the Texture Paste and the Palette Knives. You can purchase just the Texture Paste for $8.50 or a combination of the paste with the Knives for $14. This special in available until 9:59am on 1-19-2021 and is repeatable.


Both of today's specials are available in my shop at: www.inallsassiness.com as a part of my Sassy January Layout Series.  For more information on this series, click here.

Sassfully yours, 
Tonya


Saturday, November 14, 2020

Advent & Countdown Calendars

Close To My Heart introduced a new Thin Cut at the beginning of September and I just couldn't wait to use it to create an Advent Calendar!  This calendar is created with the Comfort and Joy paper collection along with our beautiful Scarlet Glitter paper - the two pair beautifully together!  

The finished calendar is showcased in an 8 1/2" x 11" Black frame with the glass taken out so that the doors can be easily accessed.  


I used a layer of acetate to protect the little elements behind the doors so that the calendar could be used year after year.


Accents of Gold Foil paper are found in the stickers that complement the paper, so I included small pieces of Gold Foil under a few of the windows.  I used the Black dots from the Black and White Dots embellishment set - they were glued down with the Tombow Glue to add an extra layer of adhesion.  


Here are the supplies that were used in my calendar:


Supplies used:  (Z6526) Scarlet Exclusive Ink Pad, (Z3685) Tabbed Doors Thin Cuts, (Z3314) Black & White Dots,  (Z3790) Black Onyx Liquid Pearls, (Z3839) Scarlet Glitter Paper, (X7261S) Comfort & Joy Paper Pack with Stickers, (Z3762) Pennant Alphabet Stamp Set & Thin Cuts, (Z4314) Rectangle Foam & Acetate, (X6047) Black cs.

If you would like to make your own variation of my calendar, the supplies can be purchased at: www.tonyasheridan.ctmh.com.

Once I completed my Advent calendar, I had the idea to also create a Halloween countdown calendar featuring our adorable little Spooky Gnomes Stamp and Thin Cut Set.  I adore both calendars for their different purposes!


Supplies used:  (Z3802) Grape Shimmer Trim, (D1962) Spooky Gnomes Stamp Set, (X9019) Mix-In Paper Pack, (X6047) Black cs, (X6053) Avocado cs, (Z3875) Black Bursts Embellishments, (Z3314) Black & White Dots, (Z3236) Black Glitter Paper, (Z3762) Pennant Alphabet Stamp Set and Thin Cuts, (Z3685) Tabbed Doors Thin Cut, (C1874) Boo-tiful Characters, (Z2805) Black Exclusive Ink Pad.

Kits for both calendars can be purchased in my In All Sassiness Designs Shop.

Make it sassy!

Saturday, September 12, 2020

Gingerbread Flip Flap Book


Such a fun way to create a mini-album -- with our signature Flip Flaps!  This book concept was designed by fellow consultant Jen Patrick and I adore it!! I have made several variations, but this Gingerbread one is my all time favorite!!  I love how the French Vanilla looks like the royal icing on the little gingerbread men!  


Click here for a video teaching you how to create this cute little book!!

You can purchase the kit to create this book, or others like it, in my In All Sassiness Designs shop at: www.inallsassiness.com.

Supplies used:  Supplies used: (Z3293) Clear Shimmer Brush, (Z3231) 4” x 6” Flip Flaps, (Z3639) Scalloped Circle Thin Cut, (X6044) Peach cs, (X5950) Toffee cs, (Z2828) Toffee Exclusive Ink Pad, (Z2805) Black Ink Pad, (Z6045) Rose Gold Loose Sequins, (Z4023) Thin Cuts - Square Multi Windows, (D1884)) From Candyland Stamp Set, (Z2068) White Fine Embossing Powder, (Z891) VersaMark, (Z3662) Toffee Shimmer Brush, (Z3661) Peach Shimmer Brush, (X6046) French Vanilla cs, (1385) White Daisy cs, (Z2060) Thin 3-d Foam tape, (Z3341) Thin 3-d Foam Dots, ((Z3372) Adhesive Runner, (Z341) Mini Glue Dots, (Z3340) Dual Tip Permanent Glue Pen.   All of the current items may be purchased on my Close To My Heart website at: www.tonyasheridan.ctmh.com.