Showing posts with label Christmas Cards. Show all posts

Friday, November 24, 2023

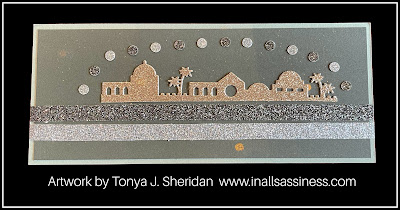
Glitter Bethlethem Card

As we have now "officially" entered the Christmas season, I wanted to share a card that I created that I just adore! Simple.  Elegant. And made with glitter!


This is the stamp set and Thin Cut set that includes the Thin Cut for Bethlehem.  
How to create the card:
1.  Cut a piece of Sage cs to 3 1/2" x 8 1/2".
2.  Cut a piece of Pine cs to 3 1/4" x 8 1/4".
3.  Splatter the Pine cs with the Gold Shimmer Brush.  Allow a few minutes to dry.
4.  Center, and adhere, the Pine cs to the Sage cs.  
5.  Adhere a piece of Seabrook Shimmer Trim to card front. This extends across the horizontal width to the card and is about 1/2" to 3/4" above the bottom edge of the card.  Trim the edges of the shimmer trim off where it exceeds the card.
6.  Adhere a piece of Pine Shimmer Trim to the card front.  This extends across the horizontal width to the card and is approximately 1/4" above the Seabrook Shimmer Trim.
7.  Adhere the gold glitter cut of Bethlehem to the base.  This is just right of centered and is 1/8" above the top of the Pine Shimmer Trim.  This piece is quite fragile so adhere with care. I found the CTMH Adhesive Runner worked the best for not tearing the cut.
8.  Using a hand held hole punch, cut out circles from the Pine and Seabrook Glitter Paper.
9.  Arrange the glitter circles in a half-circle from the left side of Bethlehem, around and over, the piece, to the right side of the of Bethlehem.  Alternate the two colors and adhere with Mini Glue Dots.
10.  Adhere the card front to a Slimline Card.

Supplies used:  (Z7093) Nativity Scene Stamp & Thin Cuts, (Z4659) Pine Shimmer Trim, (Z4660) Seabrook Shimmer Trim, (Z4610) Pine Glitter Paper, (Z4611) Seabrook Glitter Paper, (Z3316) Gold Shimmer Brush, (X6070) Pine cs, (X6045) Sage cs, (Z3238) Gold Glitter Paper, (X257) Slimline Cards & Envelopes, (retired) Mini Glue Dots, (Z7010) CTMH Adhesive Runner.  Current items can be ordered on my Close To My Heart website at:  www.tonyasheridan.ctmh.com.

For those who would prefer For those who would prefer a pre-cut, & pre-stamped set of this card, I have added it to my card buffet.  You can order the cards for $2.50 each or 7/$15.  (click on the quantities for the associated links) I will also be hosting a few pop-up card buffets over the next few weeks so be on look-out for those as well.

Create with sass,

Tonya

Wednesday, November 22, 2023

Triangle Tree Inspiration #3.

I just can't stop creating with this fantastic Triangle Tree set!!  Hope you are loving it too!  This collection includes a stamp set, a Thin Cut set and a dual stencil set that can all be purchased, and used, independently of one another, or used together, and when they are, they are a statement of  beauty!  I am in love with this collection so over the next few days, I will be sharing some artwork that I have created with the elements independently and collectively.

(D2204) Triangle Trees stamp set 

(Z8064) Triangle Trees Thin Cuts

(z8065) Triangle Trees Stencil duo

(Z8066) Triangle Trees Bundle

The Triangle Tree collection is only available until the end of December, or while supplies last.  They can be ordered here:  https://tonyasheridan.closetomyheart.com/retail/search.aspx?searchvalue=triangle+trees

The third card that I wanted to share uses one of the stamped trees as an embellishment.  Being quite the music lover, I especially liked how this one turned out.


Here are the directions to create the card:

(optional) Splatter the music note paper wit the Gold or Clear Shimmer Brush before creating. 

1.  Cut a 4 1/4" x 5 1/2" piece of Sage cs.
2.  Cut a 4" x 5 1/4" piece from the music note paper.
3.  Cut (2) 1 1/2" squares from the Pine Glitter paper and (1) 1 1/2" square from the Seabrook Glitter Paper.
4.  Position the three squares so that they make a diamond pattern.  There is a slight space between the pieces.  Adhere to the card front with Thin Foam Tape.
5.  Cut the tree out of the light side of the Pine cs.
6.  Using the Pine Exclusive Ink, and the Triangle Tree stamp set, stamp the tree design onto the tree.
7.  Adhere the tree in the bottom right corner of the card so that the top overlaps the Seabrook Glitter Square.  Where the tree overlaps the square, one layer of Thin Foam Tape is used.  Where the tree extends over the music note paper, adhere with two layers of regular Foam Tape.
8.  Using a hand-held hole punch, adhere (3) glitter dots in a vertical row down the center of the tree.  The top one is Seabrook, followed by Pine, and then a 2nd Seabrook.
9.  Adhere an additional Pine glitter dot to the music paper under the center of the tree for the trunk.
10.  Cut a piece of Sage cs to 3/4" x 1 7/8".  
11.  Using the Pine Exclusive Ink, stamp the "Season's greetings" sentiment onto the light side of the Sage cs.  Trim the edges off of the left and right edges so that the sentiment is centered.
12.  Cut a piece of Pine cs to 1" x 2 3/4".
13.  Adhere the sage cs with sentiment to the right side of the Pine piece leaving 1/8" border on the upper, lower and right edges.
14.  Adhere (2) glitter dots in a vertical row to the right of the sentiment.  The Seabrook is on the top and the Pine is at the bottom.
15.  Adhere the combined sentiment piece to the card front.  The left edge is flush with the left card edge and is popped up with Thin Foam Tape.  The right overlaps the glitter squares and is adhered flat.  Red Line Tape, or a Mini-Glue Dot will work best to adhered this to the glitter surface.
16.  Adhere the card front to the card base.

Supplies used:  (Z8064) Triangle Tree Thin Cut, (D2204) Triangle Tree Stamp Set, (Z7088) Silver Bells Cardmaking Stamp & Thin Cuts, (X6045) Sage cs, (Z4610) Pine Glitter Paper, (Z4611) Seabrook Glitter Paper, (Z6540) Pine Exclusive Ink, (X6070) Pine cs, (X7299B) Evergreen Paper Pack, (Z2060) Thin Foam Tape, (Z7010) Adhesive Runner, (retired) Mini-Glue Dots, (retired) Red Line Tape. Optional:  (Z3316) Gold Shimmer Brush, (Z3293) Clear Shimmer Brush.   The current supplies can be found on my website at:  www.tonyasheridan.ctmh.com.

For those who would prefer For those who would prefer a pre-cut, & pre-stamped set of this card, I have added it to my card buffet.  You can order the cards for $2.50 each or 7/$15.  (click on the quantities for the associated links) I will also be hosting a few pop-up card buffets over the next few weeks so be on look-out for those as well.

In all that you do, create with sass!

Tonya
Saturday, November 18, 2023

Triangle Tree Inspiration #2

 Are you in love with the Triangle Tree Collection yet?  This collection includes a stamp set, a Thin Cut set and a dual stencil set that can all be purchased, and used, independently of one another, or used together, and when they are, they are a statement of  beauty!  I am in love with this collection so over the next few days, I will be sharing some artwork that I have created with the elements independently and collectively.

(D2204) Triangle Trees stamp set 

(Z8064) Triangle Trees Thin Cuts
(z8065) Triangle Trees Stencil duo
(Z8066) Triangle Trees Bundle

The Triangle Tree collection is only available until the end of December, or while supplies last.  They can be ordered here:  https://tonyasheridan.closetomyheart.com/retail/search.aspx?searchvalue=triangle+trees

The second card is a gold threaded tree card and here are the directions to how I created this card:

1.  Cut a 4 1/4" x 5 1/2" piece of Sage cs. 

2.  Cut a piece of 4" x 5 1/4" of French Vanilla cs.  

3.  Position the 2nd largest tree Thin Cut over the French Vanilla cs in the desired position.  Cut the tree out.

4.  Stamp the sentiment "happy holidays" from the Silver Bells Card Making Stamp Set in Pine Exclusive Ink Pad to the French Vanilla cs. This is stamped above where the tree was cut out.

5.  Using the Gold Shimmer Brush, splatter the front of the French Vanilla cs.  Allow a few minutes to dry.

6.  Flip the French Vanilla over to the backside.  Adhere Thin Foam tape directly beside where the tree was cut out.  Remove the film from the tape.

7.  In a crisscross pattern, take the thread back and forth adhering it to the foam tape before between each turn.

8.  Adhere Thin Foam Tape around the outer edge of the French Vanilla.

9.  Remove the film around the bordering foam tape.  Center, and adhere, to the Sage cs.

10.  Cut a smaller tree from the Pine cs.  Cut an even smaller tree from the Pine Glitter Paper.

11.  Stamp the tree image with the Pine Exclusive Ink Pad onto the light side of the pine cut tree.

12.  Position, and adhere, the stamped tree, to the left side of the empty tree space with Thin Foam Tape.  

13.  Position, and adhere, the glitter tree, to the right side of the empty tree space with Thin Foam Tape.

14.  Cut the Gold Shimmer Trim at an angle and tuck under each of the trees.  Note: if you don't have Gold, Pine works well too.

15.  Add Gold Stickles to the stamped tree for ornaments or create "dots" using the tip of the Gold Shimmer Brush.

Supplies used:  (Z8064) Triangle Tree Thin Cuts, (D2204) Triangle Tree Stamp Set, (C1995) Silver Bells - Card Making Stamp Set, (retired) Gold Embellishing Thread, (retired) Gold Shimmer Trim, (retired) Golden Rod Stickles, (Z3316) Gold Shimmer Brush, (Z4610) Pine Glitter Paper,  (Z6540) Pine Exclusive Ink Pad, (X6046) French Vanilla cs, (X6045) Sage cs, (X6070) Pine cs, (X254) Value Cards & Envelopes.  These items can be ordered on my website at: www.tonyasheridan.ctmh.com.

For those who would prefer For those who would prefer a pre-cut, & pre-stamped set of this card, I have added it to my card buffet.  You can order the cards for $2.50 each or 7/$15.  (click on the quantities for the associated links) I will also be hosting a few pop-up card buffets over the next few weeks so be on look-out for those as well.

In all that you do, create with sass!

Tonya

Triangle Tree Inspiration #1: layered striped trees

 Have you seen Close To My Heart's new Triangle Tree collection?  This collection includes a stamp set, a Thin Cut set and a dual stencil set that can all be purchased, and used, independently of one another, or used together, and when they are, they are a statement of  beauty!  I am in love with this collection so over the next few days, I will be sharing some artwork that I have created with the elements independently and collectively.

(D2204) Triangle Trees stamp set 

(Z8064) Triangle Trees Thin Cuts

(z8065) Triangle Trees Stencil duo

(Z8066) Triangle Trees Bundle

The Triangle Tree collection is only available until the end of December, or while supplies last.  They can be ordered here:  https://tonyasheridan.closetomyheart.com/retail/search.aspx?searchvalue=triangle+trees

The first card is a layered tree card and here are the directions to how I created this card:


1.  The card base is Pine cs which is cut to 4 1/4" x 5 1/2".
2.  The paper behind the tree is cut from French Vanilla cs and to 3 3/4" x 4".  It is then splattered with the Gold Shimmer Brush.  Allow a few minutes for the splattering to dry.  Adhere to the top of the Pine cs with 1/8" borders above and to the left and right.
3.  Next, the patterned paper is from the Evergreen Paper pack.  It is cut to 1 1/2" x 4".  Before adhering to the Pine cs, adhere a piece of Seabrook Shimmer Trim to the top edge of the patterned paper and trim to fit.
4.  Next, cut a piece of Sage cs to 3/4" x 4".  Using the Pine Exclusive Ink Pad, stamp the "thinking of you this Christmas" sentiment from the Home for the Holidays Card Making Workshop Kit.  Note: if you don't have this stamp set, you could easily substitute with a different stamped sentiment.
5.  Adhere the stamped sentiment to the center of the visible Evergreen patterned paper.
6.  Adhere the patterned/stamped/shimmer trim piece to the Pine cs directly below the French Vanilla cs.
7.  Using a hand held hole punch, punch (3) dots with Pine Glitter paper and (2) with Seabrook Glitter Paper.
8.  Adhere (2) Pine glitter dots in a horizontal row to the French Vanilla cs directly above the Seabrook Shimmer Trim and right justified.
9.  Using the 2nd largest Triangle Tree Thin Cut, cut a tree from the French Vanilla cs.  
10.  Cut a 1/2" piece of the Evergreen patterned paper.  Adhere the Evergreen print side to the bottom of the tree.  Trim to fit.  Flip the patterned paper to the polka dot side.  Adhere a row of the polka dot paper above the Evergreen patterned paper.  Trim to fit.  Adhere a piece of Seabrook Shimmer Trim directly above the polka dot paper.  Trim to fit.  Adhere a 2nd row of Evergreen pattern paper directly above the shimmer trim.  Trim to fit.  Adhere a 2nd row of the polka dot paper above the Evergreen print and trim to fit.  Adhere a row of Pine Shimmer Trim above the polka dot and trim to fit.  Finally, rotate and adhere, the Seabrook Shimmer Trim above the Pine Shimmer Trim but this one is adhered vertically to make sure that the tip of the tree is covered.
11.  Adhere the tree to the French Vanilla splattered paper with Thin Foam Tape.  
12.  Cut a small piece of Pine Shimmer Trim at an angle.  Tuck, and adhere, under the bottom center of the tree for the trunk.
13.  Adhere (2) Seabrook and (1) Pine glitter dots to the tree with Mini-Glue Dots.
13.  Adhere the card front to the card.

Supplies used:  (Z8064) Triangle Thin Cut, (X7299B) Evergreen Paper Pack, (retired) Home for Christmas Card Making Workshop, (Z4611) Seabrook Glitter Paper, (Z4660) Seabrook Shimmer Trim,  (X6068) Seabrook cs, (Z4610) Pine Glitter Paper, (Z4659) Pine Shimmer Trim, (X6070) Pine cs, (X6046) French Vanilla cs, (X6045) Sage cs, (Z3316) Gold Shimmer Brush, (Z6540) Pine Exclusive Ink Pad, (Z2060) Thin Foam Tape, (Z7010) CTMH Adhesive Runner, (X254) Value Cards & Envelopes.

For those who would prefer a pre-cut, & pre-stamped set of this card, I have added it to my card buffet.  You can order the cards for $2.50 each or 7/$15.  (click on the quantities for the associated links) I will also be hosting a few pop-up card buffets over the next few weeks so be on look-out for those as well.

In all that you do, create with sass!

Tonya

Friday, November 11, 2022

Shades of Orange Snowmen Shaker Card

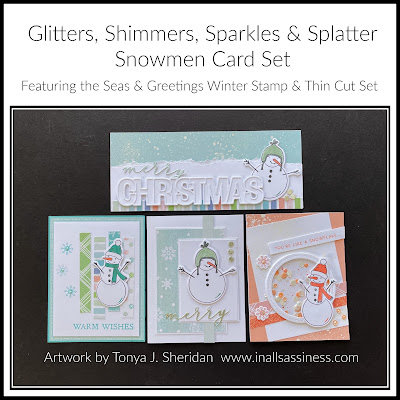
This is the second card in my Glitters, Shimmers, Sparkles & Splatters Snowmen Card Set.  It is a shaker card with all the bells and whistles!  There are so many different mediums and techniques used - I just can't help the love of the glitter! 


Both the Melon, and White Daisy cardstock pieces are splattered with White Gloss Spray.  The Melon's spray is concentrated in the upper left and the lower right corners while the White Daisy is completely covered with the spray.

The shaker for this card is created with multiple steps.  The inner circle is splattered with both the Clear & Peach Shimmer Brushes.  Once this is complete, adhere White Glitter circles to the circle with Mini Glue Dots.  Then fill the inside of the shaker with Melon Loose Sequins.

Additional techniques used are:
The addition of the White Opal Liquid Pearls which are dotted in the centers of the Loose Sequins and the stamped snowflakes.
The stitched part of the White Daisy rim is brushed with the Clear Shimmer Brush.
The snowmen's scarf and hat are brushed with the Peach Shimmer Brush.
Papaya Shimmer Trim was added for an additional shading of Peach.

Sometimes, the inside of the card is the perfect place to complete a sentiment from the front of the card.  And, why not, add some extra sparkle and detail with the sentiment?


Other supplies used:  (Z3791) White Opal Liquid Pearls, (Z4310) Circle Shaker Window & Acetate, (Z4309) Circle Shaker Thin Cuts, (Z5014) Papaya Shimmer Trim, (Z6535) Melon Exclusive Ink Pad, (Z4644) Melon Loose Sequins, (Z4189) Intense Black Ink Pad,  (Z3661) Peach Shimmer Brush, ((Z3293) Clear Shimmer Brush, (Z3237) White Glitter Paper, (Z5010) White Gloss Spray, (1385) White Daisy cs, (CC112222) Seas & Greetings Paper Pack, (CC11227) Seas and Greetings Winter Stamp & Thin Cuts, (Z2060) Thin Foam Tape, (Z3372) Adhesive Runner, (Z341) Mini-Glue Dots.  The current items can be purchased on my Close To My Heart website at: www.tonyasheridan.ctmh.com.

Here are the new Seas & Greetings stamps and paper pack that were used in the creation of this card.


If you love the cards, and would like to create a set, they are in my shop at: www.inallsassiness.com.  The card sets are pre-splattered, pre-cut and stamped.  They are made up up of 8 cards: 2 each of 4 styles.  Click here for this individual link.  Here is the full card set.


Have a sassy day!
Tonya

Thursday, November 10, 2022

Snowman wishes!

Who can resist an adorable snowman??  And this little guys is one of the cutest I have ever seen! I adore him!  He is apart of our new Seas & Greetings collection.  I thought I would share some of the tips that I used when creating this completely technique based card!

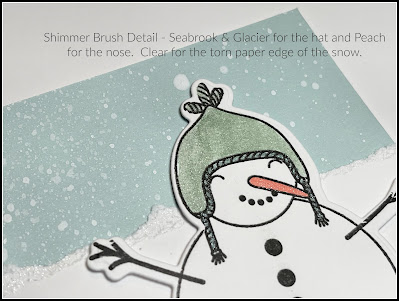
The splattering on the Glacier cs was created with the White Gloss Spray.  Additional shimmer was added with the shimmer brushes to the hat, the nose and the snowbank.


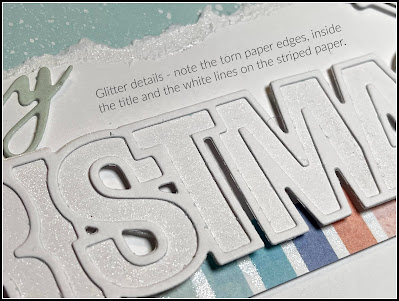
Additional shimmer was added to the title with the Clear Shimmer Brush.  This was added to the torn snowbank edge, to the white stripes in the striped patterned paper and to the base of the word Christmas.


Snowball effect: To create the snowballs, a hand held hole punch was used to punch holes from White Glitter paper.  Liquid Glass was then added to create an epoxy look after allowing it to dry overnight.

Such fun right??  The new Seas & Greetings Suite was used to create these whimsical cards.  This collection is only here for a short time so make sure you grab it before it melts away!


Other supplies used: (Z8052) Merry Christmas Layers Thin Cuts, (Z4189) Intense Black Ink Pad,  (Z3661) Peach Shimmer Brush, (Z4590) Glacier Shimmer Brush, (Z3293) Clear Shimmer Brush, (Z4585) Seabrook Shimmer Brush, (X6068) Seabrook cs, (Z3237) White Glitter Paper, (Z679) Liquid Glass, (Z5010) White Gloss Spray, (X5978) Glacier cs, (1385) White Daisy cs, (CC112222) Seas & Greetings Paper Pack, (CC11227) Seas and Greetings Winter Stamp & Thin Cuts, (X257) Slimline Cards & Envelopes, (Z2060) Thin Foam Tape, (Z3372) Adhesive Runner, (Z341) Mini-Glue Dots.  The current items can be purchased on my Close To My Heart website at: www.tonyasheridan.ctmh.com.

If you love the cards, and would like to create a set, they are in my shop at: www.inallsassiness.com.  The card sets are pre-splattered, pre-cut and stamped.  They are made up up of 8 cards: 2 each of 4 styles.  Click here for this individual link.  Here is the full card set.


Have a sassy day!
Tonya

Sunday, November 6, 2022

Gingerbread cards

I love the color combination from the new Freshly Baked paper suite and how well they work with gingerbread men/women!  I created these cards using a variety of retired and current products and was delighted with how well they all came together.


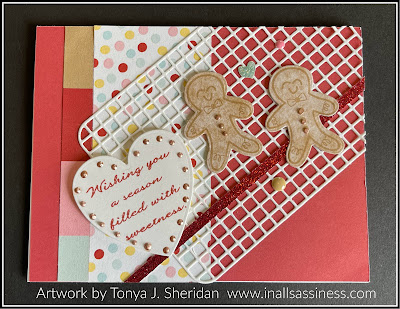
Note the tiny details of the Rose Gold Liquid Pearls on random circles in the dotted patterns.


For this card, note how adorable the drying rack thin cut added dimension and detail to the little men.  The Liquid Pearls also added cuteness, and detail, to the buttons on the gingerbread men and for embellishing around the heart.

This card is my favorite of the set.  I used one of the thin cuts and stencils from the National Stamping Month collection to created the layered background. Where you see the Toffee ink, this was inked with the stencil.  I adore how this turned out. I then added patterned paper and a small piece of Scarlet Glitter Paper to add more depth and the cute little men are popped up with Thin Foam Tape.  I then added tiny dots of the Liquid Pearls in the centers of the designs at the top to carry over the details on the buttons of the gingerbread men.  


For the last card, I wanted to incorporate the cute baking patterned paper from the Freshly Baked papers.  I added random of the Freshly Baked Dots to the pattern and then showcased the paper by adding dots of Liquid Pearls around the edges of the paper.  The sentiment was "popped" by adding a stamped sentiment to a glitter background.


This is the stamp and thin cut set that I used for to create the cards.


Supplies used:  
(Z8047) Freshly Baked - Scrapbooking Stamp & Thin Cuts, (X7285E) Freshly Baked Dots, (X7285B) Freshly Baked Paper Pack, (Z3839) Scarlet Glitter Paper, (X6049) Scarlet cs, (retired) July-Sept Mix-In Paper, (X9044) October-Dec. Mix-In Paper, (Z2828) Toffee Exclusive Ink Pad, (Z6526) Scarlet Exclusive Ink Pad, (Z3765) So Happy Together Stamp & Thin Cuts, (Z3793) Rose Gold Liquid Pearls, (X254) Value Cards & Envelopes, (X6046) French Vanilla cs.  Various retired Christmas stamps for sentiments.  The supplies that are current, can be ordered by visiting my website at:  www.tonyasheridan.ctmh.com.  

This card kit can be ordered in my shop by using this link.  The card kit includes the supplies to make 2 each of all four designs.  A full pack of the Freshly Baked Dots is included as well.  The cards are pre-stamped, pre-cut and pre-stenciled for your creating ease.  Detailed instructions and a color photo is also included.

Sassyfully yours,
Tonya

Friday, December 3, 2021

Sassy 25 Days of Christmas (2021) - December 3rd. Featuring Red Line Tape.

 Sassy 25 Days of Christmas - December 3rd.  Red Line Tape!

If you have never used Red Line Tape...you are so missing out! It is one of the most awesome adhesives out there!  It works fabulously on ribbons, fabrics, embellishments and even acetate!  So because of that, and being in the festive red and green season...that is my featured product of the day.


--------------------------------------------------------------------------------------------------

Here is one of my current favorite cards created with Red Line Tape.


1.  Stamp the image at the top of the White Cs leaving 1/4" from the top edge.


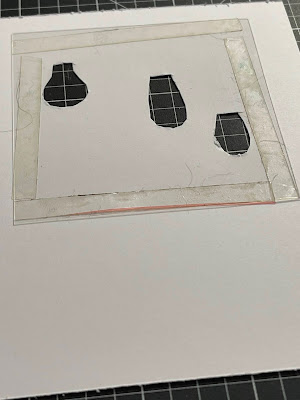
2.  Cut out the light bulb images that you want to be the shaker elements.  To find the most success, pierce the center of the light bulb and then cut from the underside.  Make sure to leave the outline of the stamped lightbulb visible.


3.  Cut two pieces of acetate to 3" x 3".


4.  Remove the film from one, or both, sides of the acetate.  If this is CTMH acetate, there is film on one side.  If this is Cricut acetate, there is film on both sides.  Set aside.


5.  Using Red Line Tape, adhere tape to all four sides of the acetate.


6.  Remove the red film from the Red Line Tape and then attach the acetate piece to the back of the light bulbs.  Make sure when attaching that the Red Line Tape doesn't cover the cut out lightbulbs.  Run your finger across the Red Line tape to make sure it seals to the cardstock.


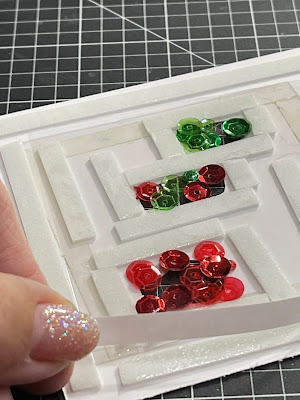
7.  Using Thin Foam Tape, create a small box around each of the cut out lightbulbs leaving a little wiggle room.  Make sure the boxes connect or are up against each other so that the sequins don't "sneak out".  


8.  Next, using the same height of foam, add additional foam around the edges of the cardstock and in some of the in-between spaces so that the piece lies flat when attached to the card base.


9.  Carefully add red sequins to the one of the windows, a mixture of the red and green to another one, and green in the 3rd.


10.  CAREFULLY remove the film from the foam tape surrounding the sequin boxes.  Tip: use your hand to hold down the base while pulling the film so that the sequins don't pop up and stick to the foam.


11.  Remove the film from the 2nd piece of acetate and attach to the foam tape.


12.  Press down to the seal.


13.  Remove the film from the remaining foam tape and attach the entire piece to the card base.


And there you go!!


14.  Add title as desired.


Supplies used:  (Z3565) Holiday Loose Sequins, (Z2060) Thin Foam Tape, (Z2805) Black Ink Pad,  November Stamp of the Month, (Z5024) Red Line Tape.
------------------------------------------------------------------------------------------------------------
Back by request, welcome to the Sassy 25 Days of Christmas!  Each day, from now until Christmas, I will be sharing a special of some sort.  Some might be product, other might be class kits, but either way, this is a great way to celebrate your love of scrapbooking and paper crafting all December long!  

The days specials will be posted each day around 3PM and will be only good until 2:59PM on the following day.  There is be a special link in my www.inallsassiness.com shop for that days special.  The special price is the final price - there is nothing additional for tax.  Visit here on my blog, or my shop each day to check out the special and order the ones that you like!  The shipping will be set to pick up so that shipping charges are not assessed.

During the week between Christmas and New Years, I will be sending out all orders from the collective 25 days.  If shipping is needed, you will then be sent an invoice for the actual shipping to you (for most customers this is right around $10 per box) although depending on the weight, it might be a little more.  Once you pay the invoice on a secure site, your box of all your happiness will be mailed to you.

Anyone who takes advantage of 5 of the 25 days will receive a special gift in their box.

Additionally, all VIP's that take of advantage of 5 of the 25 days will receive a free pack of the Smitten Paper with Sticker sheet with their box!  VIP's will also receive VIP Credit for the purchase price of their special orders all month.

Until tomorrow,

Sassyfully yours,

Tonya