Showing posts with label 3-d. Show all posts

Saturday, November 14, 2020

My Sassy Perpetual Calendar!

And speaking of calendars...yesterday I shared my Advent and countdown calendars, this morning I have a different type of calendar to share!  Close To My Heart has introduced a new Perpetual Calendar and I have created one just in time for the holiday gift giving season!

When this calendar was introduced, CTMH shared a version that many of the artists at the Home Office created.  each person took a page and I loved the variety of fonts and elements that were incorporated.  I built my foundation from those pages and then many of my pages were inspired by some of my favorite layouts that I have created throughout the year - my philosophy was I had already pulled together the elements, concepts, color palettes for my layouts.  I  I fell in love with those so why not use those same "ingredients" for my calendar pages?  

You will note that I incorporated our fabulous Glitter Paper in almost every page as well as our incredible Holographic paper.  Both cut beautifully on the Cricut and with our Thin Cuts.

Note: the finished size is 6 1/4" x 11 1/2".

You Tube links which teach you step by step how to create the pages are at the bottom of this post.


My Sassy version of this calendar can be purchased to two formats to meet your own personal needs:

1.  You can purchase the custom pre-cut, and individually bagged, pieces and elements for all of the pages for $15 and then if you are a consultant on my team, or one of my VIP's, you can order the calendar pages and base yourself to receive all of your benefits. -OR-

2.  You may purchase the custom kit, and the calendar for $32.

Details can be found in my In All Sassiness Designs Shop at: www.inallsassiness.com.

You Tube links to take you step by step through the creating process:

January/February:  https://youtu.be/u6BO1fH-F30

March/April: https://youtu.be/7bVsJopLguU

May/June:  https://youtu.be/o9AChWjnB98

July/August: https://youtu.be/cNy3uQFRjow

September/October:   https://youtu.be/hfzw1M_yIsM

November/December:  https://youtu.be/TrpMaEFS098

Make it sassy!

Advent & Countdown Calendars

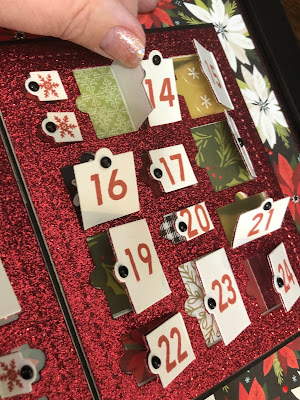
Close To My Heart introduced a new Thin Cut at the beginning of September and I just couldn't wait to use it to create an Advent Calendar!  This calendar is created with the Comfort and Joy paper collection along with our beautiful Scarlet Glitter paper - the two pair beautifully together!  

The finished calendar is showcased in an 8 1/2" x 11" Black frame with the glass taken out so that the doors can be easily accessed.  


I used a layer of acetate to protect the little elements behind the doors so that the calendar could be used year after year.


Accents of Gold Foil paper are found in the stickers that complement the paper, so I included small pieces of Gold Foil under a few of the windows.  I used the Black dots from the Black and White Dots embellishment set - they were glued down with the Tombow Glue to add an extra layer of adhesion.  


Here are the supplies that were used in my calendar:


Supplies used:  (Z6526) Scarlet Exclusive Ink Pad, (Z3685) Tabbed Doors Thin Cuts, (Z3314) Black & White Dots,  (Z3790) Black Onyx Liquid Pearls, (Z3839) Scarlet Glitter Paper, (X7261S) Comfort & Joy Paper Pack with Stickers, (Z3762) Pennant Alphabet Stamp Set & Thin Cuts, (Z4314) Rectangle Foam & Acetate, (X6047) Black cs.

If you would like to make your own variation of my calendar, the supplies can be purchased at: www.tonyasheridan.ctmh.com.

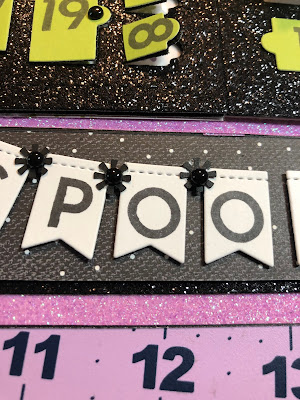
Once I completed my Advent calendar, I had the idea to also create a Halloween countdown calendar featuring our adorable little Spooky Gnomes Stamp and Thin Cut Set.  I adore both calendars for their different purposes!


Supplies used:  (Z3802) Grape Shimmer Trim, (D1962) Spooky Gnomes Stamp Set, (X9019) Mix-In Paper Pack, (X6047) Black cs, (X6053) Avocado cs, (Z3875) Black Bursts Embellishments, (Z3314) Black & White Dots, (Z3236) Black Glitter Paper, (Z3762) Pennant Alphabet Stamp Set and Thin Cuts, (Z3685) Tabbed Doors Thin Cut, (C1874) Boo-tiful Characters, (Z2805) Black Exclusive Ink Pad.

Kits for both calendars can be purchased in my In All Sassiness Designs Shop.

Make it sassy!
Wednesday, November 11, 2020

Gerber Daisy Sliding Shaker Box

Today I wanted to share an elegant, interactive sliding box that I created using my Cricut and our new Serenity collection.  I previously created a fall variation of this box, and just adore it!  My vision is to use these as plate accents for Thanksgiving - and when the recipient opens the box they will find a little verse of why each member of our family is thankful for them and a few little treats!  But beyond that, they could be used for so many other gift giving possibilities!!


Note how sophisticated, and elegant, the stitched design transfers to the Gold Foil paper.
Beautiful and quite the finishing touch in my mind.


Love this box and want to create your own?  I invite you to watch a how-to instructional video that I have created taking you step by step through the process:  https://youtu.be/SMUTR99qEfk.  If you would like to create one just like mine, you can order the supplies in my CTMH shop, or I have pre-cut kits available in my In All Sassiness Designs Shop.


Supplies used:
(Z3840) Sapphire Glitter Paper, (Z3342) Blue Belle Glitter Paper, (Z3676) Blue Belle Loose Sequins, (Z3800) Blue Belle Shimmer Trim, (Z3365) Gold Foil Paper, (Z3316) Gold Shimmer Brush, (X7263B) Serenity Paper Pack, (X5957) Sapphire Cardstock, (X6048) Blue Belle Cardstock, (Z4314) Rectangle Window Foam & Acetate, (Z3440) Tombow Liquid Glue, (Z3563) Diamond Stickles.  Close To My Heart's Flower Market Cricut Collection (to add this to your digital collection, use my Cricut Affiliate link by clicking here).  Supplies may be purchased on my Close To My Heart site at: www.tonyasheridan.ctmh.com.

The Design Space File to create this box can be found here.  You will need Close To My Heart's Artiste' and Flower Market Cricut Collection for the file to cut.  If you do not have that file, you may purchase it using my CTMH Cricut Affiliate link.

Have a great day and make it sassy!


Friday, June 26, 2020

Ladybug Happies!

"Lots and lots of ladybugs"  my favorite quote from Under the Tuscan Sun!  And I adore ladybugs!  They are just a little smile waiting to happen and these little "happies" are no exception!  

These are one of my many create and takes for my presentation in the Stamp and Scrapbook Expo @ Home Virtual Expo on Saturday @ 10:30am Pacific.  (Click here to find out all the details.)  I would love for you to join me!!  Each create and take will have a how to video in the description so that you can follow along and create with me.  Step-by-step.

The kit comes with pre-cut and pre-scored boxes, pre-stamped wings, the needed ribbons, Shaker disks and foam, loose sequins, brads, patterned paper, scallops, three treat tubes, detailed instructions and a color photo.  In addition, if you would like to create additional boxes, you will receive the Cricut Design Space file.  You will need to have CTMH's Artiste' and Stitched Together Cricut Collections to cut the file.  If you don't have these already, you can always purchase them using my Cricut affiliate and I will receive a small commission.


Box style one:  Treat tubes.  So cute right?  There is a treat tube filled with red and black jellybeans (not included) extended from the little box.  The tube supports the ladybug.  Here you can also see the wings in full flight!  The tag has a ric-rack hanger that is anchored to the tube to keep the ladybug in place.

Box style 2:  angled box

Box style three:  Rectangle Box.

The ladybug Thin Cut and stamp are available on my Close To My Heart website, however I am also offering them as a part of my Expo Participant specials.  You can access that link by clicking here.


B1703 Hello Ladybug

Z3710 Ladybug Thin Cut


Here is a step-by-step how-to video that teaches you how to create these sassy boxes!

Click here to order this adorable kit before it takes flight and retires!


Thursday, November 21, 2019

Nativity artwork

This post is a work in progress....so check back for it's completion at a later time.

I absolutely cannot get enough of the Nativity scene image that is on Close To My Heart's new Complete Creativity Cricut Collection!  This Cricut collection is filled with many intricate and amazing designs, but the Nativity one is by far my favorite!  This image was originally designed as a 5" x 7" card however, in my card class we work with 4 1/4" x 5 1/2" cards so initially I changed the card size and then continued to create additional cards with different parts of the images (see the cards below).  My favorite project was however the Nativity Shadow Box.  

I designed the shadow box inset initially for a dear friend, and truly had no plans to create additional boxes but I was so delighted with the results that I wanted to make one for myself and then my customers who I had showed it to asked for me to teach it as a class, so here we are!  

The first obstacle in creating the box is that the box is a square and the card format was a rectangle.  Simply changing the size stretched the image too much and distorted it.  So, with that being said, I used duplication tools, the slice tools and the welding tools to change the original image to a new size and shape.  Along with that, I found there was too much height and white space in the image for the new shape, so I duplicated, heightened, flipped, and created a third middle layer in my scene.  This also allowed me to add a third color and create a more depth--and a more 3-d appearance.

12" x 12" Nativity Shadow Box

12" x 12" Nativity inset without glass

details of the depth

Nativity Cricut Card Set


The featured colors are: Sapphire, Black, Pewter, Charcoal and White Daisy.

If you would like to create this shadow box inset, or the card set, both are available in digital files and as traditional kits in my In All Sassiness Designs Shop.

Thursday, July 19, 2018

Astronaut Block Frame


It has been awhile since I have posted, so I have quite a lot to catch up and share!  This little guy has been at the top of my list to share! He is just so cute!  This is one of the create and take projects for my summer expos (Chantilly, VA back in June and Edison, NJ in August).  The frame is made from a wooden block that has been cut to size, pre-sanded and pre-painted.  We then added the spacey background from the Stargazer paper suite (now retired) and a zip strip.  Next, we added some very cool Americana sand with (Z679) Liquid Glass to create a grounding point for the little astronaut.  The astronaut is cut from the (Z4157) Stargazer Cardmaking Stamp and Thin Cut combo set and then stamped with black archival ink.  Once stamped, we colored him with our Shin Han markers and attached him to the block with (Z2060) 3-d foam tape.  The sentiment of the circle was printed and cut from the Cricut and also attached with 3-d foam tape.  And then there was just the finishing touch of adding blue dots from the (Z4143) Stargazer Dots as accents.  I love, love, loved this project.  Simple and easy, so so stinkin' cute!

If you would like to create your own, we will be teaching it at the Edison, NJ Scrapbook Expo August 24th and 25th, or you can purchase the block kit in my In All Sassiness Designs shop.  The Stargazer stamp set/thin cut combo, the Liquid Glass and the Stargazer Dots can all be found on my website at: www.tonyasheridan.ctmh.com.

Monday, August 21, 2017

No Worries Block Frame

Our beachy No Worries Paper suite is about to retire (on August 31st or sooner if supplies are depleted) and I find myself loving it more and more with each creation!  Our family doesn't get to go to the beach very often, but the memories that we have made there are most certainly precious.  I wanted to create a cute way to show off some of my favorite pictures in a small space - and this block frame fits the bill.  The frame idea came from the wonderfully talented Tina Sutton -- I just tweaked it to include images from our You Are Here Cricut cartridge (that stinkin' cute crab!) and our No Worries compliments and sequins.  Fun right?  

The frame is a standard 2" x 4" piece of wood cut to 4" in length.  Next, we sanded the blocks and then painted them with a greyish chalkboard paint.  Once this has been done, you can create until your heart is context!  I added background paper, photo mats and then a variety of mediums in embellishments --chipboard, sequins, stickers, and burlap ribbon.  The result...adorableness (at least in my opinion!) and part of the fun, is that the frame is too sided --face one out for a while then flip to to the other side.


You can certainly create your own version of this frame, or if you would like a kit for mine, you can purchase one (or more!) in my In All Sassiness Designs Shop for just $5 each.  Shipping can be combined with other class kits to save on cost, or if I will be seeing you soon, you can forgo the shipping option and I will deliver it personally.  I will be at my Scrap Pink in Gettysburg, PA at the end of September; in Atlantic City, New Jersey with Scrappers Anonymous Getaways in mid October and in Conn. with Croptopia Getaways in early November.

Monday, December 14, 2015

A special gift for Santa

We are preparing to make our annual visit to see the Legendary Santa in Richmond, VA next weekend and my children's excitement and anticipation is beginning to grow.  This afternoon, Gabriel was helping me prepare some Christmas presents and asked if he could use one of my My Creations Pint Sized Containers to make a gift for Santa.  I wasn't sure what he was planning but agreed to let him.  Before I knew it he had my ShinHan markers, and was decorating the little container.  He added Red Shimmer Trim and the Glitter Dots from the Cranberry Fundamental Assortments for additional decorations.  He filled the bottom with red shred and then added some Hershey Kisses...which I find funny because Gabriel himself doesn't even like chocolate!  Anyway, once he was done, he sat down and wrote Santa a letter and included his list.  He insisted that his letter had to be folded up, and then wrapped with more Shimmer Trim, so that Santa wouldn't overlook it.  I am not sure if a more original, and thoughtful letter, has Santa ever received.  


Thursday, December 3, 2015

12 Days of A Sassy Scrapbooking - Day 3 FRAMES

On the 3rd Day of a Sassy Scrapbooking, 
my consultant offered me...

a free box of Mini Glue Dots when you purchase our Design Decor Frames! 
 (a savings of $7.50 retail)

But wait, there is more!  (I love saving that!)...when you purchase the Design Decor' Frames in the next 24 hours, they are also 25% off as a part of CTMH's Cyber Week Special!  How fantastic are those savings??


There are several Designer Decor' frames to choose from, but my favorite by far is the Black Shadow Box.  What makes this the most fantastic of all 12" x 12" frames?  Let me count the ways...
1.  The bottom hinges open so that you can switch the layout featured to a new layout.
2.   Because there is no glass, shimmer and bling can still shine brightly!
3.  And because there is no glass, 3-d elements are not crushed.
4.  The back of the frame is solid and black so artwork can be created on the frame itself - see my Scrabble Art Frames below.
5.  The frame itself is intricately crafted and showcases whatever beautiful art you display inside of it.

So, how do you attach the art so that it can be removed?  I use Mini Glue Dots - one is each corner and two in the center, but you can also use the Hoop and Loop Velro Dots.

Black Shadow Box Frame with a layout

Black Shadow Box Frame with a Studio J Chalkboard Art Print

Black Shadow Box Frame Scrabble Art

The Shadow Box frame also comes in Colonial White.

Here is a sample of a little larger frame - and this is the Magnetic Chalkboard.

To see more of my Scrabble Art as well as instructions of how to create your own, click here.

Another favorite is the Printers Tray.  There are so many possibilities!


And finally the 5" x 7" Hinged Frame.

This special is offered exclusively with myself, Tonya Sheridan, Independent Close To My Heart Consultant and is available until 9:00am on Friday, December 4, 2015.  

You can take advantage of this special in one of two ways:

1.  Go to www.tonyasheridan.ctmh.com and place your order for your Designer Decor' Frames.  Make sure while you are there that you check out the CYBER WEEK specials (which end tomorrow!) and the Clearance Sale for some additional great Christmas deals.  During check out, click to join the Sassy Gathering.  When I receive notification of your order from Close To My Heart, I will send you the free Mini Glue Dots!

2.  E-mail your order to me at: inallsassiness@gmail.com.  I will determine your total and will send you an invoice that you can pay on a secure website with a credit or debit card.  Please let me know if you want me me to place your order now, or wait until the 12 Days of Sassy Scrapbooking are completed.  I know I for one, like to start my hand crafted gifts early in December because history has proven that one, if not all three, of my kids and myself WILL get sick during the month.  I don't like to be behind the eight ball and others might be like me so I wanted to give you the options.