Showing posts with label Class Kit. Show all posts

Monday, April 29, 2019

How Did They Do That? It is so all about the triangles!

Last week I shared the first or two layouts that I was teaching for my How Did They Do That series.  This morning, I want to share the second layout - which is my absolute favorite!  The color combination, and the design of the left page just jumped out at me and I had to figure out how to, and to actually create the layout.  This layout is found on page 143 of the Seasonal Expression 1 Idea Book -- which by the way retired tomorrow (April 30th) so if you fall in love with any of the supplies, as I did, you will want to order them right away at: www.tonyasheridan.ctmh.com.

Here is the original layout which was just a one page layout:

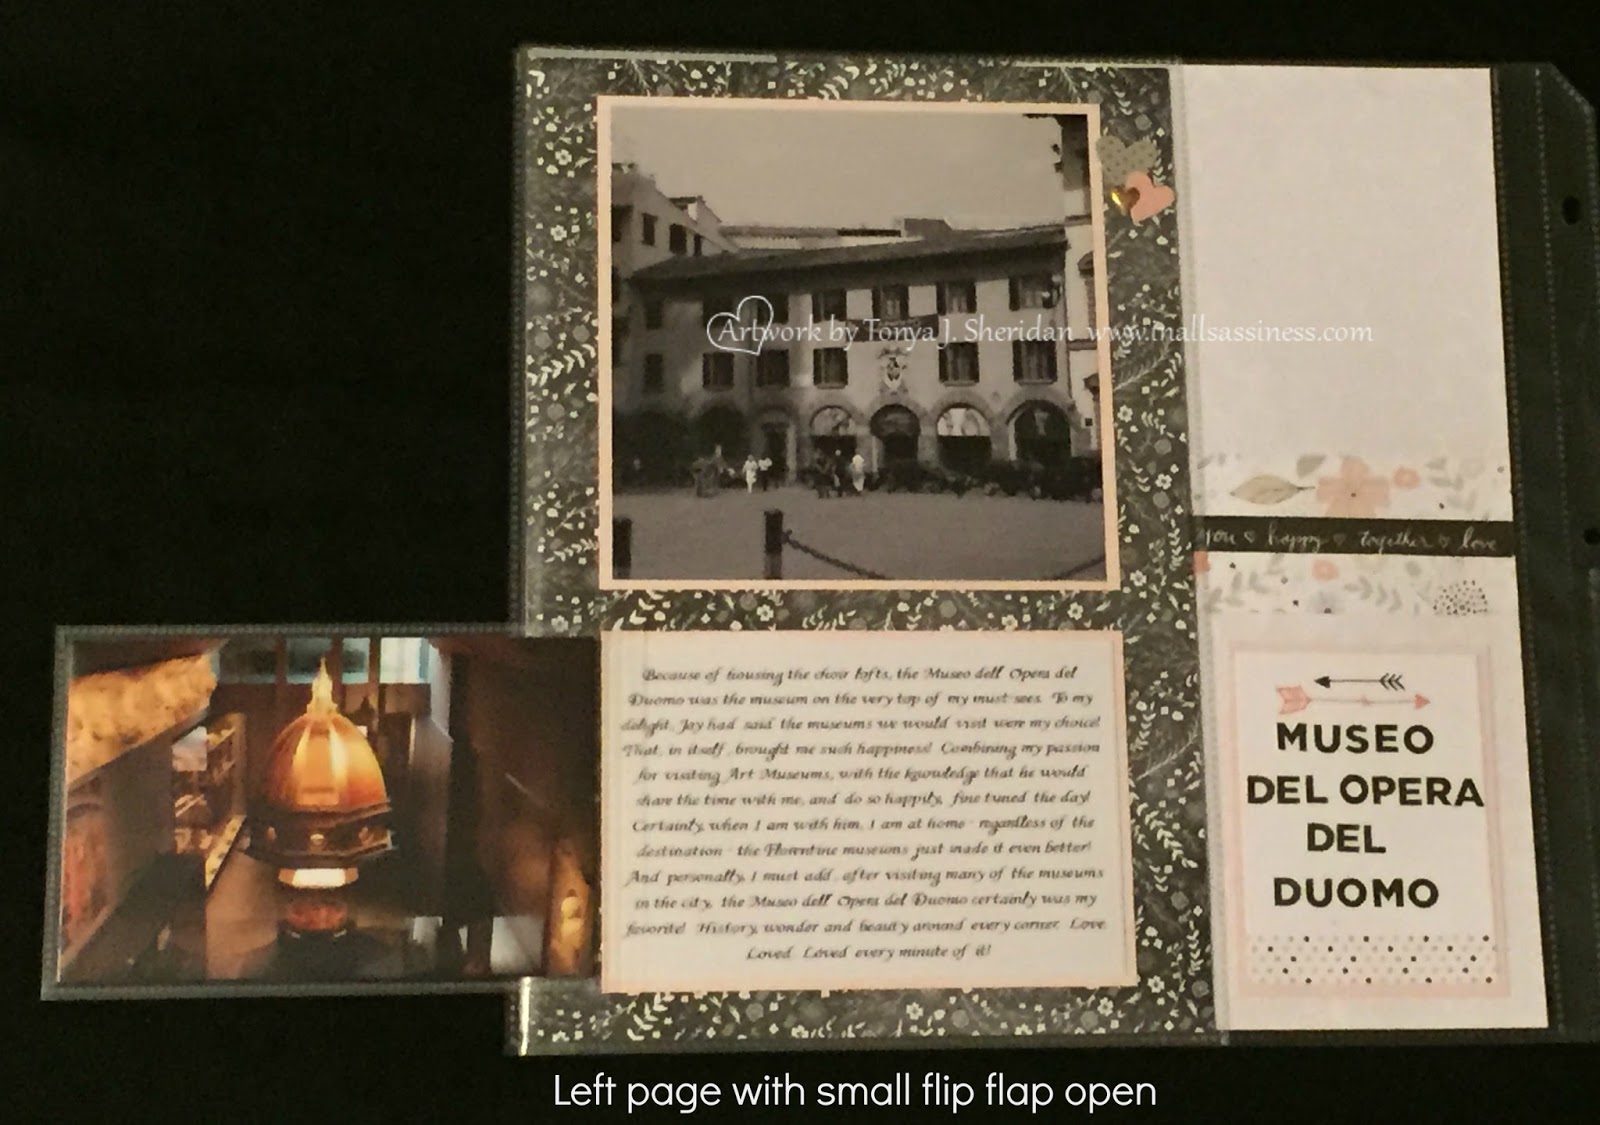
And here is my adaptation of the layout with the addition of the left page:

I did alter the title from "our whole world" to "his whole world" as I plan on using the layout for pictures of my son playing baseball.  To see a larger image of the layout, simply click on the layout and it will open in a larger window.

Here are some photos of the details of the layout which completely make the layout in my opinion:


Supply list:

Although I have offered this as a class, I do still have kits available.  The kits include the pre-cut triangles and Die cut pieces as well as other needed materials, a complete pack of So Much Happy compliments (which provides multiple letters to create your own subtitles or journaling points), detailed instructions and a color photo for your reference.  It can be purchased in my In All Sassiness Designs Shop by clicking here.

Friday, February 5, 2016

Flip Flap That! Class in Charlotte

Flip Flap That! is a class series that teaches new, and creative ways, to use Close To My Heart's innovative flip flaps into your scrapbooking pages.  This layout is one that I have been wanting to create for 15 years. Yes, you read that correctly - 15 years.  The photographs are from my honeymoon trip to Florence, Italy.  At the time, I had a panoramic camera - which I must add, at the time, was "the" camera to have.  The problem that has arisen is that I now cannot find any place to print those photos as they are in unusual sizes.  Studio J has been an awesome solution for this as I can use the No Limits template and alter the size of the photo well to the size of the original picture.

Sadly, Studio J will be retiring at the end of April 2016, or when CTMH's paper supply runs out.  Because of this, I am pushing forward strongly to finish this honeymoon album while I have a resource to print the photos in.  This layout is actually one of my favorite layout types in that it is what I call a hybrid layout - I have incorporated the best of traditional scrapbooking with a flair of Studio J!  All of the photos were printed in Studio J, as well as the journaling...certainly the best of both worlds!

The layouts were photographed inside of the page protectors so forgive the blurriness and reflection of the flash from the page protectors, but do take note of the sheer quantities of photos, and journaling, that I was able to include!  I was able to convert some of the photo wells to journaling spots so that I could share the details of the photographs!  This worked like a charm.  The flip flaps themselves enabled me to add many photos that I normally would not be able to fit on one layout.

I am absolutely delighted with how the final layout turned out and cannot wait to add it to my album!  To see a larger version of any of the pages, simply click the layout and it will open in a new window.


And I saved the best for last!  This is my favorite part of the layout!  I love how the colors worked so well with the paper collection, and the combination of the black and white photos and the color ones.


Now, you can envision the layout with your own pictures;


This class kit is $25.  It includes mostly pre-cut pieces, with a few exceptions, and includes a full pack of Charlotte compliments (there will many extra pieces to play with or add to the layout should you desire), bulk embellishments, (2) 6" x 12" Flip Flaps, (1) 8" x 12" Flip Flaps, (2) 4" x 6" Flip Flaps, detailed instructions and a color photo.

Monday, January 20, 2014

January Make and take...and just in time!

Tomorrow, if the weather forecasts are correct, we might just be "walking in a wonderland" so I thought I would share my make and take for this weekends crop for my attendees so they can take pictures during the snow, or stay inside where it is dry and warm, and locate pictures from previous snows.  Your choice of course.

To see a larger image of the layout, click on the layout and it will open up in a larger window.

Full spread.

Left side.

Right side.

Details.

To create this layout I used: X7175B Frosted Paper Pack, Z1799 Silver Shimmer Trim, Z1812 Small Sparkle Flourishes, Z1752 Small Sparkles, Z1906 Artbooking Cricut Cartridge.  The layout design was taken from 9042 Make It From Your Heart Vol. 2.  

The photograph sizes are:  (six) 2 1/4" x 2 1/4" (matted on Whisper) and (five) 1 1/2" x 1 1/2" that are positioned where the Colonial White squares are holding their places.  

Monday, November 11, 2013

Truly sparkling and shining!

Hello friends!  I apologize for my long-absence from my blog!  I have been fighting being sick, and some personal matters, for almost two weeks and have just been down for the count to say, but I am hoping to be on the upward climb.  My thanks to the many of you who have been waiting for the images, the details, and for me to work out the kinks on how to create the trees that grace the cover of Close To My Heart's Holiday Gift Guide.  And before I share, my gratitude's go out to Barb Carrico and to Theresa Andrews for helping me iron out all of the kinks in the measurments!  I am so blessed for their friendship and willingness to share their hard work and knowledge!  So all of that being said, here is my tree!

I chose to create the center tree (from the bottom photograph that corporate created) that shares the colors of the candy cane.  I love the whimsical-ness that it shares with the candy cane stripes and my family loves the story of the candy cane which made it perfect!  My plan is to package the tree in a box filled with mini-candy canes and send it to the sister of a loved one who is in a nursing home.  They aren't allowed to have "real trees" there and there isn't much room for the traditional table top artificial tree.  Including the "coordinating" little candy canes are a great little thank you for all of the nurses who take care of her each and every day.

The votive holder that serves as a base was a treasured find that my friend Barb discovered and completes the tree!  Love, love, love it!


I will be teaching a step-by-step "Let's Get Started Class" on Friday night, November 15th from 7PM - 8:30PM during my November Gratitude Crop (and yes, you can just take the class without attending the entire crop) and again on Sunday, November 24th from 1:30-3PM at Plains Community Center.  Note, the class is designed to get you started on your tree and the knowledge to create the tree; you will most likely need to put in more time outside of class to finish your tree.  Needed supplies are:  a low-temp hot glue gun, extension cord, Liquid Glass, Bone Folder and patience.  The class is $20 and includes the PRE-CUT tree pieces and toppers, the balance of the Sparkle and Shine paper pack, Pre-cut Sparkle Silver Snowflakes, 1/2 pack of Ruby Mini Medleys, 1/2 pack Red Base and Bling Red Jewels, a Silver Votive holder and detailed step by step instructions as well as the details on the Cricut Cuts should you want to create the project again.  You may choose the multi-color tree (as seen in the company's picture) or the candy candy/red toned as seen in mine).

Kits will also be available for order/purchase.  If you need them to be shipped add $6 for Priority Shipping.


Christmas Tree Kit/Class

Thursday, October 10, 2013

Elegant and "Classy" Doily cards!

Three of the cards for this weeks Card Club were created with the B1424 Classic Doily Stamp set.  I am in love with this stamp set--there are so many possibilities on how to use it!  With card B we separated each layer with 3-d foam tape, whereas card C the layers were all flat: each style created a unique look.  With card D we darkened the card by switching the order of the layers and adding cardstock as well--love the results! And as a bonus, the outer edge of the Doily is a Cricut Compatible shape on Close To My Heart's exclusive (Z1790) Artiste' cartridge. The cards are created with the X7175B Frosted Paper Collection and accented with the Z1812 Small Sparkle Flourishes, Z1752 Clear Sparkle Assortment, Z1829 Grey and Black Sparkle Paper and Z1799 Silver Shimmer Tape.  All of the stamping with these three cards was done with Z2172 Whisper Exclusive Ink and the sentiments were all found on the October Stamp of the Month S1310 Scandinavian Wishes which you can purchase for $5 with a $50 qualifying purchase.  The Slate ribbon is retired but was originally found in the For Always Cardmaking WTG.  A similar ribbon could be found at your local craft store.  

For card A, we used the B1412 Perfect Fit - Holiday stamp set with Twilight and Crystal Blue Exclusive inks.  The snowflakes were random stamped with the following combinations:  Whisper - first generation; Twilight - second generation; Crystal Blue - second generation.  

Full card set

Card A

Card B

Card B details of layers

Card C

Card D

The cards are now available as a kit.  The kits are all pre-stamped and pre-cut.  The kit includes the needed supplies to create 8 cards:  2 each of 4 designs and are $10.  Add $3 for shipping if applicable but may be combined with other In All Sassiness Designs Kits.  To order your kit, e-mail me at: inallsassiness@gmail.com.  


Thursday, October 3, 2013

Sassy Girl!

Yes, like mother, like daughter!  My daughter Abby is definitely full of sass!  I couldn't wait to use the Perfect Paisley's stamp set with the "sass" sentiment on it and partner it with the Cricut Cut title "Sassy Girl" from our Close To My Heart's new Artbooking Cartridge.  I actually created this layout to teach at the 2013 New Jersey Scrapbook Expo without the pictures.  And then upon chatting with my dear friend Linda (see Linda, I told you I would give you credit! :) I realized that Abby's ballet outfit would work beautifully with the papers, title, and expressions...and thus a complete layout was created.  And, I have to admit...I  L-O-V-E how it turned out!  I tried to take several detail shots as the details definitely make the layout!

Full spread with photographs

Left page with flaps closed

Left side with Flip flaps open

Right Side flap closed

right side flap open

And here are the before pictures:
 Full Spread

Title Detail

expression and accent details

Artbooking overlay details 

Paisley details


This layout is one of two that will be taught in October's Sassfully Chirping Cricut Class on Friday, October 18th at 6:30PM.  The place is TBD.  Class kits are also available for this Sassy Girl Layout.  Visit my In All Sassiness Designs Kit page for more details.

Saturday, August 17, 2013

Tween Dream Pop Layout

Introducing a new Tween/kids class that I just couldn't wait to share!  

The class, Good-bye Summer! will be Sunday, August 25th from 1:30-3:30 at the Plains Community Center in Timberville.  The cost is $5.

This will be such a great chance to spend an afternoon with your child or tween before they head back to school.


Create a layout remembering "10 Things I love..."...could be in general or what you were summer lovin' this summer.  This bright colored layout will help you remember the moments that were/are special.

All pieces are pre-cut to maximize creating time.  Supplies needed:  adhesive of choice and 3-d foam tape.  Adding photos and journaling at the class is optional.

Exclusive Good-bye Summer Kits are available to adults as well!  Would be a great layout to add to a siblings/grandchild's book! Or, I will have additional "quick" hassle free layouts that adults can work on while their child/tween creates their layouts.  Additional kits will vary in price. 

Note: this class can also be purchased in kit form, or as a class for slumber parties, tween parties, Girl Scout, 4-H or church groups!  E-mail me for details at: inallsassiness@gmail.com.

Please register 24 hours in advance so that I can have a kit pre-cut for you.


Note:  To see more of the details of the layouts, simply click on the layout and they will open larger in a new window.

I hope you can join me!  To register, simply e-mail me at: inallsassiness@gmail.com.  Please register 24 hours in advance. 

Saturday, July 20, 2013

How Sweet Life Is!

Tonight I wanted to share a book that I created in Studio J for a kids/tween class that I recently taught. The girls did really well with the class and I loved seeing the books they created with their own personal flairs!  The class was such a rewarding experience for me!


To create the book, I went into Studio J and used the Stella Paper Pack which has very trendy colors and ones that were bright enough that I thought would delight the girls.  I created four layouts adding my own personal touches (stitching, elements, titles etc) and purchased just the J-Pegs.  Next, I took those J-Pegs and loaded them as individual pictures back into Studio J.  I used the No-Limits layout design and created four 6" x 6" photo wells on each page for a total of 8 wells.  Once the layout photos were loaded I printed the layouts as is.  So ultimately, each gal received a full 2-page 12" x 12" layout in their kit.  Because of their ages, and the time restraint, I cut the pages into the 6" x 6" size. 

 Next, we cut the flaps off of two 6" Flip Flaps.  These were then adhered with Red-Lined tape to the cover of 6" accordion books as a protective layer -- my thoughts were the covers would have more handling so this would assist in preserving their books longer.  Later, we would slide the cover pages into these sleeves.  Next, we added the Stella Canvas My Stickease to the pages as the girls desired.  This added lots of texture and dimension to the books.  After this, we adhered the pages to an Accordion Album and slid the covers into their pockets.  We then added Flip Flaps from the Small Flip Flap Assortment over the photo mats.  

The girls took their books home and will add photographs to their books.  The journaling can be done with a Sharpie which will not smear on the photo paper.  

I did create a few extra books and am able to sell them as kits.  Each has the needed supplies, the 6x6 Accordion Album and color step by step instructions included.  The kits are $18.00.  Add $3.00 for shipping if applicable.  

For more Studio-J Hybrid ideas, or classes/class kits, subscribe to my e-newsletter or become a follower of my blog!  You can also e-mail me at: inallsassiness@gmail.com!  I would love to share my love for this fantastic innovative way to enhance your scrapbooking with you!  Faster, Simpler, Easier of course!

To order a kit, use the PayPal link, or e-mail me at: inallsassiness@gmail.com.  

How Sweet Life Is Accordion Book Kit