Showing posts with label Thin Cuts. Show all posts

Wednesday, December 6, 2023

Sassy 25 Layouts of Christmas - 2023. Layout 4. Tis The Season (Silver Bells)

Welcome to my Sassy 25 Layouts of Christmas 2023!  I will be celebrating the art of scrapbooking during the next 25 days leading up to Christmas and I invite you to join me!

So how does this work? For the next 25 days, I will share a layout here on my blog, in my In All Sassiness Scrapbooking Facebook Group and in my In All Sassiness Shop.  The layout will be available in kit form and quantities will be while supplies last.  Because many of the layouts are created with retired product, the quantities will vary from day to day so if you see one that you want, you will want to order it sooner verses later.  Additionally, there will be a product special that will compliment the Layout which will just be available for 24 hours. Grab, and order, the kits, and product deals that you love, select pick up at check out and then the items will be collectively at conclusion of the 25 days! Which saves you on individual shipping cost AND gives you a very happy box to open!!  A special note:  due to the roll-a-coaster ride of CTMH's inventory last December, I will be very pro-active and will placing one collective order at the end of each day to ensure I can get the product ordered. And of course, if you are one of VIP's you will receive VIP credit for all specials and layout kits that you order.

So with all of that being said, here is day four!!!
---------------------------------------------------------------

My fourth layout sports a new technique that I absolutely love: mosaics with acetate!  The technique was originally shared by Laura Beacham, from Australia, I find fun to create, and once done, it creates a wow-factor!  If you take note of the 1/2" strip of little squares towards the top of the layout, you will see the technique that I am speaking about.


This layout is created with the new Silver Bells paper suite which is a current collection.  My absolutely favorite part of this collection is the sweet Thin Cut set that comes in the Silver Bells Card Making workshop.  While I adore how the Thin Cuts were used in the cards, those Thin Cuts are amazing and are perfect for layouts as well!!

Additionally, for the title, I used the Tis The Season stand alone Thin Cut set.  This little Thin Cut set has quite the wow factor!  As I didn't want the title to get lost within the patterns of the papers, I adhered it to White Daisy, popped the title pieces up and adorned the spaces between the words with the silver enamel glitter dots from the Silver Bells collection.


Today's product special will be shared in a separate post.

Have a sassy day!
Tonya

Friday, November 24, 2023

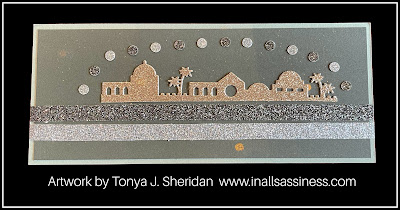
Glitter Bethlethem Card

As we have now "officially" entered the Christmas season, I wanted to share a card that I created that I just adore! Simple.  Elegant. And made with glitter!


This is the stamp set and Thin Cut set that includes the Thin Cut for Bethlehem.  
How to create the card:
1.  Cut a piece of Sage cs to 3 1/2" x 8 1/2".
2.  Cut a piece of Pine cs to 3 1/4" x 8 1/4".
3.  Splatter the Pine cs with the Gold Shimmer Brush.  Allow a few minutes to dry.
4.  Center, and adhere, the Pine cs to the Sage cs.  
5.  Adhere a piece of Seabrook Shimmer Trim to card front. This extends across the horizontal width to the card and is about 1/2" to 3/4" above the bottom edge of the card.  Trim the edges of the shimmer trim off where it exceeds the card.
6.  Adhere a piece of Pine Shimmer Trim to the card front.  This extends across the horizontal width to the card and is approximately 1/4" above the Seabrook Shimmer Trim.
7.  Adhere the gold glitter cut of Bethlehem to the base.  This is just right of centered and is 1/8" above the top of the Pine Shimmer Trim.  This piece is quite fragile so adhere with care. I found the CTMH Adhesive Runner worked the best for not tearing the cut.
8.  Using a hand held hole punch, cut out circles from the Pine and Seabrook Glitter Paper.
9.  Arrange the glitter circles in a half-circle from the left side of Bethlehem, around and over, the piece, to the right side of the of Bethlehem.  Alternate the two colors and adhere with Mini Glue Dots.
10.  Adhere the card front to a Slimline Card.

Supplies used:  (Z7093) Nativity Scene Stamp & Thin Cuts, (Z4659) Pine Shimmer Trim, (Z4660) Seabrook Shimmer Trim, (Z4610) Pine Glitter Paper, (Z4611) Seabrook Glitter Paper, (Z3316) Gold Shimmer Brush, (X6070) Pine cs, (X6045) Sage cs, (Z3238) Gold Glitter Paper, (X257) Slimline Cards & Envelopes, (retired) Mini Glue Dots, (Z7010) CTMH Adhesive Runner.  Current items can be ordered on my Close To My Heart website at:  www.tonyasheridan.ctmh.com.

For those who would prefer For those who would prefer a pre-cut, & pre-stamped set of this card, I have added it to my card buffet.  You can order the cards for $2.50 each or 7/$15.  (click on the quantities for the associated links) I will also be hosting a few pop-up card buffets over the next few weeks so be on look-out for those as well.

Create with sass,

Tonya

Wednesday, November 22, 2023

Triangle Tree Inspiration #3.

I just can't stop creating with this fantastic Triangle Tree set!!  Hope you are loving it too!  This collection includes a stamp set, a Thin Cut set and a dual stencil set that can all be purchased, and used, independently of one another, or used together, and when they are, they are a statement of  beauty!  I am in love with this collection so over the next few days, I will be sharing some artwork that I have created with the elements independently and collectively.

(D2204) Triangle Trees stamp set 

(Z8064) Triangle Trees Thin Cuts

(z8065) Triangle Trees Stencil duo

(Z8066) Triangle Trees Bundle

The Triangle Tree collection is only available until the end of December, or while supplies last.  They can be ordered here:  https://tonyasheridan.closetomyheart.com/retail/search.aspx?searchvalue=triangle+trees

The third card that I wanted to share uses one of the stamped trees as an embellishment.  Being quite the music lover, I especially liked how this one turned out.


Here are the directions to create the card:

(optional) Splatter the music note paper wit the Gold or Clear Shimmer Brush before creating. 

1.  Cut a 4 1/4" x 5 1/2" piece of Sage cs.
2.  Cut a 4" x 5 1/4" piece from the music note paper.
3.  Cut (2) 1 1/2" squares from the Pine Glitter paper and (1) 1 1/2" square from the Seabrook Glitter Paper.
4.  Position the three squares so that they make a diamond pattern.  There is a slight space between the pieces.  Adhere to the card front with Thin Foam Tape.
5.  Cut the tree out of the light side of the Pine cs.
6.  Using the Pine Exclusive Ink, and the Triangle Tree stamp set, stamp the tree design onto the tree.
7.  Adhere the tree in the bottom right corner of the card so that the top overlaps the Seabrook Glitter Square.  Where the tree overlaps the square, one layer of Thin Foam Tape is used.  Where the tree extends over the music note paper, adhere with two layers of regular Foam Tape.
8.  Using a hand-held hole punch, adhere (3) glitter dots in a vertical row down the center of the tree.  The top one is Seabrook, followed by Pine, and then a 2nd Seabrook.
9.  Adhere an additional Pine glitter dot to the music paper under the center of the tree for the trunk.
10.  Cut a piece of Sage cs to 3/4" x 1 7/8".  
11.  Using the Pine Exclusive Ink, stamp the "Season's greetings" sentiment onto the light side of the Sage cs.  Trim the edges off of the left and right edges so that the sentiment is centered.
12.  Cut a piece of Pine cs to 1" x 2 3/4".
13.  Adhere the sage cs with sentiment to the right side of the Pine piece leaving 1/8" border on the upper, lower and right edges.
14.  Adhere (2) glitter dots in a vertical row to the right of the sentiment.  The Seabrook is on the top and the Pine is at the bottom.
15.  Adhere the combined sentiment piece to the card front.  The left edge is flush with the left card edge and is popped up with Thin Foam Tape.  The right overlaps the glitter squares and is adhered flat.  Red Line Tape, or a Mini-Glue Dot will work best to adhered this to the glitter surface.
16.  Adhere the card front to the card base.

Supplies used:  (Z8064) Triangle Tree Thin Cut, (D2204) Triangle Tree Stamp Set, (Z7088) Silver Bells Cardmaking Stamp & Thin Cuts, (X6045) Sage cs, (Z4610) Pine Glitter Paper, (Z4611) Seabrook Glitter Paper, (Z6540) Pine Exclusive Ink, (X6070) Pine cs, (X7299B) Evergreen Paper Pack, (Z2060) Thin Foam Tape, (Z7010) Adhesive Runner, (retired) Mini-Glue Dots, (retired) Red Line Tape. Optional:  (Z3316) Gold Shimmer Brush, (Z3293) Clear Shimmer Brush.   The current supplies can be found on my website at:  www.tonyasheridan.ctmh.com.

For those who would prefer For those who would prefer a pre-cut, & pre-stamped set of this card, I have added it to my card buffet.  You can order the cards for $2.50 each or 7/$15.  (click on the quantities for the associated links) I will also be hosting a few pop-up card buffets over the next few weeks so be on look-out for those as well.

In all that you do, create with sass!

Tonya

Saturday, November 18, 2023

Triangle Tree Inspiration #2

 Are you in love with the Triangle Tree Collection yet?  This collection includes a stamp set, a Thin Cut set and a dual stencil set that can all be purchased, and used, independently of one another, or used together, and when they are, they are a statement of  beauty!  I am in love with this collection so over the next few days, I will be sharing some artwork that I have created with the elements independently and collectively.

(D2204) Triangle Trees stamp set 

(Z8064) Triangle Trees Thin Cuts
(z8065) Triangle Trees Stencil duo
(Z8066) Triangle Trees Bundle

The Triangle Tree collection is only available until the end of December, or while supplies last.  They can be ordered here:  https://tonyasheridan.closetomyheart.com/retail/search.aspx?searchvalue=triangle+trees

The second card is a gold threaded tree card and here are the directions to how I created this card:

1.  Cut a 4 1/4" x 5 1/2" piece of Sage cs. 

2.  Cut a piece of 4" x 5 1/4" of French Vanilla cs.  

3.  Position the 2nd largest tree Thin Cut over the French Vanilla cs in the desired position.  Cut the tree out.

4.  Stamp the sentiment "happy holidays" from the Silver Bells Card Making Stamp Set in Pine Exclusive Ink Pad to the French Vanilla cs. This is stamped above where the tree was cut out.

5.  Using the Gold Shimmer Brush, splatter the front of the French Vanilla cs.  Allow a few minutes to dry.

6.  Flip the French Vanilla over to the backside.  Adhere Thin Foam tape directly beside where the tree was cut out.  Remove the film from the tape.

7.  In a crisscross pattern, take the thread back and forth adhering it to the foam tape before between each turn.

8.  Adhere Thin Foam Tape around the outer edge of the French Vanilla.

9.  Remove the film around the bordering foam tape.  Center, and adhere, to the Sage cs.

10.  Cut a smaller tree from the Pine cs.  Cut an even smaller tree from the Pine Glitter Paper.

11.  Stamp the tree image with the Pine Exclusive Ink Pad onto the light side of the pine cut tree.

12.  Position, and adhere, the stamped tree, to the left side of the empty tree space with Thin Foam Tape.  

13.  Position, and adhere, the glitter tree, to the right side of the empty tree space with Thin Foam Tape.

14.  Cut the Gold Shimmer Trim at an angle and tuck under each of the trees.  Note: if you don't have Gold, Pine works well too.

15.  Add Gold Stickles to the stamped tree for ornaments or create "dots" using the tip of the Gold Shimmer Brush.

Supplies used:  (Z8064) Triangle Tree Thin Cuts, (D2204) Triangle Tree Stamp Set, (C1995) Silver Bells - Card Making Stamp Set, (retired) Gold Embellishing Thread, (retired) Gold Shimmer Trim, (retired) Golden Rod Stickles, (Z3316) Gold Shimmer Brush, (Z4610) Pine Glitter Paper,  (Z6540) Pine Exclusive Ink Pad, (X6046) French Vanilla cs, (X6045) Sage cs, (X6070) Pine cs, (X254) Value Cards & Envelopes.  These items can be ordered on my website at: www.tonyasheridan.ctmh.com.

For those who would prefer For those who would prefer a pre-cut, & pre-stamped set of this card, I have added it to my card buffet.  You can order the cards for $2.50 each or 7/$15.  (click on the quantities for the associated links) I will also be hosting a few pop-up card buffets over the next few weeks so be on look-out for those as well.

In all that you do, create with sass!

Tonya

Triangle Tree Inspiration #1: layered striped trees

 Have you seen Close To My Heart's new Triangle Tree collection?  This collection includes a stamp set, a Thin Cut set and a dual stencil set that can all be purchased, and used, independently of one another, or used together, and when they are, they are a statement of  beauty!  I am in love with this collection so over the next few days, I will be sharing some artwork that I have created with the elements independently and collectively.

(D2204) Triangle Trees stamp set 

(Z8064) Triangle Trees Thin Cuts

(z8065) Triangle Trees Stencil duo

(Z8066) Triangle Trees Bundle

The Triangle Tree collection is only available until the end of December, or while supplies last.  They can be ordered here:  https://tonyasheridan.closetomyheart.com/retail/search.aspx?searchvalue=triangle+trees

The first card is a layered tree card and here are the directions to how I created this card:


1.  The card base is Pine cs which is cut to 4 1/4" x 5 1/2".
2.  The paper behind the tree is cut from French Vanilla cs and to 3 3/4" x 4".  It is then splattered with the Gold Shimmer Brush.  Allow a few minutes for the splattering to dry.  Adhere to the top of the Pine cs with 1/8" borders above and to the left and right.
3.  Next, the patterned paper is from the Evergreen Paper pack.  It is cut to 1 1/2" x 4".  Before adhering to the Pine cs, adhere a piece of Seabrook Shimmer Trim to the top edge of the patterned paper and trim to fit.
4.  Next, cut a piece of Sage cs to 3/4" x 4".  Using the Pine Exclusive Ink Pad, stamp the "thinking of you this Christmas" sentiment from the Home for the Holidays Card Making Workshop Kit.  Note: if you don't have this stamp set, you could easily substitute with a different stamped sentiment.
5.  Adhere the stamped sentiment to the center of the visible Evergreen patterned paper.
6.  Adhere the patterned/stamped/shimmer trim piece to the Pine cs directly below the French Vanilla cs.
7.  Using a hand held hole punch, punch (3) dots with Pine Glitter paper and (2) with Seabrook Glitter Paper.
8.  Adhere (2) Pine glitter dots in a horizontal row to the French Vanilla cs directly above the Seabrook Shimmer Trim and right justified.
9.  Using the 2nd largest Triangle Tree Thin Cut, cut a tree from the French Vanilla cs.  
10.  Cut a 1/2" piece of the Evergreen patterned paper.  Adhere the Evergreen print side to the bottom of the tree.  Trim to fit.  Flip the patterned paper to the polka dot side.  Adhere a row of the polka dot paper above the Evergreen patterned paper.  Trim to fit.  Adhere a piece of Seabrook Shimmer Trim directly above the polka dot paper.  Trim to fit.  Adhere a 2nd row of Evergreen pattern paper directly above the shimmer trim.  Trim to fit.  Adhere a 2nd row of the polka dot paper above the Evergreen print and trim to fit.  Adhere a row of Pine Shimmer Trim above the polka dot and trim to fit.  Finally, rotate and adhere, the Seabrook Shimmer Trim above the Pine Shimmer Trim but this one is adhered vertically to make sure that the tip of the tree is covered.
11.  Adhere the tree to the French Vanilla splattered paper with Thin Foam Tape.  
12.  Cut a small piece of Pine Shimmer Trim at an angle.  Tuck, and adhere, under the bottom center of the tree for the trunk.
13.  Adhere (2) Seabrook and (1) Pine glitter dots to the tree with Mini-Glue Dots.
13.  Adhere the card front to the card.

Supplies used:  (Z8064) Triangle Thin Cut, (X7299B) Evergreen Paper Pack, (retired) Home for Christmas Card Making Workshop, (Z4611) Seabrook Glitter Paper, (Z4660) Seabrook Shimmer Trim,  (X6068) Seabrook cs, (Z4610) Pine Glitter Paper, (Z4659) Pine Shimmer Trim, (X6070) Pine cs, (X6046) French Vanilla cs, (X6045) Sage cs, (Z3316) Gold Shimmer Brush, (Z6540) Pine Exclusive Ink Pad, (Z2060) Thin Foam Tape, (Z7010) CTMH Adhesive Runner, (X254) Value Cards & Envelopes.

For those who would prefer a pre-cut, & pre-stamped set of this card, I have added it to my card buffet.  You can order the cards for $2.50 each or 7/$15.  (click on the quantities for the associated links) I will also be hosting a few pop-up card buffets over the next few weeks so be on look-out for those as well.

In all that you do, create with sass!

Tonya

Tuesday, August 8, 2023

Introducing our new gnome!!

 Those braids right?  That nose?  The complete cuteness!!  LOVE her!! To pieces!

I introduce to you our new (CC72327) Gnomes for Autumn Thin Cuts!  She is available during the months of August and September, or while supplies last.


So, because I just couldn't help myself, I had to use her right away in a layout, and then loved the layout so much that I made two more variations.  Oh, the possibilities!

The first is with my all time favorite Daisy, Daisy!  For this layout, I kept the base of the sunflower for stability, and then I added the Daisies from the Daisy, Daisy Thin Cuts to the top of the sunflower.  I then added two additional daisies to the left page to carry the eyes across the layout.


(to see a larger image of the layout, click on the layout and it will open in a new window).

Here are some of the details of the layout:


Again, can we focus on those braids??  I so love them!


The title was cut out of Black cs and was popped up with Thin Foam Tape which I believe truly makes it pop!


Here is one of the accent daisies.  I built each of the daisies with a different order so there would be more character.  Each included Ballerina Glitter Paper, White Daisy cs, Ballerina cs and Flamingo cs.

The second variation was created with our new Gnomes for Autumn Collection.  This is the collection that the gnome Thin Cut was designed for strutting her sunflower happiness.  For this collection, I paired the sunflower on the gnome Thin Cut with the sunflower stamp and thin cut from the Gnomes for Autumn Scrapbooking stamp & Thin Cuts to create a more 3-d effect.  This is done with the sunflower that the gnome is holding along with the accent sunflowers on the left page.


gnome details:


title details:


Layered sunflower details:  notice how the back cut is layered and then offset slightly - this really adds to flower!  I love it!


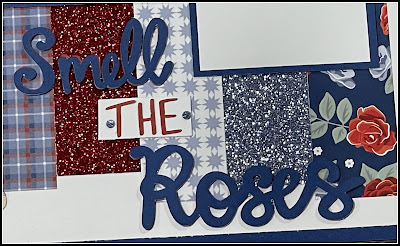
The third variation was created with the Hello Darlin' collection.  This was a patriotic themed collection that was available in the spring.  Instead of incorporating the firework parts of the paper, I chose to feature the rose part of the collection.  


gnome details:


This little gnome for this version, I have named Karen - with the namesake of my mentor at Ohio State University.  She has the most beautiful long white hair and I always loved it when she wore it in braids!

Namesake aside, for Karen, I trimmed the sunflower down, but keep it for stability.  I then cut the rose from Close To My Heart's Hello Darlin' Digital collection and adhered it to the base of the sunflower.  I love how, like the daisy, it completely changed the look of her.

rose details:


title details:


The title is actually double cut, and overlayed.  The bottom cut is from Scarlet and the top is Sapphire.  This allows a very slight margin (if desired) to show, almost like a shadow, so that the words pop a little more.  

All three of these kits are available in my In All Sassiness Designs Shop while supplies last.  With each kit, there is the option to add on the Gnome Thin Cut to your kit or you can order her by herself by clicking here.

Supplies used:
Oopsy Daisy Layout:  (X6047) Black cs, (1385) White Daisy cs, (X6036) Ballerina cs, (X6040) Clover cs, (X6030) Evergreen cs, (X6050) Flamingo cs, (retired) Ballerina Glitter Paper, (Z7006) Pink Enamel Dots, (retired) Daisy, Daisy Paper Pack, (Z3293) Clear Shimmer Brush.

Gather with Grateful Hearts Layout:  (Z2829) Espresso Exclusive Ink Pad, () Pumpkin Exclusive Ink Pad, (X6076) Pumpkin cs, (X6049) Scarlet cs, (X6073) Acorn cs, (X5951) Espresso cs, (X6059) Shortbread cs, (X6066) Honey Butter cs, (X7295E) Cozy Up Enamel Dots, (CC7238) Gnomes for Autumn Paper Pack, (CC72318) Gnomes For Autumn Scrapbooking Stamp & Thin Cuts,

Stop & Smell the Roses Layout:  (1385) White Daisy cs, (X5957) Sapphire cs, (X6049) Scarlet cs, (X6047) Periwinkle cs, (Z4625) Periwinkle Glitter Paper, (Z3839) Scarlet Glitter Paper, (Z3840) Sapphire Glitter Paper, (retired) Hello Darlin' Paper Pack, (retired) Blue Belle Glitter Gems.

Supplies used with all three layouts:  (Z7010) Adhesive Runner, (Z2060) Thin Foam Tape, (Z1836) Non-stick Fine Tip Scissors, (Z1279) Versa Mat.  The layout design is from our upcoming Make It From the Heart: Volume 6 that will be available on September 1st.

Sassfully yours,
Tonya

Monday, June 12, 2023

Love This Moment

This layout is one that was inspired by the Art Department at Close To My Heart and included in their May/June Album Retreat.  I adored the layout, and recreated it, with some tweaks, and using the Daisy Daisy colors and papers.  There are many subtle little details that really pop when you see them!  And the incorporation of the hexagons (both stamped on the page and popped up) really make a statement.

To see the details of the layout, click the picture and it will open in a new, larger window.

For my personal layout, I also added two 4" x 4" Flip Flaps to the left photo of the right page.  Inside the Flip Flaps I included my own journaling and then photos of the menu from our tea.  I wanted to include the photos of the menu, however they weren't the best of photos so underneath the flip flaps were the perfect place to "house" them.  Note: the flip flaps aren't shown as they reflect when photographing them.


Here is the layout without photos.


The bases were splattered with a circle of shimmer brush splattered with Flamingo, Clover and Ballerina Shimmer Brushes.  The hexagons were stamped directly on the bases, on popped up pieces and were also cut of Ballerina Glitter Paper.


The sub-title piece is a shaker element without the shaker: so the foam rim was used and then the Thin Cut stitched circle was cut and adhered directly to the foam rim.


For the final details, Clear Sparkles were added to the layout in clusters with the hexagons.


This layout is now available in my shop.  You can see the details and order it by clicking here.

Supplies that are current may be ordered on my Close To My Heart website at:
www.tonyasheridan.ctmh.com.  Supplies used:  () Flamingo Shimmer Brush, () Clover Shimmer Brush, () Ballerina Shimmer Brush, () Ballerina Glitter Paper, () Evergreen Exclusive Ink Pad, () Evergreen cs, () Evergreen cs, () Clover cs, ()White Daisy cs, () Black Exclusive Ink Pad, (retired) Daisy, Daisy Paper suite, () Clear Sparkles, () Circle Shaker Foam & Acetate, () Circle Shaker Thin Cuts.

Sassfully yours, 
Tonya 

Sunday, June 4, 2023

In All Sassiness....sassy, sassy, sassy

Want to maximize your patterned paper scraps?  That was completely me when I designed this layout for my signature Shamrock Crop in the spring.  As Daisy, Daisy sold out in unprecedented time, I needed to create a layout with wow! power but with little paper - and these 1 3/4" x 1 3/4" squares fit the bill.

This is my personal layout, with some of my favorite family pictures from our trip to Ireland last week.  Each of the photo sizes I used on the right side are standard, and each would allow Flip Flaps to be added as needed or desired.  I used a 3" x 4" Flip Flap for both the vertical and the horizontal photos but you could also add one for the 4" photo as well.

(to see a larger view of the layout, simply click on the picture and it will open with a larger image in a new window).


overlay and daisy details


journaling details from inside the flip flap


Each part of the title is cut out with the Cricut and has one of the colors from the paper pack adhered behind it so that the color will show through.  This is much easier than cutting out the individual letters and trying to align them when adhering them down and truthfully looks more elegant too.

The glitter dots are punched from Ballerina Glitter Paper with a hand held hole punch and then adhered with a Thin Foam Dot for depth.


Daisy details - white on white!  elegant & perfect!  These were cut with the Daisy, Daisy Thin Cut set.  


This layout is now available as a class kit in my shop.  You can find it by clicking here.

Supplies used:  (CC11211) Deck the Palms Paper Pack & Stickers, (CC2235) Daisy, Daisy Thin Cuts, (CC2231) Daisy, Daisy Paper Pack & Stickers, (1385) White Daisy cs, (X6030) Evergreen cs, (X6040) Clover cs, (X6050) Flamingo cs, (X6036) Ballerina cs, (Z3843) Ballerina Glitter Paper, (Z3341) Thin Foam Dots, (Z2060) Thin Foam Tape, (Z3372) Adhesive Runner.  The current items can be ordered on my Close To My Heart website at: www.tonyasheridan.ctmh.com.

Sassyfully yours,
Tonya