Showing posts with label Artise Cricut Cartridge. Show all posts

Sunday, May 20, 2018

Now Showing....Movie Night

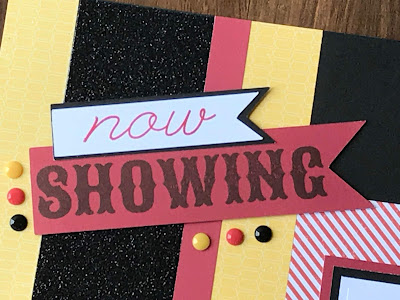
Summer screams out for movies...blockbusters, love stories, family movies...the entire cinema is at our fingertips...whether that be at home on a rainy day, at a drive-in on a clear summer night, or at the theaters on a super hot day.  Who can't help but love a night at the movies right?  Close To My Heart's newest stamp set (D1788) Movie Night is introduced at just the perfect time!  And as soon as I saw it, I couldn't help partner it with our retiring Stargazer paper...to create a 5 star layout! (click on the photo to see a larger image)


Special Features:  When creating the layout, I couldn't help but incorporate the cute little verses, or bullet points, that are included in the stamp set...I filled in the film slide randomly with these phrases... and then had to add the little popcorn pieces because really, popcorn and movies come hand in hand right?


The title was created in Circut Design Space with our exclusive Artiste' cartridge.  I welded the two words together to create a more unique look and then because I had to add some bling, I cut the title out of Black Glitter Paper.  The film protector and the "stop", "pause" and "play" icons were all stamped to add additional fun.


Additional stamping was used to create the pennant titles.


And that is it!  The layout is now ready to just add any personal details, and of course, pictures!

For my personal layout, I added a title that I created with a combination of Art Philosophy and the Star Wars - The Force is With Us cartridges.  I used a lot of patience (some of it wasn't pretty I must add), Canary and Black cardstock.  We are anxiously awaiting Solo's arrival at the theaters next weekend and I guarantee pictures will be taken!


If you would like to purchase a kit for this layout, you may do so in my In All Sassiness Designs shop.  It is available for $15.00 by itself or $30.00 with the stamp set.

Supplies used:

Cricut Cuts:
banners - Artiste' (retired); "Movie Night" Artiste' (retired) - ; filmstrip - Artbooking; 
tag for Solo title - Art Philosophy (retired)
Star Wars label - Star Wars: The Force Is With Us

Sunday, November 24, 2013

Almost down for the count...

This is a project I have wanted to create since the introduction of Close To My Heart's Holiday Gift Guide in October:  a countdown calendar.  Tonight I finally finished one for my niece Addison.  She is three and 1/2 so I made her boxes a little bigger than CTMH's original artwork so there was a little more room for the special Advent "happies" that she will be able to discover each day.  Each bag is attached to a wire on the frame.  Once Christmas is over, her mom can take the little bags off the frames and they can use it to hang Addison's special artwork etc. Check back during the month of December and follow my recaps of each day of Advent's surprises!  

Tomorrow I will share the second style I made for some special individuals in my children's lives!  I will also post more details on the how-to's of creating the calendar for those who would like to create their own!


Wednesday, October 23, 2013

A BabyCakes of a Baby Shower!

This past weekend my mom and I partnered with my sister in law's mom and sisters to give her a baby shower.  She is due in just a few weeks (yes, there is a very excited Auntie here!!) and we wanted to make the afternoon something special.  Mom and I were provided the decorations.  We chose to use Close To My Heart's Babycakes for the theme which featured the colors of Buttercup, Chocolate and Sunset which were perfect to go with the time of year!

This is the invitation that I made.  I used the Babycakes paper collection, the Bronze Shimmer Tape (LOVE that stuff!!  as you will see as you read further down!), the Spinner Cards, the Scallop Border Punch, Mocha Opaque Pearls and my Artbooking Cricut Cartridge.  The little circle spins so on one side it said "It's a boy" and on the other side it said "It's a baby shower".


I fell in love with the little giraffe on the invitations so I decided to create a wreath for the door with this little guy.  I used the Artiste' Cricut Cartridge for the pinwheel and the bow and the Artbooking for the Giraffe.  And yes, that Bronze Shimmer Tape that I mentioned...that is what I used for the wreath (on a Styrofoam wreath form). We couldn't use any form of hooks so my Sis in law and I strung the wreath by a long piece of orange tulle.  As our family had a pretty rough day on Saturday, preparing and wrapping the wreath was a great stress reliever for me...but I will say that it took HOURS!  


These were the favors that we created.  All of the little candy boxes were cut with the Cricut Craft room with many thanks to my friend Theresa for sharing the file!  The tubes are filled with Recess Pieces.  For the children, I created a bag-tag with the Babycakes paper and the Art Philosophy Cricut Cartridge.  The edges were scalloped but you can't really see that in the picture.


For the utensil holders, I used the Kraft Containers and the Canvas (now-replaced with My Stickease) My Stickease.  They have cute little lids too so once I got home I filled one container with q-tips, one with Cotton Balls, and one with Misc. little baby products and then will give them back to my Sister in Law for her nursery.  This was a super easy project that really added to the dinner table.


For the corsage, my sister in law is not fond of regular corsages (nor am I), so I used CTMH's new Base and Bling Collection and created a wristlet for her out of the necklace. I added a handmade rose to each of the medallions.  We did find that although there is a super sticky that is made for the medallion that hot glue worked better.


Here is what the wristlet looked like on Leah's wrist.  

Ignore my brother's "mean" face in this picture...they were being silly.  But I wanted to show you the headband that I made for my daughter Abby.  She truly thought she was the princess of the party for the day!  She looked so cute with it!  The headband was made with the Base and Bling Headband. I cut various sized roses, created the roses and then attached them to the bases.  Again, doing it again, I would most definitely use hot glue verses the sticky circles.  I also made one for my niece Addison but she wasn't able to come so now she has one as well!


Not wanting the Grandmother's to be left out, I created these Grandmother's corsages with my Cricut too.  I used the center medallion from the Spinner Card for strength; covered that with the Bronze Shimmer tape and attached Shimmer ribbons.  The Buttercup Pinwheel I create with my Cricut as well as the roses (all from Artiste').  I then hot glued a pin to the back so they could wear the corsage.


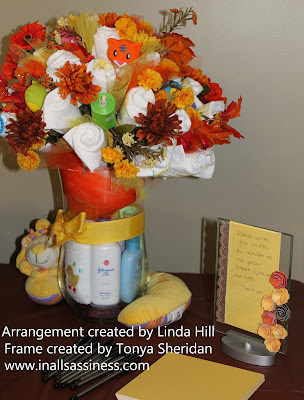
This is the beautiful diaper bouquet that my mom made as a centerpiece.  She did such an awesome job! 
 It is too pretty to take a part!  To the right was a little sign that I made with instructions for the participants to write a wish for Xander for his Wish Book.  Once the shower was over, I took out the yellow paper and now Mike and Leah can add a vertical photograph.

This is the little Wish Book that I created for all of our wishes for Xander.

And finally, you now the saying labor of love?  Well, this is my banner of love!  Let me tell you it was filled with much love in creation considering the HOURS that it took to cut out, arrange and put together!  Each piece is layered with at least three layers of foam tape.  But the hours were well spent and I think both Mike and Leah liked it.  It was a little challenging to hand as again we were in a building where we couldn't use hooks, but all in all it was the thought that mattered.

And that was it.  Now to just wait, and wait for little Mr. Xander to arrive!  That is the hard part!  As I told my cousin Rita at the shower, I truly believe there is nothing better in this world (besides being a Mom) that being an Auntie!  And this Auntie cannot hardly wait for Xander!  Of course, Rita stated that being a Grandma is pretty awesome too!  


Sunday, June 9, 2013

Pinwheel Gifts and Gift Bag

Tonight, I wanted to share some handmade gifts that I made last week to give to some of the support staff at my kid's school.  I was especially delighted with the gift bag--much nicer than one I would have purchased at the store and by using a standard white handled bag, a fraction of the cost.  The best part was that I was able to use my scraps from making the pinwheels!  Products used are:  Artiste' Cricut Cartridge, For Always Paper Pack, Scalloped Punch, Black Button Assortment, and Liquid Glass.   Non-Close to My Heart supplies used were: Hot Glue Gun, paper bags (found at Michael's), white barrel ink pens, glass vases, tissue paper and glass beads.


Monday, May 13, 2013

Cute as a cupcake?

Rather, cute enough to hold a cupcake?  With the new Dream Pop paper collection there is no doubt--these boxes are cute enough to gift a cupcake!  Last week we celebrated Teacher Appreciation Day and these were the gifts my children took to their teachers!  Because of the flooding here in Luray, we had to hand deliver one but thankfully, the others made it to school the next day.  I was delighted with how wonderful the boxes turned out and how they looked even more beautiful when filled with a gourmet cupcake.  I was even lucky enough to find a Grasshopper cupcake that's icing coordinated with the colors in the box!  Loved it!


(Look at the detail in the cardstock!  And it is even more beautiful in person!)


Want to create your own cupcake boxes?  They are so simple to create with Close To My Heart's Artiste' Cricut Cartridge!  Add the Dream Pop exclusive paper pack and Neutral Baker's Twine and you have a bundled gift!

---------------------------------------------------------------------------------------------------------------------


Dream Pop!  Available until May 31st (or while supplies last)!
Take a look at the beautiful summery color palettes!


Click here for the full campaign flyer!

Sold?  Here are the campaign details! 
 Get the exclusive paper packet for only $10 when you spend $35!
In honor of National Scrapbooking Month, you can get the yummy Dream Pop paper packet for only $10 when you spend $35 in May (valued at $19.95 retail)! This exclusive paper packet includes 12 cardstock sheets as well as 12 B&T Duos® papers that were specifically designed for this promotion only—you can’t get these sweet colors and patterns anywhere else! Start National Scrapbooking Month off right with a unique paper packet at a bargain price and get your creative juices flowing! 
Also, consider hosting this month: Hostesses receive one paper packet free with qualifying May Gathering sales totals of $400 or more.

*Shipping/handling and tax apply. Not available for purchase at full retail. Offer valid May 1–31, 2013, while supplies last. Qualifying purchases must be current, retail-priced product.
Dates: Offer valid May 1–31, 2013.

To order your very own Dream Pop paper pack, e-mail me at: inallsassiness@gmail.com or shop directly on my website at:  www.ctmh.com/tonyasheridan.  

Sunday, April 14, 2013

It's A Cricut Party!


It’s a Cricut® Party!


Whether you use one Cricut®-cut piece or several, you can create cute party favors and decorations using your Artiste cartridge. Combine your Cricut® pieces with unique stamping techniques and you have projects that will knock your guests’ socks off! Want some recipes and tips for how to make this adorable artwork? Below are instructions for creating two pieces from the “Clearly the Best: How to kiss—with stamps” episode. Combine the Cricut®-cut pieces for these projects with the kissing stamping technique taught in the video, and you have a stellar 3-D item! Want to learn more about the kissing stamping technique? Click here to watch the video.

Recipes and Tips

Party Banner
Stamp set of your choice
X5668 Honey Cardstock
X5764 Pear Cardstock
1272 Cranberry Cardstock
Z2197 Pear Exclusive Inks® Pad
Z2163 White Daisy Exclusive Inks® Pad
Z1751 Baker’s Twine Harvest Assortment
Z1311 1¼" Circle Punch
Cricut® Shapes:
Artiste
1" Shift+3D Object (cut 56, p. 57)

Art Tip! This banner only uses one type of Cricut® shape, but the finished product is still stunning. Use stamp kissing to randomly stamp across the pieces using the stamp set of your choice. Score with the help of the Cricut®-cut score lines on the shape and piece together to create little globes. Tie together with baker’s twine and voila!
Owl Miss You Bag
1385 White Daisy Cardstock
1292 Crystal Blue Cardstock
X5668 Honey Cardstock
X5930 Slate Cardstock
Z2162 Honey Exclusive Inks® Pad
Z2117 Crystal Blue Exclusive Inks® Pad
Z1349 Shimmer Designer Brads
Z1752 Sparkles Clear Assortment
Z1311 1¼" Circle Punch
Twist Ties
Thread
Cricut® Shapes:
Artiste
4½" 3D Object (p. 77)
4½" Shift+3D Object (cut 2, p. 77)
1" Shift+Accent 2 (p. 51)


Art Tip! This project uses many Cricut® shapes and all the pieces coordinate so nicely for an adorable finished product. Use the Artiste assembly booklet to put the bag together and then add the embellishments. The feathers are created with punched circles that are stamped using the kissing technique; however, if you don’t have the circle punch, you can easily make these using the Cricut as well. The eyes were created using Shimmer designer brads, but you can use any large brad or button to create the same look. Finish with the “owl miss you sentiment” for a special touch.
Be sure to share these tips with your customers! The owl bag and party banner are great projects to create at a workshop or club. Share just how wonderful Cricut® shapes can be by showing off these 3-D items with customers at Gatherings or other events. It’s a Cricut® party!

To order the supplies to create this adorable project, simple click here and place your order directly on my website!

Wednesday, January 30, 2013

Aren't the gears so cool? Artiste' special and new class announced!

 
I have received so many e-mails and comments about the Cricut cut gears used in my two most recent layouts, "Polar Roller" and "Holy Derby Batman!" that I have decided to "Gear Up" and offer a special promotion in conjunction with the release of Close To My Heart's Spring/Summer 2013 Idea Book!  So, all you Cricut lovers let's get this Idea Book into Gear!
 
Beginning at 12:01am on February 1, 2013 and continuing through Friday, February 8th at 11:58 PM when you purchase the Artiste' Cricut Cartridge ($112.21 after shipping and tax) I will add $25 of new Close To My Heart product to your order for free! The free product must be selected at the the time that the cartridge is ordered.  Use this to add the fun new Later Sk8er Paper Pack, the Blue and Green Epoxy Bubbles and the coordinating In Gear Stamp set (so you can Cricut cut the gears, then stamp a coordinating image on them) or choose something else that suits your rugged, or sassy, style.  The choice is yours!  You can will be able to view the entire new Idea Book on my website on February 1st at:  www.ctmh.com/tonyasheridan. And if you don't have your very own copy of the Idea Book, I will also add one to your order for free!
 
To take advantage of this awesome "Gear Up" savings, orders should be e-mail directly to me at: inallsassiness@gmail.com.  I will send you an invoice that you can pay with any debit or credit card and then your order will be sent directly to your home.  I can also accept Personal Checks or cash however for non-local customers, I will need to wait for the check to clear before I can ship your order. 
 
So Gear Up and let's get the Idea Book release party started!
 
-------------------------------------------------------------------------------------------------------
 
I have also decided because of the numerous requests that I have received to offer a class for these two layouts that I will offer it in the form of a kit for my clients as a part of my Sassfully Chirping Cricut Class Series.  In the kit, you will receive:
 
J-Pegs with color photos and detailed step-by-step instructions to create both of the layouts.
a set of Blue and Green Epoxy Bubbles ($3.95)
a package of 3-d foam tape (5.95)
Later Sk8er Paper Pack ($9.95)
Later Sk8er My Stickease ($4.95)
pre-cut gears and gear borders
Dimensional Elements Fresh Shapes ($4.95)
Tiny Type Epoxy Alphabet (5.95)
2 Pieces of Outdoor Denim Cardstock ($1.20)
1 piece of bulk Later Sk8er Paper ($0.75)
Shipping and tax.
 
Class kit:  $45.00. 
 
Note:  You will have ample supplies left over to complete at least one more additional layout, cards and or other projects.  Note:  the titles are not included in the cost of the kit.  If you would like your title cut out for you (as in the Batmobile layout), please indicate the size and title when  placing your order and I will be glad to cut it for you and include it in your kit at no additional cost.
 
If you would like to combine this exclusive class kit with the purchase of the Artiste' cartridge promotion above, you may do so and then just pay the $20 difference.
 
Add ons -
Outdoor Denim Exclusive Ink Pad - Participant cost:  $4.00.
Dimensional Elements Monograms Sets - Participant cost:  $2.50 each.


This kit is eligible for my Sassy On-Line Club.
 
For my local customers, I will offering this as the Sassyfully Chirping Cricut Class for February.  The class will be on Saturday, February 23rd from 10-2:30PM in Broadway.  The A light lunch will be served.  To ensure that enough class materials are available, please register by February 10th.  Additional kits may be available after this date however they are not guaranteed.