Showing posts with label Technique Tutorial. Show all posts

Friday, December 3, 2021

Sassy 25 Days of Christmas (2021) - December 3rd. Featuring Red Line Tape.

 Sassy 25 Days of Christmas - December 3rd.  Red Line Tape!

If you have never used Red Line Tape...you are so missing out! It is one of the most awesome adhesives out there!  It works fabulously on ribbons, fabrics, embellishments and even acetate!  So because of that, and being in the festive red and green season...that is my featured product of the day.


--------------------------------------------------------------------------------------------------

Here is one of my current favorite cards created with Red Line Tape.


1.  Stamp the image at the top of the White Cs leaving 1/4" from the top edge.


2.  Cut out the light bulb images that you want to be the shaker elements.  To find the most success, pierce the center of the light bulb and then cut from the underside.  Make sure to leave the outline of the stamped lightbulb visible.


3.  Cut two pieces of acetate to 3" x 3".


4.  Remove the film from one, or both, sides of the acetate.  If this is CTMH acetate, there is film on one side.  If this is Cricut acetate, there is film on both sides.  Set aside.


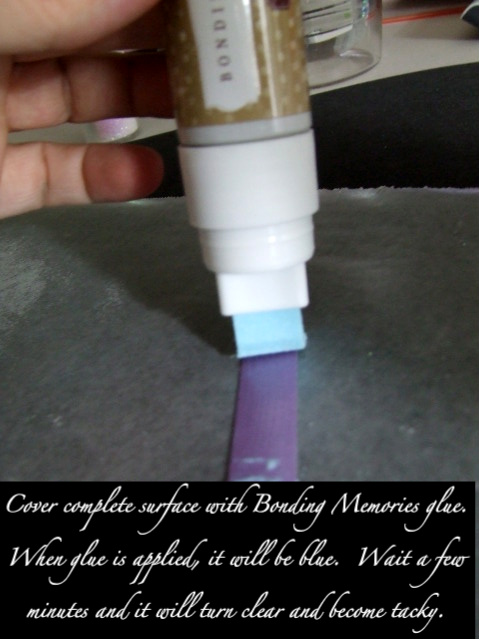
5.  Using Red Line Tape, adhere tape to all four sides of the acetate.


6.  Remove the red film from the Red Line Tape and then attach the acetate piece to the back of the light bulbs.  Make sure when attaching that the Red Line Tape doesn't cover the cut out lightbulbs.  Run your finger across the Red Line tape to make sure it seals to the cardstock.


7.  Using Thin Foam Tape, create a small box around each of the cut out lightbulbs leaving a little wiggle room.  Make sure the boxes connect or are up against each other so that the sequins don't "sneak out".  


8.  Next, using the same height of foam, add additional foam around the edges of the cardstock and in some of the in-between spaces so that the piece lies flat when attached to the card base.


9.  Carefully add red sequins to the one of the windows, a mixture of the red and green to another one, and green in the 3rd.


10.  CAREFULLY remove the film from the foam tape surrounding the sequin boxes.  Tip: use your hand to hold down the base while pulling the film so that the sequins don't pop up and stick to the foam.


11.  Remove the film from the 2nd piece of acetate and attach to the foam tape.


12.  Press down to the seal.


13.  Remove the film from the remaining foam tape and attach the entire piece to the card base.


And there you go!!


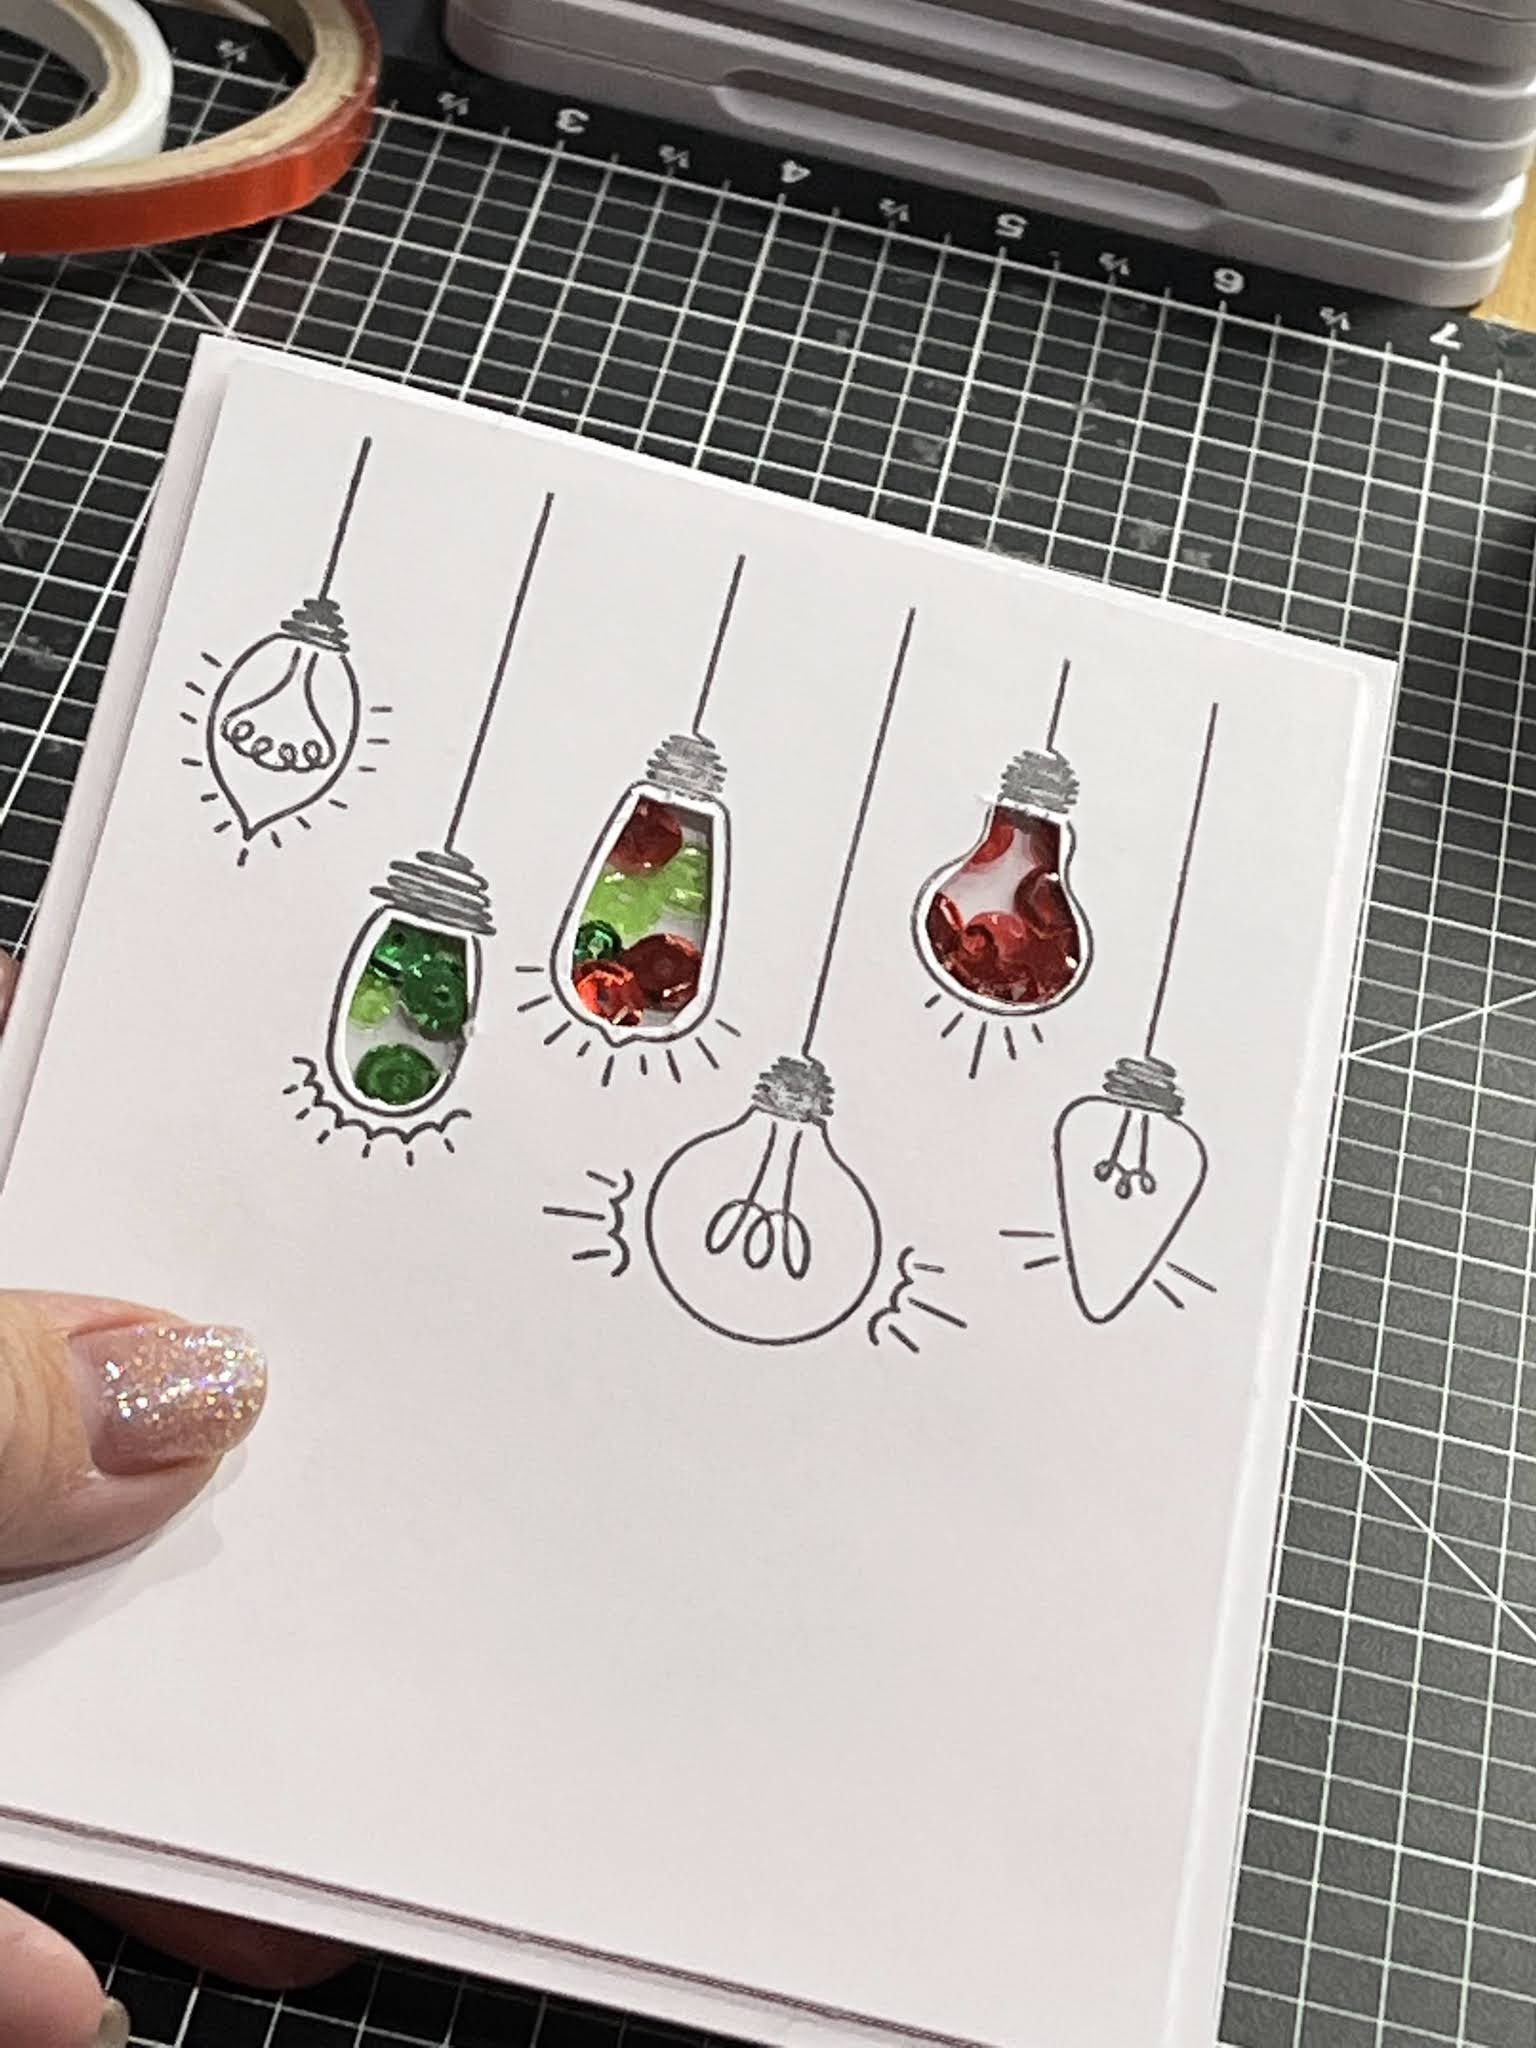
14.  Add title as desired.


Supplies used:  (Z3565) Holiday Loose Sequins, (Z2060) Thin Foam Tape, (Z2805) Black Ink Pad,  November Stamp of the Month, (Z5024) Red Line Tape.
------------------------------------------------------------------------------------------------------------
Back by request, welcome to the Sassy 25 Days of Christmas!  Each day, from now until Christmas, I will be sharing a special of some sort.  Some might be product, other might be class kits, but either way, this is a great way to celebrate your love of scrapbooking and paper crafting all December long!  

The days specials will be posted each day around 3PM and will be only good until 2:59PM on the following day.  There is be a special link in my www.inallsassiness.com shop for that days special.  The special price is the final price - there is nothing additional for tax.  Visit here on my blog, or my shop each day to check out the special and order the ones that you like!  The shipping will be set to pick up so that shipping charges are not assessed.

During the week between Christmas and New Years, I will be sending out all orders from the collective 25 days.  If shipping is needed, you will then be sent an invoice for the actual shipping to you (for most customers this is right around $10 per box) although depending on the weight, it might be a little more.  Once you pay the invoice on a secure site, your box of all your happiness will be mailed to you.

Anyone who takes advantage of 5 of the 25 days will receive a special gift in their box.

Additionally, all VIP's that take of advantage of 5 of the 25 days will receive a free pack of the Smitten Paper with Sticker sheet with their box!  VIP's will also receive VIP Credit for the purchase price of their special orders all month.

Until tomorrow,

Sassyfully yours,

Tonya

Sunday, September 2, 2012

Enhance your layout by adding Flip-Flaps

Flip Flaps are a great way to add that special touch to your layouts!  You can use them to add pictures, hidden journaling, store special documents (i.e. a ticket stub to your favorite Broadway Musical or rock concert) or just for fun!  They protect the contents just as a page protector would and allow your treasured item to stay clear from fingerprints, smudges, and handling. 

The Flip Flaps are available exclusively though Close To My Heart and are available in four different sets: (click the link to see the flaps, or to order yours today)
 4" x 6" (15 quantity to a package) $3.95
 6" x 6" (10 quantity to a package) $4.95
 12" assortment (two 4" x 12", two 8" x 12" and four 6" x 12") $4.95
 Small assortment (four each of:  4" x 4", 3" x 4", 3" x 3" and 2" x 2").  $3.95

The how-to-s on attaching Flip Flaps.
 
1.  Insert photograph into sleeve.  If using a photo back and front, adhere these two together so that they don't slide exposing the backside.  Fold the flap part both ways a few times so that the flap turns better.  The rough side of the adhesive film strip (the white part) is the side that that is sticky.

 
2.  From the non-rough side, cut the adhesive part of the film where you can see the adhesive stops. This can be distinguished as the adhesive appears to have a yellow shading.  Cut immediately to the right of the yellow shading.
 
 
3.  Pull the film off the adhesive strip.  Be careful not to get fingerprints on the sticky strip as they will show through.

 
4.  Determine where the Flip Flap will go.  Remember that the flip-flap goes on TOP of the page protector.  Position with the adhesive flap folded down (flip flap covers the adhesive strip) into the desired space and adhere into place.  Rub finger across to ensure a secure adhesion.

 
5.  Open the flap and rub finger across the plastic seam to again secure adhesion from the inside.


Artwork featuring the Flip Flaps:  click the link to see the artwork.

Avonlea (4" x 6") *
Mayberry (4" x 6", 4" x 12", 6" x 12", 8" x 12") *
Clementine (4" x 6", 4" x 4" and 3" x 4") *
Veranda (4" x 6", 6" x 6" and 4" x 6") *
 Florentine (4" x 6" - Cut down)

*these layouts are available as Kits.  E-mail me at: inallsassiness@gmail.com for ordering details.

Monday, July 4, 2011

Red, white and blue on paper!

Happy Fourth of July! This is a card that I made for my Uncle Wayne who has a July birthday. Don't worry...I don't think he reads my blog. I used the same stamping techniques as I did on my layout with Gabriel and the firetruck. I think it turned out quite festive. The photographs, not so much.


To create, this background, start with the largest stamp. Stamp once as a first generation stamping and then stamp again for a lighter, second generation stamping. Repeat with the second color. Then, move on to the next largest stamp.


Continue random stamping until the space if filled with images. Make a note to stamp some of the images off the page onto scrap paper so that it looks more like a piece of patterned paper.


Next, trim the paper down to the desired size. If dividing, divide on the trimmer so that the paper seems to continue on.


Create the card and you are done!


This particular card design is Framed Message from Originals. Completed size is: 5" x 7". My Ultimate Scrapbooking Challenge: 151 cards completed. 57 still to go.


Sunday, March 20, 2011

Creating Paper Flowers

As promised, here is the tutorial for creating the paper flowers I used in my layout and altered art that I shared earlier this week. Would love to see what you create with this technique. The technique was originally found in the 2010 Summer Idea Book. I expanded the steps to simplify, and better explain, the steps.


Have a great weekend!

Wednesday, October 20, 2010

Blinging up some Halloween fun!

This is my tweaked version of the Hooligans Workshop To Go Layout. I switched some of the patterns out, and used pumpkin stamps verses the little monsters which worked so much better with my pictures. The workshop guide taught how to add glitter to a strip of paper which is so much better than paying $2 a sheet at a local craft store! I was so fascinated with this technique, that I put together a step by step tutorial to help those who would also like to try it! For we all know, one can never have enough bling!


Left Layout:

Right Side:
To create the pumpkin accents:


To create Glitter Strips:


Supplies used: Hooligans Level 2 Paper Pack; Prisma Glitter; Bonding Memories Glue & Glue Pen; Licorice Opaques; Featured Colors: White Daisy, Black, Sunset, Gypsy; All Out Adventure Rub-ons; Color Ready Alphabet;