Showing posts with label Cricut Art Philosophy. Show all posts

Sunday, November 24, 2013

Almost down for the count...

This is a project I have wanted to create since the introduction of Close To My Heart's Holiday Gift Guide in October:  a countdown calendar.  Tonight I finally finished one for my niece Addison.  She is three and 1/2 so I made her boxes a little bigger than CTMH's original artwork so there was a little more room for the special Advent "happies" that she will be able to discover each day.  Each bag is attached to a wire on the frame.  Once Christmas is over, her mom can take the little bags off the frames and they can use it to hang Addison's special artwork etc. Check back during the month of December and follow my recaps of each day of Advent's surprises!  

Tomorrow I will share the second style I made for some special individuals in my children's lives!  I will also post more details on the how-to's of creating the calendar for those who would like to create their own!


Friday, October 25, 2013

Smitten By You...my take.

Tonight I want to share a labor of love for me from this week.  Our family had a rough week, so creating, rather figuring out "How They Did That" as I like to say, was therapeutic for me.  So, that being said, this layout is featured on Jeanette Lynton's blog (www.jeanettelynton.com) and was featured in a You Tube Video that Monica Wohing created.  To create my dual purpose class of  How Did They Do That? and Sassfully Chriping Cricut Class I created my "take" on the layout and my end result was very similar to the original.   I made a few minor details changes to better fit my needs: I changed the accent color from Pear to Sky, a few accents from wood to silver metals, flat flowers verses thick roses and the patterned paper to my own Cricut creation.  


Pre-cut kits are available for this layout. The Class Kits are available in three price points:  Basic, Better, and Best!  The Basic kit includes: detailed step by step instructions with a color photo, 10 pieces of cardstock to complete the layout (all pre-cut), bulk Silver Shimmer Tape, Black and Grey Sparkle Assortment and Slate Twist Ties and is available for $12.00.  The Better kit includes the Z1887 My Best Day Ever Assortment and is $17.00 and the Best kit also includes a full pack of  Z1883 Base and Bling Floral Accents and 1/2 package of Z1882 Base and Bling Words and is $25.00.

The stamp sets used are: D1559 Geometric Backgrounds, B1416 Keyboard Uppercase as well as all of the stamp sets included in the Artbooking Cricut Cartridge.  Both the Artiste' and Art Philosophy Cartridges were used as well.  Featured colors:  Smoothie, Slate, Sky, White Daisy and Whisper.

To purchase a kit for this layout, e-mail me at: inallsassiness@gmail.com.  Shipping, if applicable, is $8.00 but can be combined with other In All Sassiness Design Kits.

Wednesday, October 23, 2013

A BabyCakes of a Baby Shower!

This past weekend my mom and I partnered with my sister in law's mom and sisters to give her a baby shower.  She is due in just a few weeks (yes, there is a very excited Auntie here!!) and we wanted to make the afternoon something special.  Mom and I were provided the decorations.  We chose to use Close To My Heart's Babycakes for the theme which featured the colors of Buttercup, Chocolate and Sunset which were perfect to go with the time of year!

This is the invitation that I made.  I used the Babycakes paper collection, the Bronze Shimmer Tape (LOVE that stuff!!  as you will see as you read further down!), the Spinner Cards, the Scallop Border Punch, Mocha Opaque Pearls and my Artbooking Cricut Cartridge.  The little circle spins so on one side it said "It's a boy" and on the other side it said "It's a baby shower".


I fell in love with the little giraffe on the invitations so I decided to create a wreath for the door with this little guy.  I used the Artiste' Cricut Cartridge for the pinwheel and the bow and the Artbooking for the Giraffe.  And yes, that Bronze Shimmer Tape that I mentioned...that is what I used for the wreath (on a Styrofoam wreath form). We couldn't use any form of hooks so my Sis in law and I strung the wreath by a long piece of orange tulle.  As our family had a pretty rough day on Saturday, preparing and wrapping the wreath was a great stress reliever for me...but I will say that it took HOURS!  


These were the favors that we created.  All of the little candy boxes were cut with the Cricut Craft room with many thanks to my friend Theresa for sharing the file!  The tubes are filled with Recess Pieces.  For the children, I created a bag-tag with the Babycakes paper and the Art Philosophy Cricut Cartridge.  The edges were scalloped but you can't really see that in the picture.


For the utensil holders, I used the Kraft Containers and the Canvas (now-replaced with My Stickease) My Stickease.  They have cute little lids too so once I got home I filled one container with q-tips, one with Cotton Balls, and one with Misc. little baby products and then will give them back to my Sister in Law for her nursery.  This was a super easy project that really added to the dinner table.


For the corsage, my sister in law is not fond of regular corsages (nor am I), so I used CTMH's new Base and Bling Collection and created a wristlet for her out of the necklace. I added a handmade rose to each of the medallions.  We did find that although there is a super sticky that is made for the medallion that hot glue worked better.


Here is what the wristlet looked like on Leah's wrist.  

Ignore my brother's "mean" face in this picture...they were being silly.  But I wanted to show you the headband that I made for my daughter Abby.  She truly thought she was the princess of the party for the day!  She looked so cute with it!  The headband was made with the Base and Bling Headband. I cut various sized roses, created the roses and then attached them to the bases.  Again, doing it again, I would most definitely use hot glue verses the sticky circles.  I also made one for my niece Addison but she wasn't able to come so now she has one as well!


Not wanting the Grandmother's to be left out, I created these Grandmother's corsages with my Cricut too.  I used the center medallion from the Spinner Card for strength; covered that with the Bronze Shimmer tape and attached Shimmer ribbons.  The Buttercup Pinwheel I create with my Cricut as well as the roses (all from Artiste').  I then hot glued a pin to the back so they could wear the corsage.


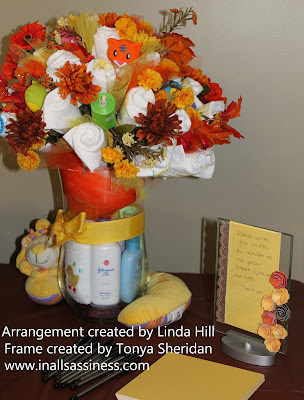
This is the beautiful diaper bouquet that my mom made as a centerpiece.  She did such an awesome job! 
 It is too pretty to take a part!  To the right was a little sign that I made with instructions for the participants to write a wish for Xander for his Wish Book.  Once the shower was over, I took out the yellow paper and now Mike and Leah can add a vertical photograph.

This is the little Wish Book that I created for all of our wishes for Xander.

And finally, you now the saying labor of love?  Well, this is my banner of love!  Let me tell you it was filled with much love in creation considering the HOURS that it took to cut out, arrange and put together!  Each piece is layered with at least three layers of foam tape.  But the hours were well spent and I think both Mike and Leah liked it.  It was a little challenging to hand as again we were in a building where we couldn't use hooks, but all in all it was the thought that mattered.

And that was it.  Now to just wait, and wait for little Mr. Xander to arrive!  That is the hard part!  As I told my cousin Rita at the shower, I truly believe there is nothing better in this world (besides being a Mom) that being an Auntie!  And this Auntie cannot hardly wait for Xander!  Of course, Rita stated that being a Grandma is pretty awesome too!  


Thursday, October 10, 2013

Introducing... the October Stamp of the Month Scandinavian Wishes!

October's Stamp of the Month Scandinavian Wishes is now available for just $5 with a qualifying $50 purchase.  The stamp set is compatible with the Close To My Heart's exclusive Art Philosophy Cricut Cartridge and has images that are perfect for both Christmas and all the year through.  


These are cards that I created with this cute stamp set.  I will be teaching a class on Saturday afternoon at my Scrap Pink Crop.  The Crop will be held at Camp Overlook in the Blessings Lodge.  If you are interested in attending, simply e-mail at: inallsassiness@gmail.com. The class is from 1:30PM - 3:00PM,  You are welcome to come early and share lunch with us for $5 more.  The lunch will be a Taco Lunch with all the Fixin's.  Lunch will be served at 12:30PM.


inspired by a sister consultant on Pinterest.


Colors featured:  Cocoa, New England Ivy, Cranberry, Colonial White.
Supplies used:  Scallop Border Punch, Art Philosophy Cricut Cartridge, Red Shimmer Tape,

Sunday, July 15, 2012

Introducing the New Artiste Cricut Cartridge Pre-Order


Can't wait to receive your very own exclusive Close To My Heart Artiste Cricut Cartridge?  If so, read below for an amazing Pre-Order opportunity!

First, a little about this amazing cartridge!  The new Cricut Artiste collection takes your creativity over the top!  With 700 images, the cartridge features themed projects, interactive cards, awards and more.  From robots to spooks to weddings and Valentines, your cupcake liners, invitations, and party favors will coordinate and quickly come together for any celebration!  Cutting and assembling the many 3-d items is a snap using the project reference chart and separate, step by step assembly book.  We also have videos on your Consultant's online Business Address so you can watch the Artiste creation process in living color (click Ideas and Inspiration).
When you purchase the Cricut Artiste collection, you'll get the cartridge plus three new coordinating D-sized stamp sets and three 12" x 9" sheets of coordinating Dimensional Elements shapes for maximum mixing, matching and wowing!

The Artiste collection is a great complement to our must-have Cricut Art Philospohy collection.

To recap:  it includes:  1 Cartridge (700 Images: Themed Projects, Cards, Font, Shapes,and 3-d Items), 3 My Acrylic D Sized Stamp Sets, and 3 12” x 9” Dimensional Elements in coordinating shapes. 
The set retails for $99.00.  With shipping and tax, the total for this collection is:  $112.
By purchasing this set, you also qualify for the August Stamp of the Month (shown below) for $5 ($6.75 after shipping and tax).  This combined offered is available for $118.75.
Click here to see flyer with complete stamp set.

Sassy Artiste Pre-Order Special: (offer is exclusive to Independent Consultant, Tonya Sheridan)
When you pre-order you will also receive a bonus Cricut Compatible B Stamp set and the first of my new monthly Sassyfully Chirping Cricut Class Kits free (valued at $25.00).  Step by Step, colored,  instructions will be e-mailed to you as well as a U-Tube link where you can follow along with the class virtually.  You will also receive a coupon for free shipping on a future Sassyfully Chirping Cricut Class Kit.  Total pre-order value:  $33.00. 
In addition, all customers who purchase (pre-order or not) will receive 6 months of an exclusive newsletter just for them that is filled with Artiste projects and their very own new Fall 2012 Idea Book mailed directly to their home for free!  ($3.95 value).
Be one of the first!  AND, the first 3 customers to pre-order and pre-pay for the Sassy Artiste Bundle will earn the opportunity to  divide all of the hostess rewards from my pre-order special!  So you could easily earn quite a great deal of free loot!
See flyer here.

Note:  To qualify for the pre-order special, orders must be placed by July 30, 2012.  All pre-orders will be placed when they are available to the public on August 1, 2012.  

Sassy Artiste Pre-Order Bundle

Monday, November 28, 2011

Typeset and Art Philosophy meet.

My finished Typeset wtg.

Close To My Heart's Typeset wtg.

I want to share one of the recent Workshop To Go's that I did with my club:  Typeset.  I tweaked the original layout to work with the colors I desired and tweaked a few of the other elements as well, but that is the freedom of the workshop to go program:  the program gives you the how-to knowledge, the tools, measurements etc. and then you can alter the layout to fit your style or photo-needs.  Perfectly!  When we add in the Art Philosophy cartridge, there is even more of a wow-factor to be found. 

Here, we used the Art Philosophy cartridge to cut out the stars (then used a cool new technique to 3-d them that was featured in the wtg guide), we also used the cartridge to simplify things and cut the circles for the title and finally, we used the cartridge to cut the awesome bracket shape (which is layered if you haven't noticed) that the focal point picture is in.  Love, love, love the possibilities that this brings to my scrapbooking.  And if you missed out on the class, no fears:  you can still purchase the Typeset WTG through me or on my website.

Don't have your own Art Philosophy Cartridge yet?  There is still time to take advantage of my Small Business Saturday special.  This is a promotion that I am offering, not Close To My Heart, so if you aren't on my mailing list, and didn't receive the details, send me an e-mail at:  inallsassiness@gmail.com I will send your the info!  Also, remember that the Company specials will end on Wednesday!  So time is running out to purchase the Cherish the Day, November Stamp of the Month ($5 with a $50 purchase) and the Holiday Wishes Stamp Special ($5 with a $25 stamp purchase.

Sunday, November 6, 2011

Sassfully Chirping moment...

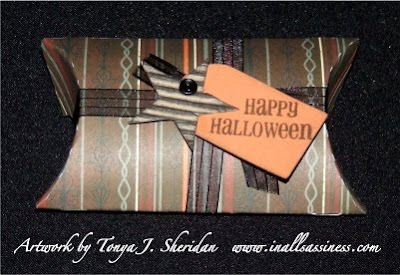
Several weeks ago, before I ended up getting run-down and sick, I volunteered to make little treat bags for the Halloween party at my church. My plan was to use the Art Philosophy cartridge and make them absolutely adorable.  And then I got sick.  So, at the last minute I was trying to cut out the 50 little bags and cute-en them up.  I used a pad of Halloween paper that I had left over from a previous projects and Jay and I cut away.  Once the bags were put together, I went back and added some little accents that complimented my paper and my parents helped me fill them an hour before the party.  Talk about wheew!  My one lesson that I learned was to make sure and use very strong adhesive so that when stuffed to capacity (which we did...lol) the bags don't pop at the seams.  This ended up being a great way to use up some extra supplies that were in my studio that I might not have otherwise used.  And, I am happy to report, they were a huge success at the party!  For Art Philosophy users:  I cut the bag at 5 1/2" so that I could successfully get two from each piece of paper. 

Thursday, November 3, 2011

Gone Batty!


Batty?  Yes, that is what I would call this little idea of mine!  A fellow consultant posted this adorable bat box on our boards, and I thought...oh how cute!  They looked super simple so I told my son we could make them for his class for Halloween treats!  I tweaked the design a little but they seemed to take forever to make...I was dreaming of bats.  But in the end, Gabriel was super excited to share them with his friends at school and oh, so, proud of them... which of course made the efforts worth it! 

So, how were they made?  I used the Art Philosophy Cricut Cartridge to cut the french fry box.  My mom free-handed a pattern for the wings which I traced onto Black Cardstock and cut out.  The eyes are google-eyes and the mouth was drawn with a white paint pen.  Because I knew these were going to be handled and loved by 5 year olds and had to make it home on the buses, I used a red-lined tape which is incredibly strong.  I applied the tape for both seams of the boxes and then to attach the wings to the back of the container.  For the final touch, I added candy in the bags and tied a bow.

Want to create your own little treat boxes?  Click here to order your very own Art Philosophy cartridge!

Monday, September 26, 2011

Wonderland...meets Art Philosophy & icing on top!

Have I mentioned how very much I love my Art Philosophy Cricut Cartridge?? It has taken my layouts to the next level without the addition of more precious time! And everything so perfectly compliments one another! This layout was created using the Wonderland Paper Collection, the Wonderland Icing Overlays, and of course my Art Philosophy cartridge!


Layout Design is Main Frame - Perfect Square.

Layout Design is Triple Play - Foundation.


The journaling reads:  "Wonderful you … that is definitely how I feel about you!  During our “little” blizzard the snow was up to your knees in a low spot and falling so very hard!  You loved it!  I will never forget how happy you looked as you watched the snow falling…you were covered with flakes…and a few even caught your eyelashes!  You laughed and laughed.  What a wonderful smile!  You even tried to catch a few flakes on your tongue!   I loved how you put up with Mommy trying to capture the picturesque moment for our family Christmas card…you were such a wonderful  little trooper…and when Mommy got her perfect picture,  you wanted to me to keep taking your picture!  When we returned inside, we sealed the day with hot cocoa and marshmallows!  These are the moments I will always treasure!  December 2009."

Want to create this layout for yourself?  Join me tomorrow night at the Hill's in Broadway at 6PM.  I do have extra kits available!  For quicker completion, please bring your Cricut mat!  Just e-mail me to register!  I can also teach this layout as a private workshop for you and your friends!

My Ultimate Scrapbooking Challenge:  73 1/2 completed.  76 1/2 to go. 

Friday, September 9, 2011

Wicked Open Workshop this Sunday!

Come and create until your wishes content with the Wicked Stamp of the Month from August! Don't have one yet? Don't worry, you didn't miss out! I have a few extras available...$17.95 retail or $5 with a $50 purchase (plus shipping and tax). You can create they "sassy" witch layout, substitute the sassy black cat, or create it your own way...or, why not create must-have Halloween cards or a Treat box? Many samples available for your inspiration and partial-guidance will also be available. Purchasing a Level 2 Mischief paper pack and either the Mischief rub-ons or felt shapes is your workshop fee for the afternoon! So join me and create your own Wicked Mischief! Kits will also be available from previous Wicked and Mischief classes.


Monday, September 5, 2011

Art Philosophy at it's spookiest!

Sassfully Chirping class debuts! and it is spooky! very cool! This is a class I am teaching at my fall crops. It is filled with Art Philosophy cut images, a touch of sanding/distressing and lots of spooks! Want a private session with you, me and the Cricut or you and a few minutes? Just e-mail me and we will get it set up! The class cost is $15 or free when you purchase the new Art Philosophy exclusive cartridge from me! Not sure yet, take the class, pay the class fee and if you decide you want to order the cartridge within 30 days of the class, the class fees that you paid will be deducted from your cartridge purchase!


You will note, that the left side is an altered version of a layout that is in the Fall Idea Book. I designed the right side to compliment Close To My Heart's page.


How to tips: Inking the image.
This Cricut shape is incredibly intricate and because of the white core of our papers, in some spots, you can see a little of the white core. To enhance the layout, and cover the white spaces, take a sponge and lightly sponge Black ink over the patterned paper. I chose the sponge over a dauber as it gives a lighter inking and subtle is what I was going for.


How to tips: Applying the adhesive.

Flip your cut image to the back side. Place on scrap paper. Gently apply removable adhesive to the back side. Lift image off of scrap paper and adhesive should only be on the image itself.


How to tip: Piercing and Sewing

When using the new rule (which is awesome by the way!), use the piercer in alignment to the holes in the ruler and make a small hole. Reinforce the hole with the piecing tool after the ruler is out of the way.