Showing posts with label Wood Grain. Show all posts

Sunday, August 7, 2022

Strategies of Design Space cutting

Design Space in Cricut can be tricky but the more that you work with it, the easier tasks become and for me much of my learnings come from trial and error.

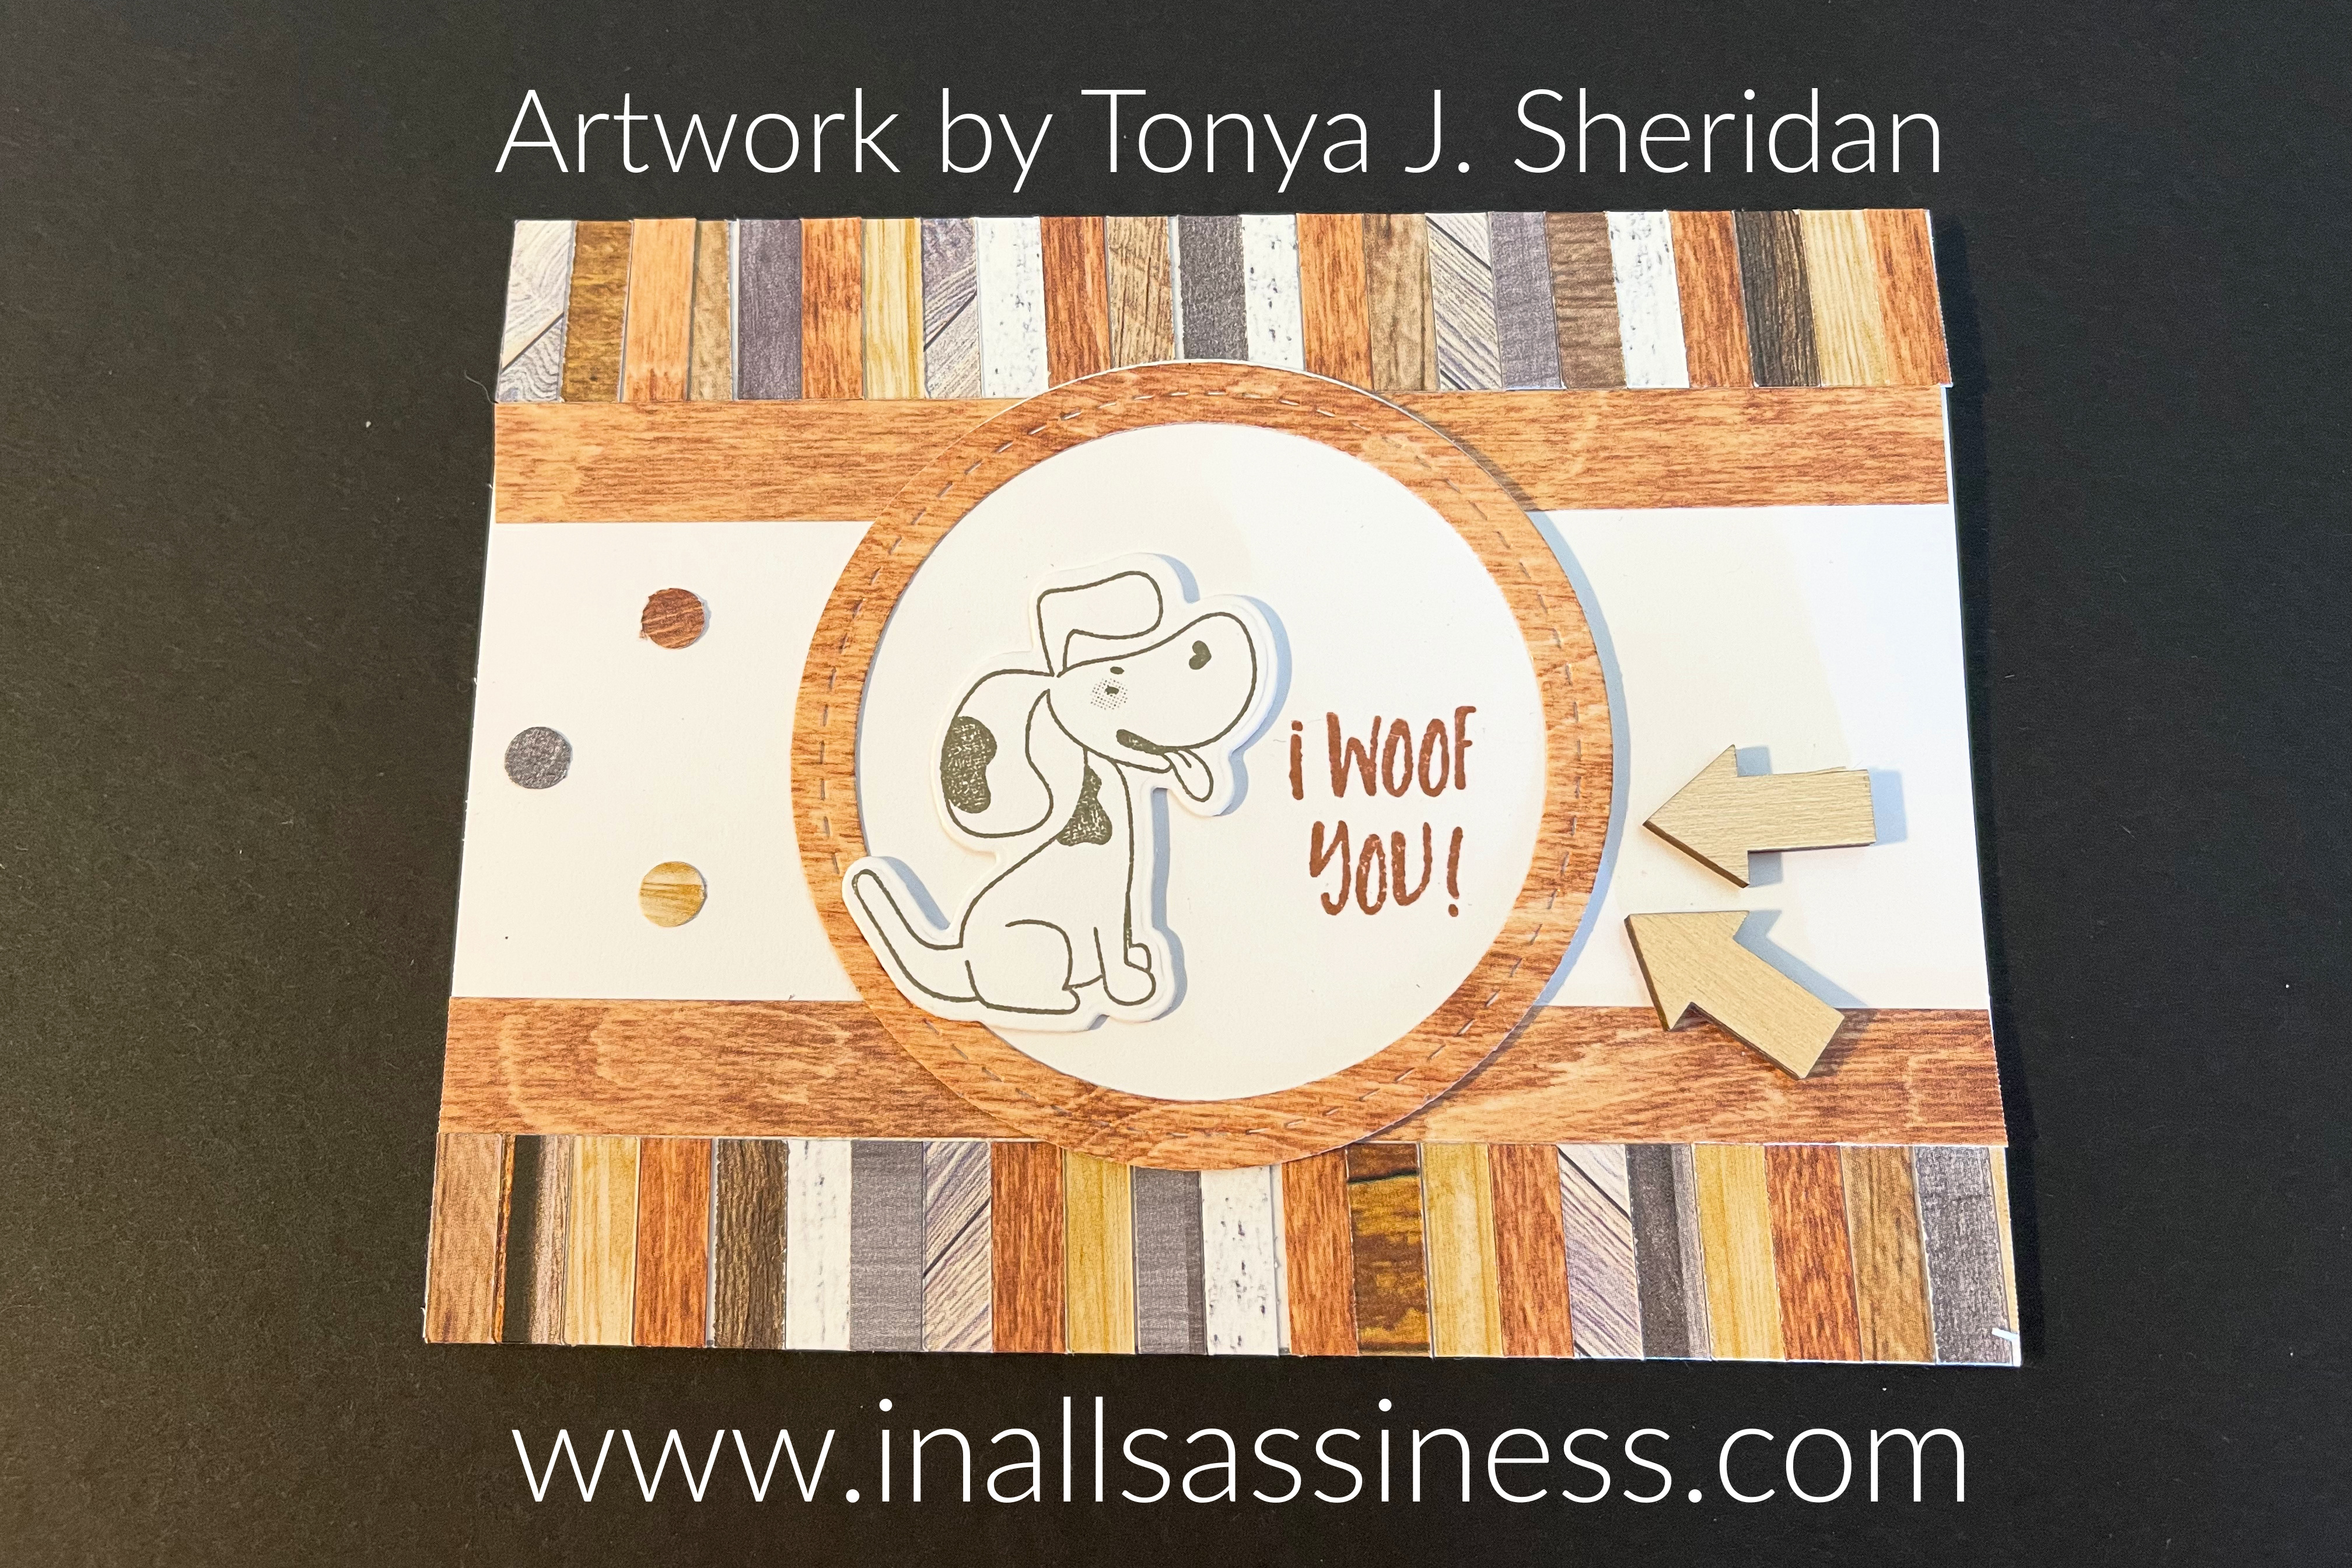
I am a huge fan of wood grain paper - especially the patterns in the 2021-2022 Paper Packet that is retiring at the end of the month (or when supplies are depleted).  With this particular set of patterns, I have especially found joy creating layouts for pets. Why wood grain you might ask?  Well, first because the patterns are neutral and lend their way for many color combinations in the photographs and second- the colors of the wood grains themselves work so well with the many shades of pet's fur.

So with that being said, one struggle that I have is that there are often lines across the wood grain patterns that I might not want to go through whatever I am cutting.  And, now I have a solution to be able to cut around those lines!

Let me explain. 

Here is the wood grain pattern that I chose to work with.  You will note that there are indeed lines in the paper.  When you place the paper on the Cricut Mat, you can then use the measurements on the left side of the mat to guide you in Design Space.


When strategizing my cuts in Design Space, I can manipulate the images around those lines.  So for i.e., in this sheet, I see that my image is larger than 1" so it will not fit above that first line.  I can then move the image down below the 1 1/2" mark, and still above the 4" mark and the image will cut without having the line move through the image.  

For this cut, I know that Cricut will not cut larger than an 11 1/2" x 11 1/2" space so I created a box, measured it to 11 1/2" x 11 1/2".  I ensured that all of my images were aligned within that box, deleted the box and attached my images all together that way they stayed in the position that I placed them in and would align with the lines of my wood grain.  This is how my screen looks in Design Space.


And here is what my cuts look like after being removed from the Cricut mat - you can see how the wood grain line is in between all of the cuts.


Fun right??  So, now that I have explained how to create these cuts, here is the layout that I created using this design element.  To see a larger picture, click on the image and it will open up with a larger view in a new window.


And here are a few pictures of the details:


This layout kit is now available in my shop.  You can find out more details by clicking here.

Supplies used:  (X8028) Wood Grain Paper Pack, (X6047) Black cs, (1385) White Daisy cs, (Z5022) Adhesive Paper, (Z6018) Wood Arrows, (Z2060) Thin Foam Tape, (Z3372) Adhesive Runner, (Z341) Mini-Glue Dots.  Supplies that are current can be ordered here on my CTMH website.

Sassfully yours, 
Tonya


Thursday, June 2, 2022

Stamptacular with an Artistic Flair!


 As we enter the month of June, Close to My Heart also begins the month-long event of Stamptacular!!  What does this mean?  A month of deep savings on our signature acrylic stamps and even some stamps and thin cut paired sets!  There are even FIVE exclusive stamps that are just available during this sale.  You can see all that there is offer by clicking here.  

In addition to the awesome sales that the company is offering, I will also be sharing artwork all month featuring some of the stamps that are on sale!  I have created a special section in my shop (www.inallsassiness.com) where the featured artwork from the Stamptacular with an Artistic Flair can be ordered.  Many of these will be limited in quantity, so if you love them, and want to order them, don't delay.  I have set this option up so that you can order the art that speaks to you all month long, and then I will ship them out (or have available for pick up) the first week in July - with only one shipping fee.  Bonus right??  Because of such, the shipment option has been set to "pick up".  For those needing shipping, I will invoice you the shipping charges when I mail out your boxes.

So, let's start off the month with one of my favorites!  Ok, well actually two:  "You're Pawsome" (B1752 for the stamp set and Z3974 for the stamp and thin cuts) and "I Woof You" (B1753 for the stamp set and Z3975 for the stamp and thin cuts).  I absolutely adore these two sets!  I have used them over and over again all year long and just can't get enough of their cuteness!  In my book, they are a must have!  You can order both of these here.  


Here is some of the artwork that I have created with these two cuties!  


These projects can be found in my shop by clicking here.

Have an artful day!!

Sassfully yours,
Tonya

Tuesday, October 19, 2021

Angel Wood Grain Cards

Tonight I wanted to share the cards we created in our card club this morning.  We miced the wood grain paper, along with our new Slimline Thin Cuts, a little bit of shaker magic and Close To My Heart's new Peace & Joy Stamp Set with Thin Cuts.  I am so delighted with how the various elements all complimented each other!


One of the things that I love about the new Slimline Dies is that you can cut a piece for one card, and use the remnants in a different card - there are just so many options!

fancy fold Card


Note how well the wooden shapes compliment the wood grain paper?  Me too!  I love this combination together!  And just a dab of the Dual Tip Permanent Glue under the shapes and you are good to go!

horizontal praying angel card


Simplicity!  This card is a simple layering of the various wood grain papers and the shapes.  I believe the simplicity speaks volumes.  My favorite element is the little wooden prayer" bubble.  So cute!

horizontal heart angels card


This card features the "cut out" circles from the Slimline Thin Cut inset in the White Daisy cutting of the same Thin Cut.  Although not really visible in the card, the outer angels are popped up with regular Foam Tape and the inner angels are popped up with Thin Foam Tape which creates more depth within the card.

vertical flying angel shaker card


This card is a shaker card with the hearts moving under the shaker element.  The hearts have more height than sequins so they don't move very well but look so fun and yet elegant as well from underneath the angels.

Supplies used:  (Z4103) Slimline Shaker Window Thin Cut, (Z4105) Circle Windows Slimline Thin Cuts, (X8028) Wood Grain Paper, (1385) White Daisy cs, (Z6012) Wood Hearts, (Z5022) Adhesive Paper, (Z5019) Slimline Shaker Acetate & Foam, (Z2805) Black Exclusive Ink Pad, (Z4321) Peace & Joy Stamp & Thin Cut, (X257) Slimline Cards & Envelopes, (X254) Value Cards & Envelopes, (Z2060) Thin Foam Tape, (Z3372) Adhesive Runner, (Z3340) Dual Tip Permanent Glue Pen.  All of the current supplies may be purchased at: www.tonyasheridan.ctmh.com.  

Card Kits, may be purchased at: www.inallsassiness.com.

Sassfully yours,
Tonya

Friday, October 8, 2021

Falling For Fall Layout

Fall is upon us!  The brisk breeze, the falling leaves, the breathtaking colors!  I love every moment of it!  This layout was created to capture those precious moments.  The overlay with cut from Close To My Hearts digital art file Pumpkin Spice (see below for the images included in this file).

To see more details, click on the layout and it will open in a larger window.

details of the leaf and overlay


Our new Wooden Arrows were used when creating this layout.  The packs include a variety of arrows in different shapes and sizes.  The arrows were inked with the Harbour Exclusive Ink.  

Although not included in the kit (but can be added to the kit), the wooden letters were used for the title.  They too were inked with Harbour ink.  These can be added to your kit, should you desire.  Here is a picture of the letter assortment that are included for those who want to design a title -- this allows you to determine if you need one or two sets of the alphas.  My kits do include a glitter cut version of the title I chose.


Close To My Heart's digital Art Pumpkin Spice images:

Supplies used:  (X7272F) Pumpkin Spice Digital Art, (Z6018) Wood Arrows, (X8028) Woodgrain Paper Pack, (X6062) Harbour cs, (X6044) Peach cs, (X6063) Papaya cs, (X7272S) Pumpkin Spice Paper Pack, (Z6533) Harbour Exclusive Ink Pad, optional (Z6027) - Wooden Alphabet, (Z2542) Harbour Glitter Paper, (Z2543) Papaya Glitter Paper, (Z5017) Rose Gold Shimmer Trim, (Z2060) Thin 3-d Foam tape, (Z3341) Thin 3-d Foam Dots, ((Z3372) Adhesive Runner, (Z341) Mini Glue Dots, (Z3340) Dual Tip Permanent Glue Pen.   All of the current items may be purchased on my Close To My Heart website at: www.tonyasheridan.ctmh.com.

The kit can be ordered in my shop at: www.inallsassiness.com.

Sassfully yours,
Tonya


Tuesday, June 29, 2021

Glitter Leaves & Flip Flap Layout

Originally created, and shared back in the fall, I just realized that I never posted this layout here on my blog, and as it is a true gem to my heart, I wanted to make sure that I did so.

This layout pairs our wood grain papers with the "autumn" color palette both in our cs and in our glitter paper.  I used both the Rose Gold Loose Sequins and the Rose Gold Liquid Pearls to really pop the shades of Desert Rose.


Flip flaps open


Each leaf, and its vein, were hand cut using the Thin Cuts for a sheer touch of elegance.  They are then layered, some popped up with Thin Foam tape, to create the wreath on the left page and then to carry over the design element to the right page with the border.

details of leaves


Unlike many of my layouts, and page designs, this layout was designed, and created just for me: to work with my personal pictures and to tell a story that needed to be remembered by my children.  It was a truly personal and special act of remembrance for us.  Because of such, we had much journaling and that was shared under the flip flap.

But then, once I finished my layout, I loved it so much, and had so many compliments, that I decided to make it into a kit.  My title, of course, is custom, so the kit includes 1/2 sheets of the coordinating cardstock so that you can create your own titles.  It also includes cardstock for the mats in the case that you want to change your picture sizes.  All of the leaves (the very time consuming part of this layout) have been pre-cut for you so you can just have the artsy fun of creating the layout.

This kit is available in my shop at: www.inallsassiness.com.

Supplies used: (Z3692) Leaf Thin Cuts, (Z3231) 4” x 6” Flip Flaps, (Z3232) 5” x 7” Flip Flaps, (X8017) Woodgrain paper, (Z4065) Rose Gold Loose Sequins, (X5951) Espresso cs, (X6044) Peach cs, (X6055) Desert Rose cs, (X6049) Scarlet cs, (Z3842) Desert Rose Glitter Paper, (Z3839) Scarlet Glitter Paper, (Z3793) Rose Gold Liquid Pearls, (Z2060) Thin 3-d Foam tape, (Z341) Thin 3-d Foam Dots, ((Z3372) Adhesive Runner, (Z341) Mini Glue Dots, (Z3340) Dual Tip Permanent Glue Pen. All of the current items may be purchased on my Close To My Heart website at: www.tonyasheridan.ctmh.com.

Sassfully yours,

Tonya 

Sunday, January 24, 2021

SJLS #15 Wood grain tree Layout

Sassy January Layout Series #15

Welcome to the 15th segment in a series of 31 that will be shared during the month of January.  
Click here to find out about the Sassy January Layout Series.  

This layout was created for my Joys of the Seasons event in November.  I completely adore it!  I love the intricacy of the trees as well as the flourishes and title.  Collectively, they create a sense of elegance.  To gain a larger view of the layout, simply click on the photo and it will open up in a new window. 

I used the Liquid Pearls White Opal to create a look almost like twinkle lights.  This was done by adding a small dot to the center of where the wood planks met.


Also using the Liquid Pearls, I traced the tree image to make it stand out more and added accents around the flourishes.


Supplies used:  (X8017) Wood Grain Paper, (Z3791) Liquid Pearls White Opal, (X6046) French Vanilla cs.
------------------------------------------------------------


Today's partnering product special is on our Wood Grain Paper pack.  You may purchase unlimited sets of this paper for $8 each.  They are available until 9:59am on 1/26/21.


Both of these specials are available in my shop at: www.inallsassiness.com.

Sassfully Yours,
Tonya


Saturday, January 16, 2021

SJLS #10 Woodgrain Wreath Layout

  Sassy January Layout Series #9

Welcome to the 10th segment in a series of 31 that will be shared during the month of January. Click here to find out more about the Sassy January Layout Series.

This is a layout that I created in the fall for my Joys of the Season event.  It is almost entirely cut out of our Flower Market Cricut Collection.  


So, a few elements that I want to draw attention to.  First, is look at the raised red dots on the berries.  Aren't they beautiful? And don't they pop?!  Some of the berries have a small cut hole that enhances the look of the berry.  I added a dot of the Carnation Red Liquid Pearls to each of these cut outs and the other berries and it adds such a realistic appearance!  LOVE, LOVE, LOVE it!


Second, notice the glitter?? On the leaves and holly leaves?  This was done with the Shimmer Brushes and goodness - it looks fantastic - almost gives the appearance like frost does.  If you will also take note, the title "Silent Night" was also traced with the Espresso Shimmer Brush.  What a difference this makes.  Normally, I would most likely have used the Clear Shimmer Brush; however, for this one, I used the Avocado, Espresso and Evergreen Shimmer Brushes and all I can say it SHIMMER!!!  Can you tell that I am excited?


And third, I used the Espresso Shimmer Brush to draw a line across the bottom edge of the paper and create a border.  My hand isn't very steady but I went with that made it look realistic!  (lol!)


Supplies used: (Z3816) Avocado Shimmer Brush, (Z3812) Espresso Shimmer Brush, (Z3670) Evergreen Shimmer Brush,  (Z3799) Carnation Red Liquid Pearls, (X6038) Candy Apple cs, (X5959) New England Ivy cs, (X6053) Avocado cs, (X5951) Espresso cs, (X6030) Evergreen cs, (X8017) Woodgrain paper, (Z2060) Thin Foam Tape.

-------------------------------------------------------------------------


Today's partnering special features the Shimmer Brushes.  These are available in so many colors and will truly turn your creative world around!  For the special price of $15, you can choose 4 Shimmer Brushes in the colors of your choice.  This special in available until 9:59am on 1-18-2021.


This product special, and layout kit, are available in my shop at: www.inallsassiness.com as a part of the Sassy January Layout Series.  For more details on this series, click here.

Sassfully Yours,

Tonya

Saturday, August 22, 2020

Oh so many "Little Buddies"!

Close To My Heart's stamp set Little Buddies is just about to retire and be placed in the CTMH vault forever.  I just couldn't let this happen before I shared a card that I created with this adorable set!  The animals in this set are so stinkin' cute!!  With a wealth of cute little buddies, the cat and dog are just too cute for words - and my favorites!  This card was inspired by a fellow CTMH consultant Chris Franco and when I saw Chris', I just had to create a version of it for my Stamp and Scrapbook Expo Pet presentation this coming week.


To create the card, I used the rectangle multi-window frame Thin Cuts and stamped underneath the squares inside the windows with the cat and dog leaving a space for paw prints and my sentiment.  Once these were all stamped, I lifted the grid and colored them in with my Tri-Blend markers.  After all of the pets were colored, I used that same multi-window frame that was cut from our new to be released (on Sept. 1st) Wood Grain paper and adhered it over the stamped images.  The combined pieces were then popped up with Thin 3-d Foam tape and adhered to a Black base.  The Black base was then adhered to the card front.  By waiting until after the images were colored, I left myself a little wiggle room in case I messed up on the coloring of one of the images.  If I had, I could simply stamp that pet again on a scrap of paper and adhere it over the original image before the grid was adhered and no one would be the wiser.  Once the grid was put into place, I used the Clear Shimmer Brush to trace over the stitched line.  I love how this adds just a little shimmer to the canvas!

Overall, such a simple card to create, with a wow-factor of returns!


As mentioned, the Little Buddies stamp set retires on August 31st.  It can be still ordered on my CTMH site at: www.tonyasheridan.ctmh.com or can be ordered as a bundle with 4 pre-cut, pre-stamped cards shown here.  This bundle can be found in my In All Sassiness Designs shop at: www.inallsassiness.com.  In addition, if not interested in the stamp set, but still love the cards, those are available separate from the Bundle in my shop as well.  Lots of choices to bring these Little Buddies into your life!


Supplies used:  (X8017) Wood Grain Paper - available September 1st, (C1856) Little Buddies Stamp Set, (1385) White Daisy cs, (X6047) Black cs, (Z4023) Rectangle Multi-Window Thin Cut, (X254) Value Cards and Envelopes,  (Z3293) Clear Shimmer Brush, (Z2479) Gold Brown Tri-Blend Marker, (Z2478) Earth Brown Tri-Blend Marker, (Z4277) Tan Tri-Blend Marker, (Z2475) Brown Grey Tri-Blend Marker, (Z2805) Black Exclusive Ink Pad, (Z2060) Thin Foam Tape, (Z341) Mini-Glue Dots, (Z3372) Adhesive Runner.  The current product can be purchased on my website at: www.tonyasheridan.ctmh.com.

Sassfully yours,
Tonya