Showing posts with label Cards. Show all posts

Saturday, July 13, 2024

Honey Bunny Digital Files = amazing flowers!

The Honey Bunny digital file collection from Close To My Heart has captured my heart ever so completely.  This collection features a layout and then additional images.  The simplicity of the flowers combined with the colors of the collection and an adorable pair.  I recently used these images in my monthly card class and wanted to share them here.   The beauty of a collection like this is once you have paired, and selected the colors, the embellishments, the images and concepts together for a layout or card set, you can use the same elements to create the opposite: either layout or card set - as the coordination part is already done!  


I'm Here For You Card

Just Because Card

Get Well Soon woven daisy card

For those who would like to order a set of these A-2 sized cards, here is the link.

-------------------------------------------------------------------------

And here are two additional art collections that I created using the same Honey Bunny digital files.  Like I said, I just can't get enough of their simplicity and loveliness.

First, is the Bloom & Grow Layout.  This has very few alterations from the original file.  For this layout, I used the beautiful Pink Glitter paper for the lattice overlay.  My goodness does it pop!  I found that this particular glitter paper was a little more challenging to work with and cut then CTMH's regular glitter paper so a few Cricut mishaps were made...where the full overlay didn't cut, or because it was a 45 minute cut, if the internet went out momentarily then the full cut stopped and couldn't be re-started.  However, this turned out to be inspiring as I didn't want to waste the partial lattice's!  I then incorporated the "oops" pieces into the 5" x 7" shaker cards that you will see later in this post.

Bloom & Grow Layout


This pre-cut layout is now available in my shop and the details can be found by clicking here.  

And these are the 5" x 7" shaker cards that I created with those extra lattice pieces and where I incorporated the Oval Shaker rims.

Floral 5" x 7" Shaker Card Set

This card set of 6: 2 each, of three designs, is also available in my shop and can be found using this link.

Supplies used in these projects are all from CTMH:  Toffee cs, Ballerina cs, Flamingo cs, Sage cs, Honey Butter cs, Seabrook cs, White Daisy cs, Honey Bunny patterned paper, Toffee Exclusive Ink Pad, White Word Die Cut Tags, Oval Shaker foam and acetate windows, Silver & Gold Glitter Gems, Pink Glitter Paper, Mini Glue Dots, Thin Foam Tape, Adhesive of choice, Red Line Adhesive, Fine Tip non-stick scissors, 5" x 7" card bases & envelopes, Value Cards & Envelopes, Oval Shaker Thin Cuts.

The supplies used are from Close to My Heart which is no longer in business.  You can contact me at: inallsassiness@gmail.com to see if I still have the items in my inventory or I can help advise you with an alternative color or product that I either have in my inventory, or a suggestion of a Stampin’ Up! Product that would compliment the project as I am now a Demonstrator with Stampin’ Up.  My website there is:  www.tonyasheridan.stampinup.net. 

Have a sassy day!
Tonya

Friday, November 24, 2023

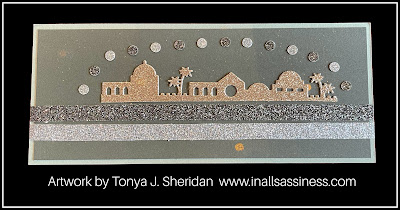
Glitter Bethlethem Card

As we have now "officially" entered the Christmas season, I wanted to share a card that I created that I just adore! Simple.  Elegant. And made with glitter!


This is the stamp set and Thin Cut set that includes the Thin Cut for Bethlehem.  
How to create the card:
1.  Cut a piece of Sage cs to 3 1/2" x 8 1/2".
2.  Cut a piece of Pine cs to 3 1/4" x 8 1/4".
3.  Splatter the Pine cs with the Gold Shimmer Brush.  Allow a few minutes to dry.
4.  Center, and adhere, the Pine cs to the Sage cs.  
5.  Adhere a piece of Seabrook Shimmer Trim to card front. This extends across the horizontal width to the card and is about 1/2" to 3/4" above the bottom edge of the card.  Trim the edges of the shimmer trim off where it exceeds the card.
6.  Adhere a piece of Pine Shimmer Trim to the card front.  This extends across the horizontal width to the card and is approximately 1/4" above the Seabrook Shimmer Trim.
7.  Adhere the gold glitter cut of Bethlehem to the base.  This is just right of centered and is 1/8" above the top of the Pine Shimmer Trim.  This piece is quite fragile so adhere with care. I found the CTMH Adhesive Runner worked the best for not tearing the cut.
8.  Using a hand held hole punch, cut out circles from the Pine and Seabrook Glitter Paper.
9.  Arrange the glitter circles in a half-circle from the left side of Bethlehem, around and over, the piece, to the right side of the of Bethlehem.  Alternate the two colors and adhere with Mini Glue Dots.
10.  Adhere the card front to a Slimline Card.

Supplies used:  (Z7093) Nativity Scene Stamp & Thin Cuts, (Z4659) Pine Shimmer Trim, (Z4660) Seabrook Shimmer Trim, (Z4610) Pine Glitter Paper, (Z4611) Seabrook Glitter Paper, (Z3316) Gold Shimmer Brush, (X6070) Pine cs, (X6045) Sage cs, (Z3238) Gold Glitter Paper, (X257) Slimline Cards & Envelopes, (retired) Mini Glue Dots, (Z7010) CTMH Adhesive Runner.  Current items can be ordered on my Close To My Heart website at:  www.tonyasheridan.ctmh.com.

For those who would prefer For those who would prefer a pre-cut, & pre-stamped set of this card, I have added it to my card buffet.  You can order the cards for $2.50 each or 7/$15.  (click on the quantities for the associated links) I will also be hosting a few pop-up card buffets over the next few weeks so be on look-out for those as well.

Create with sass,

Tonya

Wednesday, November 22, 2023

Triangle Tree Inspiration #3.

I just can't stop creating with this fantastic Triangle Tree set!!  Hope you are loving it too!  This collection includes a stamp set, a Thin Cut set and a dual stencil set that can all be purchased, and used, independently of one another, or used together, and when they are, they are a statement of  beauty!  I am in love with this collection so over the next few days, I will be sharing some artwork that I have created with the elements independently and collectively.

(D2204) Triangle Trees stamp set 

(Z8064) Triangle Trees Thin Cuts

(z8065) Triangle Trees Stencil duo

(Z8066) Triangle Trees Bundle

The Triangle Tree collection is only available until the end of December, or while supplies last.  They can be ordered here:  https://tonyasheridan.closetomyheart.com/retail/search.aspx?searchvalue=triangle+trees

The third card that I wanted to share uses one of the stamped trees as an embellishment.  Being quite the music lover, I especially liked how this one turned out.


Here are the directions to create the card:

(optional) Splatter the music note paper wit the Gold or Clear Shimmer Brush before creating. 

1.  Cut a 4 1/4" x 5 1/2" piece of Sage cs.
2.  Cut a 4" x 5 1/4" piece from the music note paper.
3.  Cut (2) 1 1/2" squares from the Pine Glitter paper and (1) 1 1/2" square from the Seabrook Glitter Paper.
4.  Position the three squares so that they make a diamond pattern.  There is a slight space between the pieces.  Adhere to the card front with Thin Foam Tape.
5.  Cut the tree out of the light side of the Pine cs.
6.  Using the Pine Exclusive Ink, and the Triangle Tree stamp set, stamp the tree design onto the tree.
7.  Adhere the tree in the bottom right corner of the card so that the top overlaps the Seabrook Glitter Square.  Where the tree overlaps the square, one layer of Thin Foam Tape is used.  Where the tree extends over the music note paper, adhere with two layers of regular Foam Tape.
8.  Using a hand-held hole punch, adhere (3) glitter dots in a vertical row down the center of the tree.  The top one is Seabrook, followed by Pine, and then a 2nd Seabrook.
9.  Adhere an additional Pine glitter dot to the music paper under the center of the tree for the trunk.
10.  Cut a piece of Sage cs to 3/4" x 1 7/8".  
11.  Using the Pine Exclusive Ink, stamp the "Season's greetings" sentiment onto the light side of the Sage cs.  Trim the edges off of the left and right edges so that the sentiment is centered.
12.  Cut a piece of Pine cs to 1" x 2 3/4".
13.  Adhere the sage cs with sentiment to the right side of the Pine piece leaving 1/8" border on the upper, lower and right edges.
14.  Adhere (2) glitter dots in a vertical row to the right of the sentiment.  The Seabrook is on the top and the Pine is at the bottom.
15.  Adhere the combined sentiment piece to the card front.  The left edge is flush with the left card edge and is popped up with Thin Foam Tape.  The right overlaps the glitter squares and is adhered flat.  Red Line Tape, or a Mini-Glue Dot will work best to adhered this to the glitter surface.
16.  Adhere the card front to the card base.

Supplies used:  (Z8064) Triangle Tree Thin Cut, (D2204) Triangle Tree Stamp Set, (Z7088) Silver Bells Cardmaking Stamp & Thin Cuts, (X6045) Sage cs, (Z4610) Pine Glitter Paper, (Z4611) Seabrook Glitter Paper, (Z6540) Pine Exclusive Ink, (X6070) Pine cs, (X7299B) Evergreen Paper Pack, (Z2060) Thin Foam Tape, (Z7010) Adhesive Runner, (retired) Mini-Glue Dots, (retired) Red Line Tape. Optional:  (Z3316) Gold Shimmer Brush, (Z3293) Clear Shimmer Brush.   The current supplies can be found on my website at:  www.tonyasheridan.ctmh.com.

For those who would prefer For those who would prefer a pre-cut, & pre-stamped set of this card, I have added it to my card buffet.  You can order the cards for $2.50 each or 7/$15.  (click on the quantities for the associated links) I will also be hosting a few pop-up card buffets over the next few weeks so be on look-out for those as well.

In all that you do, create with sass!

Tonya

Saturday, November 18, 2023

Triangle Tree Inspiration #2

 Are you in love with the Triangle Tree Collection yet?  This collection includes a stamp set, a Thin Cut set and a dual stencil set that can all be purchased, and used, independently of one another, or used together, and when they are, they are a statement of  beauty!  I am in love with this collection so over the next few days, I will be sharing some artwork that I have created with the elements independently and collectively.

(D2204) Triangle Trees stamp set 

(Z8064) Triangle Trees Thin Cuts
(z8065) Triangle Trees Stencil duo
(Z8066) Triangle Trees Bundle

The Triangle Tree collection is only available until the end of December, or while supplies last.  They can be ordered here:  https://tonyasheridan.closetomyheart.com/retail/search.aspx?searchvalue=triangle+trees

The second card is a gold threaded tree card and here are the directions to how I created this card:

1.  Cut a 4 1/4" x 5 1/2" piece of Sage cs. 

2.  Cut a piece of 4" x 5 1/4" of French Vanilla cs.  

3.  Position the 2nd largest tree Thin Cut over the French Vanilla cs in the desired position.  Cut the tree out.

4.  Stamp the sentiment "happy holidays" from the Silver Bells Card Making Stamp Set in Pine Exclusive Ink Pad to the French Vanilla cs. This is stamped above where the tree was cut out.

5.  Using the Gold Shimmer Brush, splatter the front of the French Vanilla cs.  Allow a few minutes to dry.

6.  Flip the French Vanilla over to the backside.  Adhere Thin Foam tape directly beside where the tree was cut out.  Remove the film from the tape.

7.  In a crisscross pattern, take the thread back and forth adhering it to the foam tape before between each turn.

8.  Adhere Thin Foam Tape around the outer edge of the French Vanilla.

9.  Remove the film around the bordering foam tape.  Center, and adhere, to the Sage cs.

10.  Cut a smaller tree from the Pine cs.  Cut an even smaller tree from the Pine Glitter Paper.

11.  Stamp the tree image with the Pine Exclusive Ink Pad onto the light side of the pine cut tree.

12.  Position, and adhere, the stamped tree, to the left side of the empty tree space with Thin Foam Tape.  

13.  Position, and adhere, the glitter tree, to the right side of the empty tree space with Thin Foam Tape.

14.  Cut the Gold Shimmer Trim at an angle and tuck under each of the trees.  Note: if you don't have Gold, Pine works well too.

15.  Add Gold Stickles to the stamped tree for ornaments or create "dots" using the tip of the Gold Shimmer Brush.

Supplies used:  (Z8064) Triangle Tree Thin Cuts, (D2204) Triangle Tree Stamp Set, (C1995) Silver Bells - Card Making Stamp Set, (retired) Gold Embellishing Thread, (retired) Gold Shimmer Trim, (retired) Golden Rod Stickles, (Z3316) Gold Shimmer Brush, (Z4610) Pine Glitter Paper,  (Z6540) Pine Exclusive Ink Pad, (X6046) French Vanilla cs, (X6045) Sage cs, (X6070) Pine cs, (X254) Value Cards & Envelopes.  These items can be ordered on my website at: www.tonyasheridan.ctmh.com.

For those who would prefer For those who would prefer a pre-cut, & pre-stamped set of this card, I have added it to my card buffet.  You can order the cards for $2.50 each or 7/$15.  (click on the quantities for the associated links) I will also be hosting a few pop-up card buffets over the next few weeks so be on look-out for those as well.

In all that you do, create with sass!

Tonya

Triangle Tree Inspiration #1: layered striped trees

 Have you seen Close To My Heart's new Triangle Tree collection?  This collection includes a stamp set, a Thin Cut set and a dual stencil set that can all be purchased, and used, independently of one another, or used together, and when they are, they are a statement of  beauty!  I am in love with this collection so over the next few days, I will be sharing some artwork that I have created with the elements independently and collectively.

(D2204) Triangle Trees stamp set 

(Z8064) Triangle Trees Thin Cuts

(z8065) Triangle Trees Stencil duo

(Z8066) Triangle Trees Bundle

The Triangle Tree collection is only available until the end of December, or while supplies last.  They can be ordered here:  https://tonyasheridan.closetomyheart.com/retail/search.aspx?searchvalue=triangle+trees

The first card is a layered tree card and here are the directions to how I created this card:


1.  The card base is Pine cs which is cut to 4 1/4" x 5 1/2".
2.  The paper behind the tree is cut from French Vanilla cs and to 3 3/4" x 4".  It is then splattered with the Gold Shimmer Brush.  Allow a few minutes for the splattering to dry.  Adhere to the top of the Pine cs with 1/8" borders above and to the left and right.
3.  Next, the patterned paper is from the Evergreen Paper pack.  It is cut to 1 1/2" x 4".  Before adhering to the Pine cs, adhere a piece of Seabrook Shimmer Trim to the top edge of the patterned paper and trim to fit.
4.  Next, cut a piece of Sage cs to 3/4" x 4".  Using the Pine Exclusive Ink Pad, stamp the "thinking of you this Christmas" sentiment from the Home for the Holidays Card Making Workshop Kit.  Note: if you don't have this stamp set, you could easily substitute with a different stamped sentiment.
5.  Adhere the stamped sentiment to the center of the visible Evergreen patterned paper.
6.  Adhere the patterned/stamped/shimmer trim piece to the Pine cs directly below the French Vanilla cs.
7.  Using a hand held hole punch, punch (3) dots with Pine Glitter paper and (2) with Seabrook Glitter Paper.
8.  Adhere (2) Pine glitter dots in a horizontal row to the French Vanilla cs directly above the Seabrook Shimmer Trim and right justified.
9.  Using the 2nd largest Triangle Tree Thin Cut, cut a tree from the French Vanilla cs.  
10.  Cut a 1/2" piece of the Evergreen patterned paper.  Adhere the Evergreen print side to the bottom of the tree.  Trim to fit.  Flip the patterned paper to the polka dot side.  Adhere a row of the polka dot paper above the Evergreen patterned paper.  Trim to fit.  Adhere a piece of Seabrook Shimmer Trim directly above the polka dot paper.  Trim to fit.  Adhere a 2nd row of Evergreen pattern paper directly above the shimmer trim.  Trim to fit.  Adhere a 2nd row of the polka dot paper above the Evergreen print and trim to fit.  Adhere a row of Pine Shimmer Trim above the polka dot and trim to fit.  Finally, rotate and adhere, the Seabrook Shimmer Trim above the Pine Shimmer Trim but this one is adhered vertically to make sure that the tip of the tree is covered.
11.  Adhere the tree to the French Vanilla splattered paper with Thin Foam Tape.  
12.  Cut a small piece of Pine Shimmer Trim at an angle.  Tuck, and adhere, under the bottom center of the tree for the trunk.
13.  Adhere (2) Seabrook and (1) Pine glitter dots to the tree with Mini-Glue Dots.
13.  Adhere the card front to the card.

Supplies used:  (Z8064) Triangle Thin Cut, (X7299B) Evergreen Paper Pack, (retired) Home for Christmas Card Making Workshop, (Z4611) Seabrook Glitter Paper, (Z4660) Seabrook Shimmer Trim,  (X6068) Seabrook cs, (Z4610) Pine Glitter Paper, (Z4659) Pine Shimmer Trim, (X6070) Pine cs, (X6046) French Vanilla cs, (X6045) Sage cs, (Z3316) Gold Shimmer Brush, (Z6540) Pine Exclusive Ink Pad, (Z2060) Thin Foam Tape, (Z7010) CTMH Adhesive Runner, (X254) Value Cards & Envelopes.

For those who would prefer a pre-cut, & pre-stamped set of this card, I have added it to my card buffet.  You can order the cards for $2.50 each or 7/$15.  (click on the quantities for the associated links) I will also be hosting a few pop-up card buffets over the next few weeks so be on look-out for those as well.

In all that you do, create with sass!

Tonya

Friday, May 19, 2023

Hello Stinkers!

Have you met our little tribe of skunks?  These are little skunks that I would be glad to meet in a dark field!  Introducing Close To My Heart's Little Stinkers!  The Stamp of the Month for the month of May!

A trick that I shared in my card class -  the skunks are much more adorable with a dark, clean stamped image and the best way to accomplish that is to use a new, or freshly re-inked, ink pad! If you don't have this available, try using a MISTI, or alternate stamping platform - by multiple stamping of the same image, you can also achieve that dark, bold and vibrant black color.  

So how do you snag this adorable stamp set?  I am glad you asked!  If you are a VIP, you can earn this stamp set for FREE with a $50 qualifying purchase!  If not, you can still earn this stamp set for $5 with a qualifying purchase.  Click here for more details!  Or course, you can also buy the stamp outright for $19.95.  Whatever method you choose, this is a must have for card makers (in my opinion!)
So now that I have shared the little stinkers, and what I have found is the best way to achieve a great image, I want to share some cards I created with the stamp set!


I adore all four of the cards, but I do believe that this one is my favorite!  The "wash" under the sentiment was created with the Honey Butter Shimmer Brush so it shimmers! Bonus right?  A trick I learned with this is to create your wash, and then let it completely dry before stamping over the wash - otherwise you will likely smear your sentiment.  

Love the noses?? That inspiration was from my dear friend, and cardmaker, Linda Adams!  Once we added the little touch, I just had to add it to every. single. skunk!  

The flowers on the stamped images are colored in with the Raspberry and Flamingo Shimmer Brushes.  

Although hard to see in the photo, each of the smaller stitched circles are popped up with Thin Foam Tape to create a fun depth!


This card used some "controlled" splattering with the Capri Shimmer Brush!  I learned recently that if tap your shimmer brush on the lid for splattering it creates a much finer, and smaller shimmer - almost a mist.  LOVE it!    It is quickly becoming an addictive color to me! I have to be honest, I haven't used much of the Capri before but wow! It is such a beautiful color!

The circle element is from the circle shaker Thin Cuts and window foam HOWEVER, I didn't create it as a shaker - I used the foam circle and adhered the stitched circle directly to the foam for depth.  Super cute idea right?  By adding the White Daisy circle behind the foam, it allowed me to have a "clean" circle for my stamping.  

The little hearts inside the foam rim and stamped with the stamp of the month and then a dollop, or dot, of Ballerina Liquid Pearls were added to the center of each stamped heart.


This card was intentionally created to use some of the circles left from the cutting of the previous two cards - I am all about using all of the fruits leftover from one card, or project, on another!  I added Honey Butter circles that were left from a different project and then cut the three stitched circles to add depth and more character to the card.  Although not truly obvious in the photo, the colored circles are all flat and the stitched circles are all popped up with Thin Foam Tape.

The card also has that fine shimmer splatter from the Capri Shimmer Brush and the centers of the dainty stamped flowers are the Ballerina Liquid Pearls.


For this card, I wanted a little more a  masculine feel so I chose to back the card with Sapphire verses the Capri and pinks.  Paired with that, I used the Deep Water Liquid Pearls verses the Ballerina.  This color is absolutely beautiful!  It is bold and vibrant and works so well with anything Sapphire.

For those who would like to create cards like these, below are the supplies that I used.  For those who would like a pre-cut and pre-stamped kit of this card set.  The set includes 8 cards: 2 each of 4 designs.  Click here for to order your own set, or for ordering details.


Supplies used:  All current supplies are available at: www.tonyasheridan.ctmh.com.  (Z4310) Circle Shaker Window Foam & Acetate, (Z4309) Circle Shaker Window Thin Cuts, (Z4583) Honey Butter Shimmer Brush, (Z4288) Capri Shimmer Brush, (Z3606) Raspberry Shimmer Brush, (Z3814) Flamingo Shimmer Brush, (Z3798) Ballerina Liquid Pearls, (Z4602) Deep Water Liquid Pearls, (Z2805) Black Exclusive Ink Pad, (X6050) Flamingo cs, (X5957) Sapphire cs, (1385) White Daisy cs, (X6066) Honey Butter cs, (X6057) Capri cs, (X8033S) Flower Shoppe Paper Pack with Stickers, (Z2060) Thin Foam Tape, (Z3372) Adhesive Runner, (Z4105) Circle Windows Slimline Thin Cuts, (X257) Slimline Card Bases & Envelopes, (X254) Value Cards & Envelopes.

Sassfully yours,

Tonya

Monday, April 3, 2023

Hope & Kindness meets White Gloss Spray!

It's been awhile!! One of my personal goals for the spring is to get back into blogging here!  And, so I thought I would start with a card that I recently created using the (Z5010) White Gloss Spray, the (CC5223) Hope & Kindness textured cardstock (LOVE, LOVE, LOVE! this paper!) I cannot get enough of it truthfully! AND, the (CC5226) Fancy Doilies Thin Cuts.

The White Gloss, & Gilt Spray are my new found loves - and when sprayed on this textured cardstock the wow factor magnifies!  It just pops beyond all popping and stands out quite elegantly as seen here.


A tip: to create the splatter around the 1/2 scalloped circle, create a mask by taking the same 1/2 circle and covering the holes with post-it notes.  Position the mask as desired and splatter around the mask.  Remove the mask, allow to dry for a few minutes before adhering the actual 1/2 scalloped circle.  The mask then can be used over and over again to create additional cards.

Hope & Kindness Textured Cardstock

Fancy Doilies Thin Cuts
White Gloss Spray

Other products used are:  (Z6533) Harbour Exclusive Ink, (M1313) Thoughts & Prayers Stamp set, (retired) Hope & Kindness Paper & stickers & (Z2542) Harbour Glitter paper.   These items can be found on my website at: www.tonyasheridan.ctmh.com.  The card kit shown above can be found in my shop at: www.inallsassiness.com

Sassfully yours,
Tonya

Friday, November 18, 2022

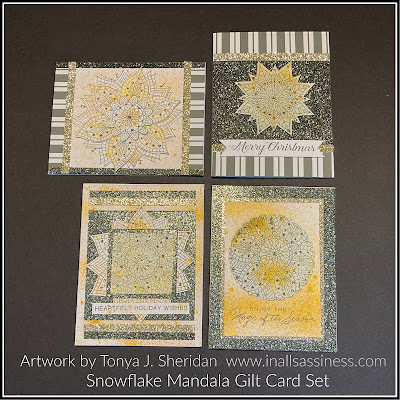
Snowflake Mandalas & Gilt!

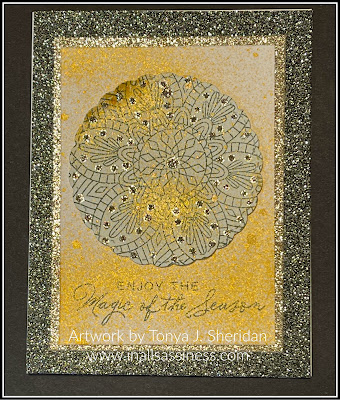
 My new fascination are the Gloss Sprays!  Oh my creating happiness!!!  They are so awesome!  This week I played with the Gilt Gloss Spray and I have to say - I do believe that I love that even more than I do the White Gloss Spray!  The finish is gold and glittery and really pops!!

Now, a friendly disclaimer...the spray sprays and it sprays and falls where it falls!  Each application is going to reap very different results!  So for me, I stamped my images several times, sprayed them, and then selected my favorites to then create my cards with.  


Now, the stamped images are from the November Stamp of the Month (which of course is only available for a few more weeks!!)  A am completely in love with this too!  There are so many possibilities to stamp, and layer, and it is just a wow! factor.


For this card, I used the Mix-in paper for the small square.  I love how it has just a little bit of color in it and differentiates from the White Daisy papers.


For each card, I wanted a different look so here I took the snowflake and cut it with a scalloped tag.  To me, it gives a completely different look and feel.

It is important to note that when combining the stamping & Gilt Gloss Spray, you will want to spray first, allow adequate time to dry, then stamp.  If you were to do these steps in reverse, the Gilt Gloss Spray could end up covering up the stamped sentiment. 


Finally, for the last card, I used the smaller stamp in the set.  


Here is the image of the Stamp of the Month.  This is available only during November at full retail value of $19.95, $5 with a $50 qualifying purchase or free for VIP's with a $50 qualifying purchase.


Supplies used:  (Z5009) Gilt Gloss Spray, (Z3787) Platinum Stickles, (Z4610) Pine Exclusive Ink Pad, (1385) White Daisy cs, (Z4610) Pine Glitter Paper, (Z3238) Gold Glitter Paper, (X9044) Oct-Dec Mix Ins, (X7286B) Christmas Story Paper Pack, (X254) Value Cards & Envelopes, (S2211) Snowflake Mandala Stamp Set (November Stamp of the Month), (Z5024) Red Line Tape, (Z2060) Thin Foam Tape, and (Z3372) Adhesive Runner.  All of these supplies can be ordered on my Close To My Heart website at: www.tonyasheridan.closetomyheart.com.

As for this card set, it is available in my shop both pre-splattered and non-pre-splattered.  Click here for more details.  

With very gilt-glittery fingers,
Tonya

Saturday, November 12, 2022

That stinkin' cute truck!

 I just can't help but love this truck over and over again!  There are so many possibilities!!!

For this card, I stamped the truck with Black Exclusive Ink onto the Hope & Kindness textured Pine cs.  

Once the ink was dry, I cut out the window and then traced the stamped image with the Silver Markers.  

For the inside of the wheels, I use a hand held hole punch and punched two dots from Pine Glitter Paper and adhered with Mini-Glue Dots.

The tree was stamped with Pine Exclusive Ink onto the Hope & Kindness textured Sage cs.

The tree is popped up on one layer of Thin Foam Tape when adhered to the Sage cs.  When the truck is adhered, it is adhered on two layers of Thin Foam Tape.

I used one of my favorite retired stamp sets to stamp the sentiment in Pine Exclusive Ink.

Additionally, Silver Glitter Paper, Silver Thread and Silver Glitter Gems were added to the Sage cs panel.

The the truck panel is then adhered to the card base that is made up of Sage cs, Linen cs and Silver Glitter Paper.


This card has been added to my card buffet.

The supplies used are:  (X6045) Sage cs, (X5946) Linen cs, (CC5223) Hope & Kindness cs, (Z4191) Silver Glitter Paper, (Z4213) Silver Embellishing Thread, (Z4191) Silver Glitter Gems, (Z6540) Pine Exclusive Ink, (Z4189) Intense Black Exclusive Ink, (Z4655) Seasonal Haul Stamp & Thin Cuts, (Z4580) Quicksilver Silver Metallic Paint Markers, (X254) Value Cards and Envelopes, (Z341) Mini Glue Dots, (Z3372) Adhesive Runner, (Z2060) Thin Foam Tape.

Sassfully yours,

Tonya

Thursday, November 10, 2022

Snowman wishes!

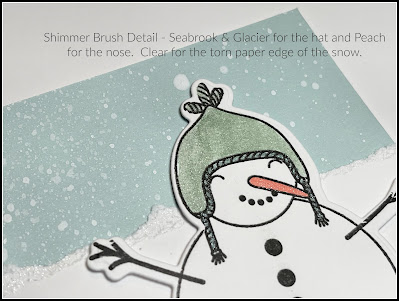
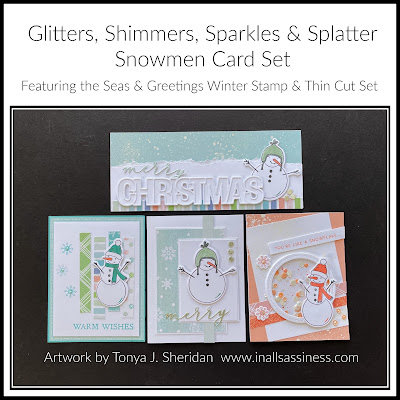
Who can resist an adorable snowman??  And this little guys is one of the cutest I have ever seen! I adore him!  He is apart of our new Seas & Greetings collection.  I thought I would share some of the tips that I used when creating this completely technique based card!

The splattering on the Glacier cs was created with the White Gloss Spray.  Additional shimmer was added with the shimmer brushes to the hat, the nose and the snowbank.


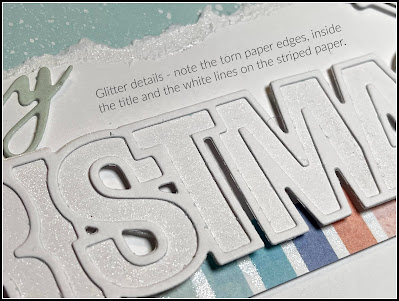
Additional shimmer was added to the title with the Clear Shimmer Brush.  This was added to the torn snowbank edge, to the white stripes in the striped patterned paper and to the base of the word Christmas.


Snowball effect: To create the snowballs, a hand held hole punch was used to punch holes from White Glitter paper.  Liquid Glass was then added to create an epoxy look after allowing it to dry overnight.

Such fun right??  The new Seas & Greetings Suite was used to create these whimsical cards.  This collection is only here for a short time so make sure you grab it before it melts away!


Other supplies used: (Z8052) Merry Christmas Layers Thin Cuts, (Z4189) Intense Black Ink Pad,  (Z3661) Peach Shimmer Brush, (Z4590) Glacier Shimmer Brush, (Z3293) Clear Shimmer Brush, (Z4585) Seabrook Shimmer Brush, (X6068) Seabrook cs, (Z3237) White Glitter Paper, (Z679) Liquid Glass, (Z5010) White Gloss Spray, (X5978) Glacier cs, (1385) White Daisy cs, (CC112222) Seas & Greetings Paper Pack, (CC11227) Seas and Greetings Winter Stamp & Thin Cuts, (X257) Slimline Cards & Envelopes, (Z2060) Thin Foam Tape, (Z3372) Adhesive Runner, (Z341) Mini-Glue Dots.  The current items can be purchased on my Close To My Heart website at: www.tonyasheridan.ctmh.com.

If you love the cards, and would like to create a set, they are in my shop at: www.inallsassiness.com.  The card sets are pre-splattered, pre-cut and stamped.  They are made up up of 8 cards: 2 each of 4 styles.  Click here for this individual link.  Here is the full card set.


Have a sassy day!
Tonya

Sunday, November 6, 2022

Gingerbread cards

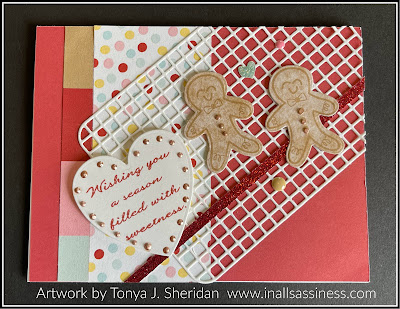
I love the color combination from the new Freshly Baked paper suite and how well they work with gingerbread men/women!  I created these cards using a variety of retired and current products and was delighted with how well they all came together.


Note the tiny details of the Rose Gold Liquid Pearls on random circles in the dotted patterns.


For this card, note how adorable the drying rack thin cut added dimension and detail to the little men.  The Liquid Pearls also added cuteness, and detail, to the buttons on the gingerbread men and for embellishing around the heart.

This card is my favorite of the set.  I used one of the thin cuts and stencils from the National Stamping Month collection to created the layered background. Where you see the Toffee ink, this was inked with the stencil.  I adore how this turned out. I then added patterned paper and a small piece of Scarlet Glitter Paper to add more depth and the cute little men are popped up with Thin Foam Tape.  I then added tiny dots of the Liquid Pearls in the centers of the designs at the top to carry over the details on the buttons of the gingerbread men.  


For the last card, I wanted to incorporate the cute baking patterned paper from the Freshly Baked papers.  I added random of the Freshly Baked Dots to the pattern and then showcased the paper by adding dots of Liquid Pearls around the edges of the paper.  The sentiment was "popped" by adding a stamped sentiment to a glitter background.


This is the stamp and thin cut set that I used for to create the cards.


Supplies used:  
(Z8047) Freshly Baked - Scrapbooking Stamp & Thin Cuts, (X7285E) Freshly Baked Dots, (X7285B) Freshly Baked Paper Pack, (Z3839) Scarlet Glitter Paper, (X6049) Scarlet cs, (retired) July-Sept Mix-In Paper, (X9044) October-Dec. Mix-In Paper, (Z2828) Toffee Exclusive Ink Pad, (Z6526) Scarlet Exclusive Ink Pad, (Z3765) So Happy Together Stamp & Thin Cuts, (Z3793) Rose Gold Liquid Pearls, (X254) Value Cards & Envelopes, (X6046) French Vanilla cs.  Various retired Christmas stamps for sentiments.  The supplies that are current, can be ordered by visiting my website at:  www.tonyasheridan.ctmh.com.  

This card kit can be ordered in my shop by using this link.  The card kit includes the supplies to make 2 each of all four designs.  A full pack of the Freshly Baked Dots is included as well.  The cards are pre-stamped, pre-cut and pre-stenciled for your creating ease.  Detailed instructions and a color photo is also included.

Sassyfully yours,
Tonya