Showing posts with label Magnifique. Show all posts

Tuesday, August 17, 2021

Series of Blues Series: Magnifique part two

One cannot go wrong with flip flaps!  They create engagement and interaction with your layout but most importantly, they provide the opportunity to add more photos - photos to help tell your story!  Love it right!  This layout combination does just that!  All in all, as designed, this combination allows for 22 photos - of course, additional flip flaps can be added to include even more photos.

As with the first layout in this series, this layout pairs the old with the new.  I have used the long-ago-retired magnifique paper suite with some current colors of Lagoon and Glacier and then splashes on our new Harbour (to be released on September 1st) Glitter Paper.  I love the addition of the Harbour - it is the perfect balance!


Here are a few close up photos of the little details that make the layout so unique!

The embellishments are made by adding Liquid Glass to small circles cut out of the scraps of the glitter paper.  Once they dry, they become beautiful epoxy-like embellishments!


Title details - the Harbour Glitter paper is the top layer and the Glacier cs is the bottom layer for the title.  Combined, the two create an elegant title piece.


subtitle details


The "all time favorite" subtitle - this can be overlapping the vertical 4" x 6" photo or dropped to overlap the 4" x 6" horizontal photo.


glitter square details


The feather details - an exquisite detail to this layout.  The stem of the feather is flat and the top of the feather is supported by Thin Foam Tape to give it dimension over the photos that they overlap.


scalloped border details

Supplies used:  (retired) Magnifique paper, Scallop Border Thin Cuts.  (Z2542) Harbour Glitter Paper, (X5978) Glacier cs, (X5968) Lagoon cs, (Z3268) 6" x 12" Flip Flaps, (Z679) Liquid Glass, (Z3372) Adhesive Runner, (Z341) Mini-Glue Dots, (Z2060) Thin Foam Tape.  Current items may be ordered at: www.tonyasheridan.ctmh.com.

This exclusive kit can be ordered at: www.inallsassiness.com.

Sassfully yours,

Tonya


Friday, August 6, 2021

Shades of Blue Class Series! Class one: Magnifique

It has been over a year and a half since I had to stop teaching live scrapbooking classes.  My customers, and I, have learned to adapt to the virtual world, but goodness do we miss the in-person interaction!!  SO, I am delighted to share that I will be teaching an in-person class series during August and September called "Shades of Blues".  This will be comprised of four classes - each on a Friday, at Your Pie in Penn Laird from 9:30 am until 12ish.  Each class will be $25 and you will create two 2-page layouts.  You have the option of cherry picking your classes, or take them all.  Those who take all four classes will receive a bundle of our new shades of blues as a gift.  This class will also be recorded and be available for on-line participants as well.  The link to register is in my In All Sassiness Designs Shop.


So, now that I have shared the details, here is the first layout from the first class!

"Where our story began" - Magnifique Layout

One of the things that I especially love about this layout is that it pairs the REALLY retired with the recently retired, current, and just released elements and pulls them all together to create a fresh new look of a beloved paper collection.  It isn't very often that I have the opportunity to do so as colors retire and new colors, and products, replace them.  This has been one of my favorite collections from my time with Close To My Heart and I am over-the-peacock excited to be creating with it again.

To see a larger view of the layout, simply click on the photo and it will open in a new, larger window.


Title details - the title was cut from a CTMH Digital file.  One is included in the kit, however if you want to be able to cut additional titles, this can be ordered by clicking here then uploaded to your cutting system.  For my kits, 1/2 piece of Harbour Glitter Paper is included for those who prefer a different title - or even just to add additional glitter paper to the layout design.  I love how clean our CTMH Glitter paper cuts on the Cricut (and with Thin Cuts as well!).


Tag details - the tags are pre-cut from a variety of different Tag Thin Cuts from Close To My Heart that I have collected over the years.  I found this layout design on Pinterest and couldn't wait to make it my own with our awesome Thin Cut Tags.


Layering tearing details - such a fun technique that we haven't done in awhile.  I adore how the tearing, worn feel of the paper collection, and the glitter all pair together.


To register for this class - either in-person or virtually - click here.

Supplies used:  (retired) Magnifique paper collection, In This Together Dots, (X5968) Lagoon cs, *New* (X6062) Harbour cs, *New* (Z2542) Harbour Glitter Paper, (X5978) Glacier cs, (Z2060) Thin Foam Tape, (Z3372) Adhesive Tape Runner, (Z341) Mini-Glue Dots.  Also used, a variety of Tag Thin Cuts from CTMH were used.  The current items are available on my website at: www.tonyasheridan.ctmh.com.  *available to order on September 1st, 2021.

Sassfully yours,
Tonya

Saturday, November 3, 2012

30 days of Thanksgiving - day 3


Day 3 – I am thankful for Close To My Heart: for a faith based company that is built around relationships.  There, I have found the most amazing founder, leadership team, mentors, colleagues and above all the most fantastic of  friends.  They have been the light in the tunnel, given me the encouragement to spread my wings, have helped drive me to my successes and then celebrated those with me, have given me faith in my inner artist  and a support system when I have needed it.  They have challenged me to be a strong business woman and a woman that my daughter can look up to.  Collectively, they are a place that I can call my “home”.

To see a larger view of the layout, click the layout.


Saturday, October 6, 2012

30 Studio J's in 30 days - day 5

I have been working diligently all weekend on a Studio J album for my in-laws of their recent trip out west.  And in doing so, I have discovered some new things in Studio J.  First of all, the first layout that you see, was not designed to go side by side.  Instead, each page goes with a complimenting page (seen further down) of the same place/event.  These two pictures were so clear and "perfect" that I felt they needed to be printed as 12" x 12"s.  To achieve this, I used the No Rules layout design and loaded a picture from each place into the cell.  I then added my titles.  You will see for the Mt.Rushmore layout, I had to leave the title on vellum and for the Devils Tower I was able to use a lighter ink color that would show up over the greenery.
 
What I did next, was to look for a double layout that had one side that would balance off of a 12" x 12" picture.  I chose that layout and then just used the one side.  If I had been doings pictures within the same paper pack I might have been able to pull off putting a layout together with the unused pages but that wouldn't work with these particular pages. It is good food for thought for upcoming projects though. 
 
So, then the right side of this layout will go with the Mr.Rushmore page.  I used the soft colors of the Avonlea as they worked beautifully with the stone colors of the mountain.  I chose not to incorporate too much extra as to not distract from the magnificent monuments.  The two smaller pictures were of a light show that they attended.  The pictures were blurry because of the distance and the lighting but I felt they were important to include as my in-laws really enjoyed the event.  By keeping the pictures small, the blurriness was not distracting to the balance of the layout.

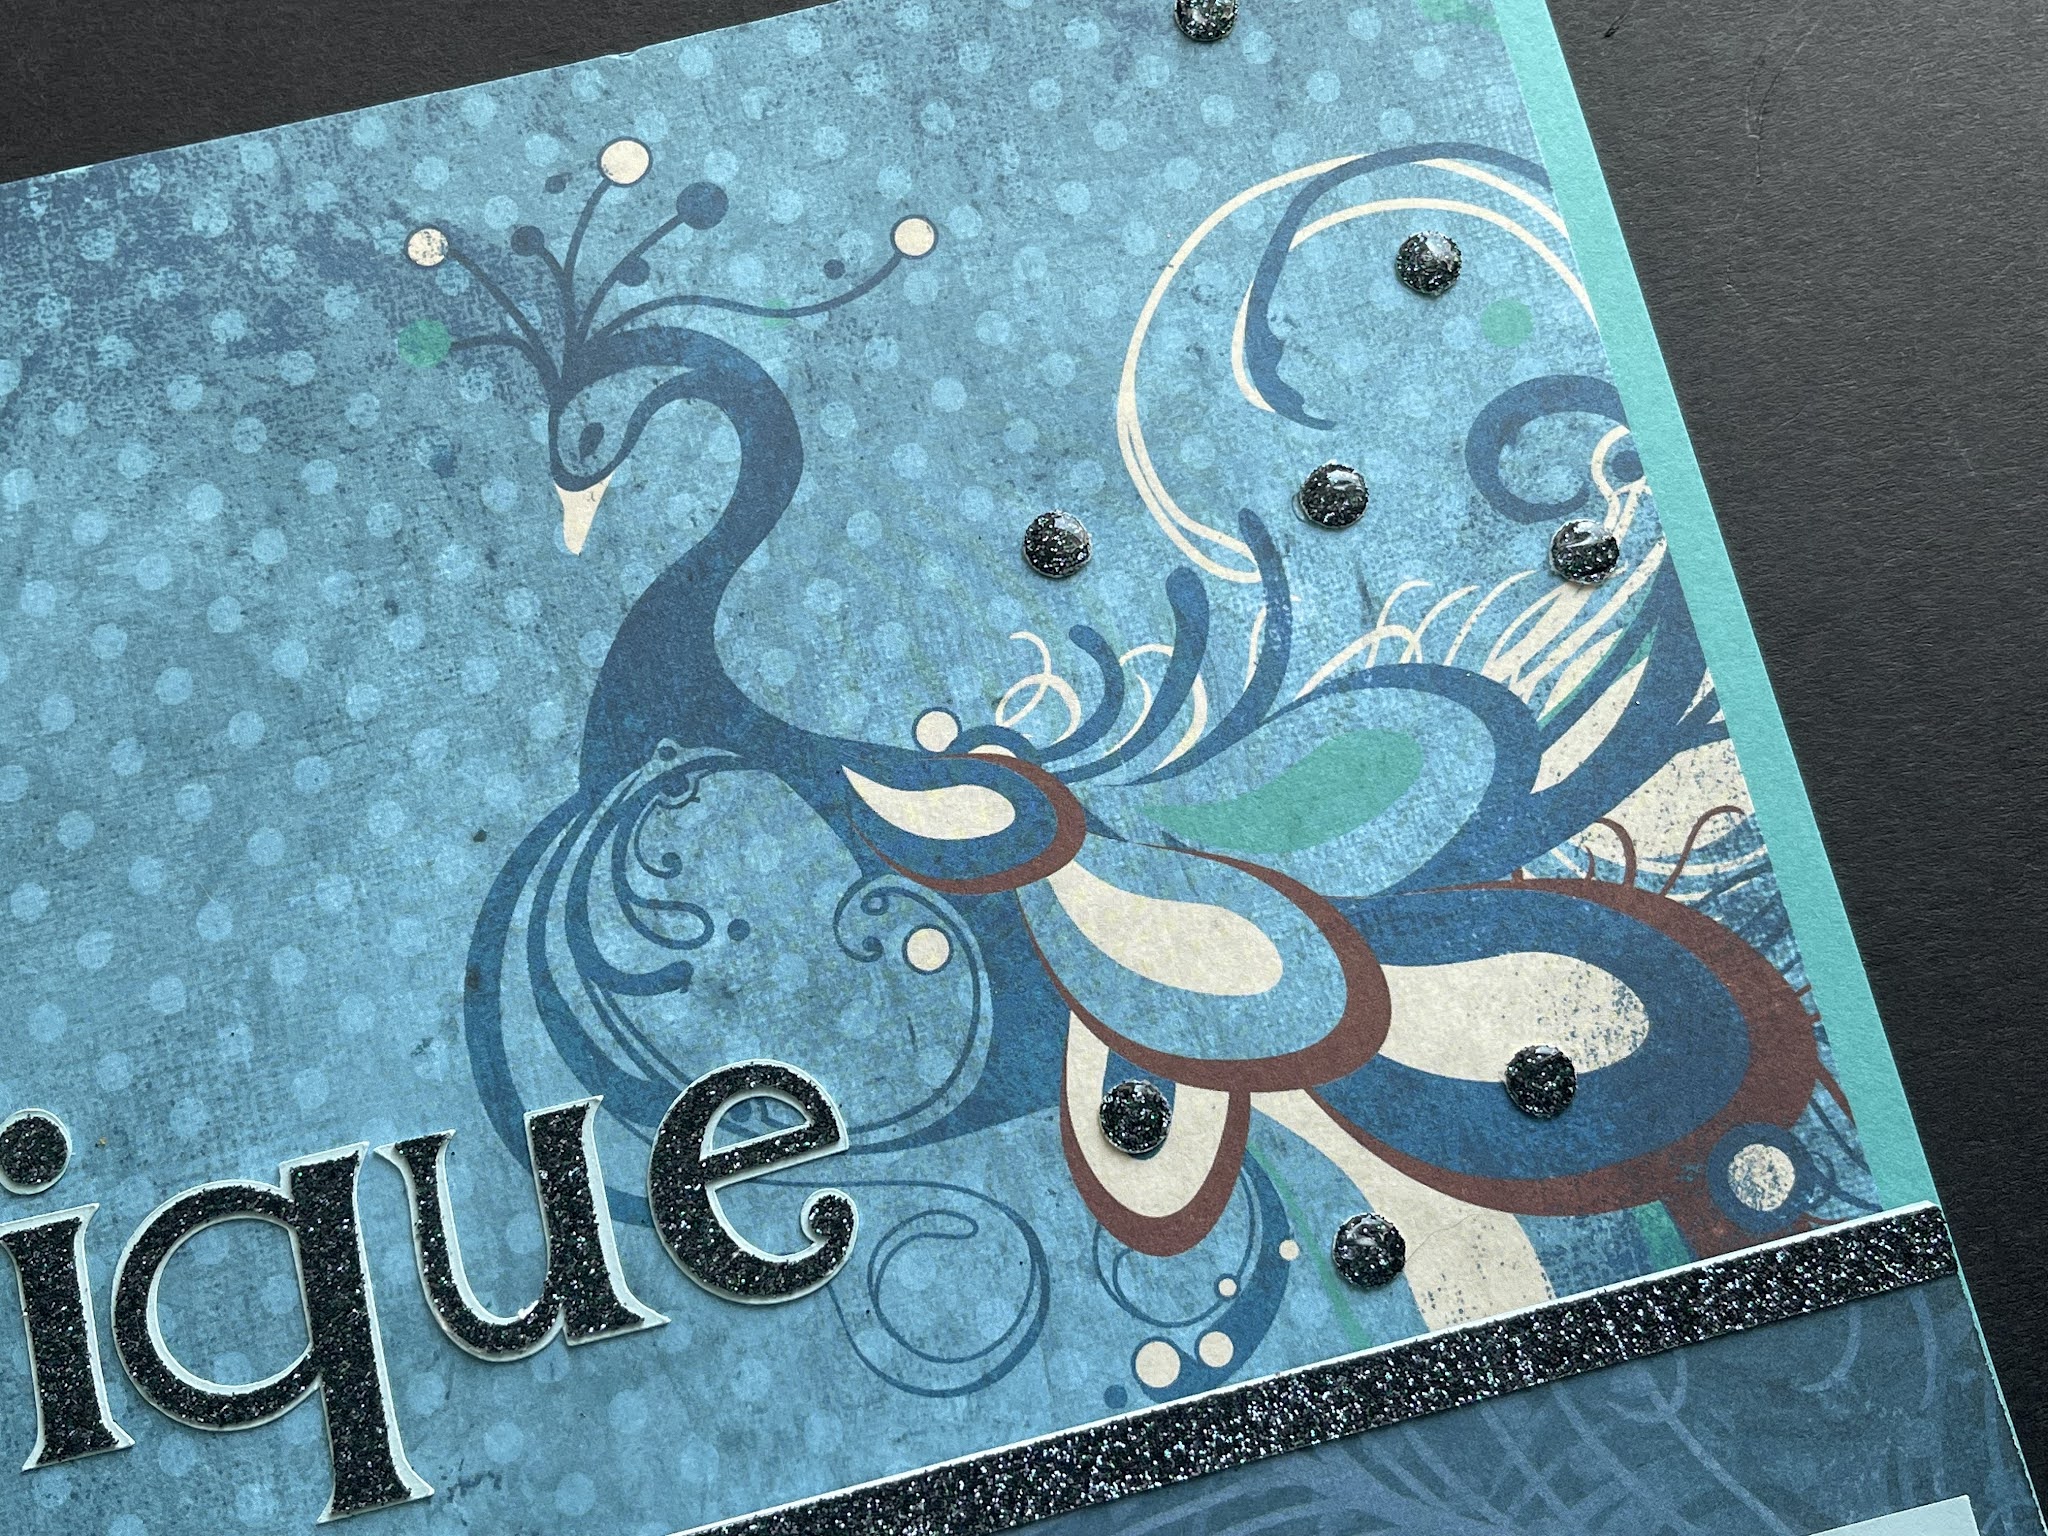
For the balance of the Devils Tower layout, I struggled a little with which paper collection to use.  The sky was absolutely beautiful that day and we do not have that bright of a blue color.  But, that being said, if I had used pulled from the blues I think the details of the photographs would have been lost.  I chose to use the Magnifique paper collection, and then muted the pattered papers to Bamboo and Desert Sand.  This really made the details "pop" and even made the prairie dogs "pop"!  I am so delighted with this layout! 

To see the details of any of the layouts, simply click on the layout itself and it will open in a larger window.
--------------------------------------------------------------------------------------------------------------------------
October Studio J Special...receive your 10th layout free when you purchase 9 layouts! To get started, visit my website at: www.ctmh.com/tonyasheridan.

--------------------------------------------------------------------------------------------------------------------------
October Stamp of the Month: A Very Merry Christmas Purchase this adorable Christmasy stamp set for just $5 with a $50 qualifying purchase. Shop now. www.ctmh.com/tonyasheridan

--------------------------------------------------------------------------------------------------------------------------
Want to win a FREE Art Philosophy or Artiste' Cricut Cartridge*? I will be giving one away from my blog on November 1, 2012! Simply place an order on my website at: www.ctmh.com/tonyasheridan and join the "Sassfully Chirping in October" link and you will be automatically entered into the drawing. Your name will be entered for each order placed between October 1-31, 2012. This giveaway is only available with Independent Close To My Heart Consultant, Tonya Sheridan and the winner will be randomly drawn by an on-line drawing service.


*if you already have the cartridges, a $99 gift certificate may be substituted for the prize.

Saturday, December 31, 2011

My mom's Studio J Birthday book

Now that Christmas has passed, I can begin to share some of the gifts that I created, and gave, for gifts this year.  These layouts were far past due as they were of my mom's surprise 60th birthday party from last December.  I created 8 layouts from the party itself.  I am still putting together a walk through her life, to add to the album...but that might have to be next Christmas' gift. 

These layouts were all created in Close To My Heart's Studio J using the Magnifique collection...which is still by far, one of my very favorites!  Studio J is the perfect way to scrapbook a lot of pictures in a short time frame.  Perfect for events like Christmas where you have a lot of pictures.  And in January, Close To My Heart will make it even easier: all Studio J Members will receive a free layout with every 9 purchased.  So grab your laptop and create away!  Not a member? We can fix that too!  E-mail me today at: inallsassiness@gmail.com on becoming a member and reaping the benefits.  And what's more, when you purchase a Studio J membership in January, you may choose a FREE My Legacy Album in the color of your choice!  That is an added $24.95 value.  Let's talk! 
Layout Design is Photo Booth from Magic.  (A Studio J members exclusive)

Layout Design is Understudy from Imagine.


Layout Design:  Super Star from Magic. (A Studio J Members exclusive)

Layout Design:  Through the Lens from Magic
(A Studio J Members exclusive)

Layout Design:  Front and Center in the Middle & Sidebar-Mainframe from Reflections.

Layout Design is Backstage from Magic. (A Studio J members only design).
Layout Design:  Ensemble Piece from Imagine.

Layout Design is Fab Fifteen from Cherish.

Tuesday, July 19, 2011

My "Wowie" artwork

This year at convention I was invited to a VIP event with my grandma up-line Tina Sutton. We had a fantastic dinner and then had a business building princess party. We were each asked to bring a "wowie" piece of artwork for an artwork contest. This is the piece I created ... & yes, it definitely wowed by son Gabriel. The little book tells about Gabriel's trip to the zoo to see the Polar Bears.


Layout Design is Mainframe Offset from Reflections.

Layout Design (left page) is Main Frame Vertical Window from Reflections.


Left Layout design is Sidebar - layers from Reflections.


Layout Design is Bottom Borders - Footnotes from Reflections.


Layout Design is Grand Finale from Imagine.


Layout Design is Front & Center - Photo Focus from Reflections.


Left Layout Design is Main Frame - Charmed from Reflections.
Right layout design is Quartet - Offset from Reflections.

Layout design is Balanced Rhythm from Imagine.


Layout design is Creative Team from Imagine.


Layout design is Subtitles from Imagine.


Supplies used: As you can imagine, yes, there were many of them! To list a few: Magnifique Level 1, 2 and My Stickease; Acrylix Album; 6x6 page protectors; Chocolate Mini-Medleys; Founding Flourishes; Mistletoe Flowers; Blue/Green Assortment of Sparkles; Chocolate, Bamboo, Lagoon, Colonial White, and Pacifica Cardstock; Pacifca, Bamboo, and Chocolate exclusive inks.


My Ultimate Scrapbooking Challenge: I have done a few of these layouts but this little book helped me quite significantly on my challenge! 70 1/2 layouts completed. 79 1/2 to go.

Monday, January 10, 2011

Our family Christmas card...


I know, a little late posting, but wanted to share my Christmas card from this year.

And before I do so, I have to tell a story that only my fellow scrappers could appreciate...


First there was the beautiful Magnifique paper pack.


Then Gymboree came out with a beautiful Peacock little girls clothing line in the fall. Complete with jewels in our colors.


Next, was two months worth of searching for coordinating outfits for my boys.


The card was designed and planned. Supplies ordered.

Next, a foot injury, and a small snow storm causing us to finally get Christmas pictures only a few days before Christmas.


Oh, and I forgot that the photographer wasn't very child friendly. So my hopes of getting a family Christmas picture of the three children together didn't work.


So back to the drawing board.


Problem...two of the pictures were horizontal and one vertical.


Cards re-designed and made. No sleep that night.


Finally, on the 23rd the majority of the cards were weighed at the post office and mailed.


So we thought.


We returned from last minute shopping only to find all of our Christmas cards back in our mailbox...needed additional postage (which was why we took them to the post office in the first place).


Finally, on Christmas eve most of our cards went out.

All that being said, I still think they turned out cute.

Maybe I should start next years cards now. lol.
The card design is Three is a Charm from Originals. My Ultimate Scrapbooking Challenge: 118 completed. 90 to go.

Sunday, December 12, 2010

Studio J is so magnifique!

Over the summer, my husband and my children were blessed with the opportunity to visit the Toledo Zoo with his family. I created a layout for each of our children, as well as Jay's parents. You will see that some of the pictures were the same, but others were specific to that particular child. I also created a layout for Abby that I posted earlier ("My Elli-pants"). I used the Magnifique paper collection which I am still in love with...even after creating several layouts with it!
This is the layout that I created for my in-laws.
The Layout design is Sidebar-Original (left) & Sampler-Photo Checkerboard (right)
which are both from Reflections.
(Both Layouts Previously used)


This was Nicholas' layout.

Layout Design: Sideline Surprise from Imagine.


And finally, Gabriel's.
The Layout design is Minuet from Imagine.
To see close ups of the layouts, click on the layouts themselves.
My Ultimate Scrapbooking Challenge: 150 layouts. 52 1/2 competed. 97 1/2 to go.

Friday, December 10, 2010

Prayer journal...or artbook...or list maker

The choice is really yours to make! But I had to share the idea of making your own journals! I love to do these and have found that the recipients love them as well. Just like most paper crafting projects, there is no right or wrong way to create the books, but I thought I would share some of the successes I have had.
For simplicity reasons, I try to use the composition books that do not have a spiral.

Cut the paper to fit and adhere from the back side wrapping the paper around to the front. Adhesives that work well are: Xyron and Zip Dry Paper Glue.

Cut, measure and adhere the paper to the front of the book overlapping the previous seam.

Decorate as desired.

Here is a finished journal that I created using the Magnifique paper.
And that is all there is to it. Have fun creating!