Showing posts with label White Pines. Show all posts

Sunday, July 11, 2021

Let's talk pinwheels!

Such a fun Thin Cut with endless possibilities!  This Thin Cut has just been added to Close To My Heart's retiring list (the end of August or while supplies last) and before we say good-bye to it forever, I thought I would share some of the whimsical ways that this set can be incorporated in cards, layouts, decorations (absolutely fabulous for cupcake toppers) and so much more!


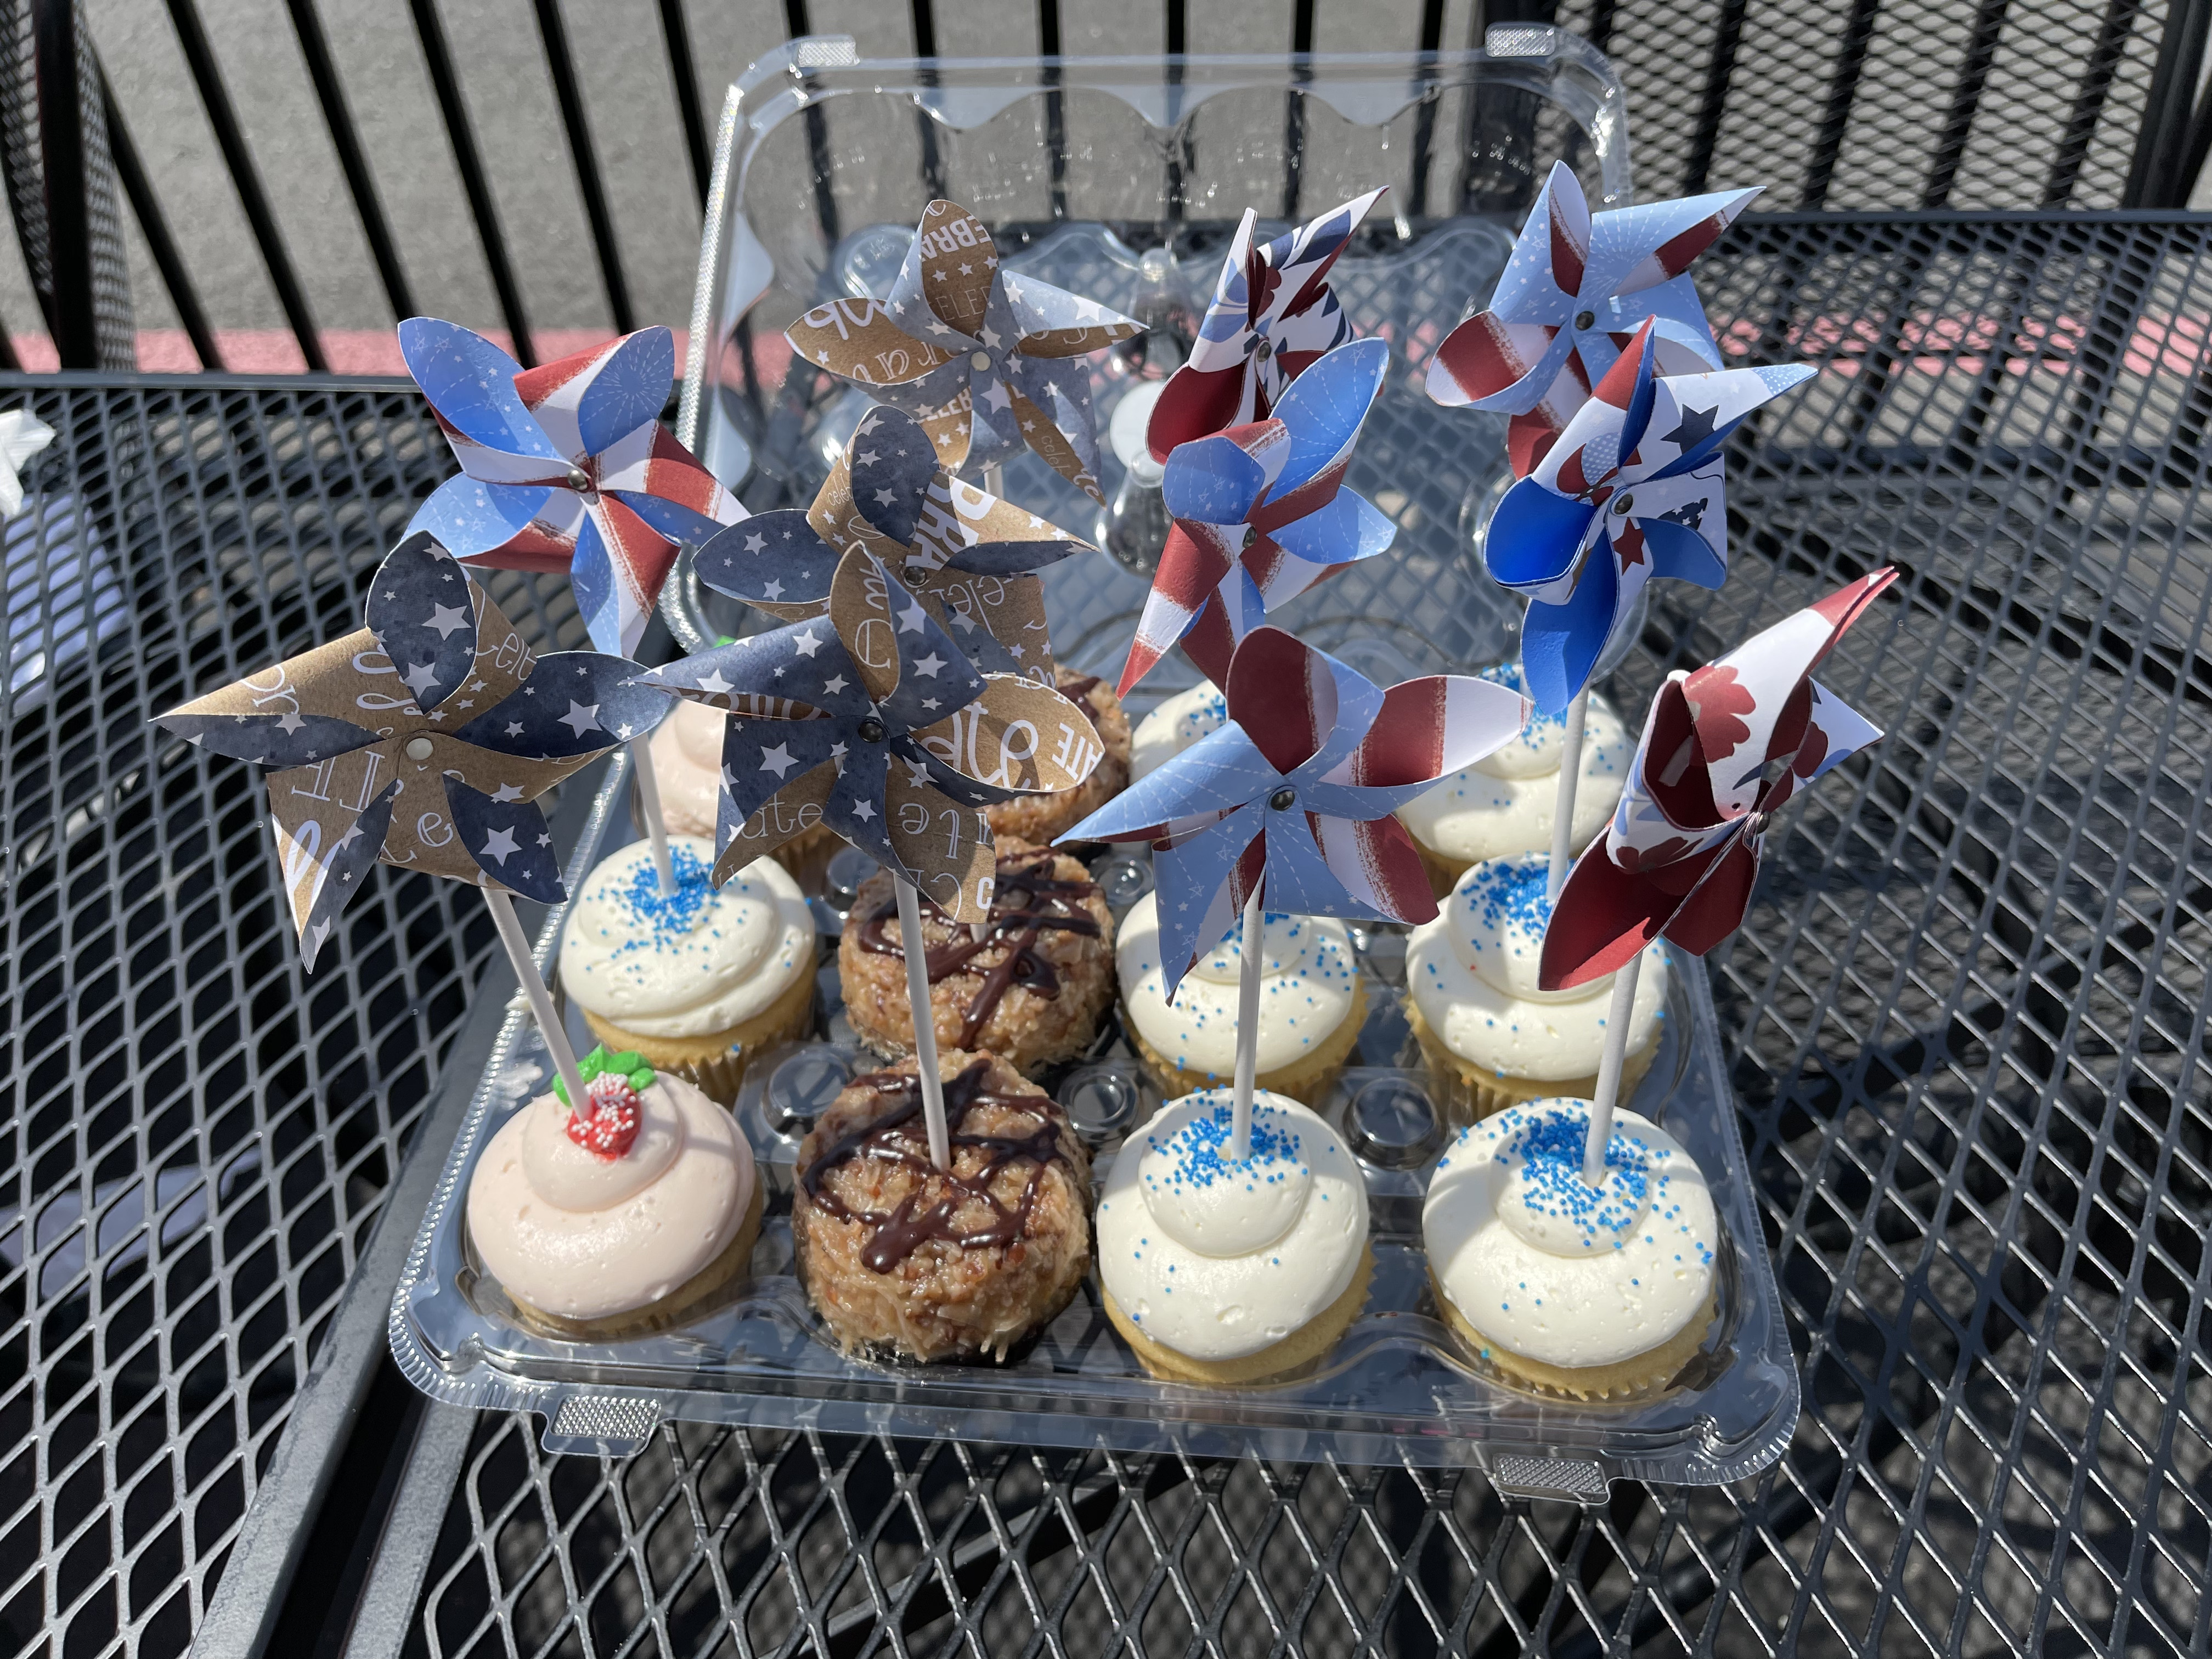
Cupcake toppers anyone??
To create, just grab your favorite paper collection, a few brads, candy sticks, the Pinwheel Thin Cut and of course your favorite cupcakes!  For mine I used the retired Stars & Sparklers Paper Collection.


When cards, and spaces, are sized correctly, you can the pinwheel makes the perfect shaker cards!!  Or, in this case, the perfect "bow" for a shaker card of my favorite mouse!


Here are a few cards that show the more whimsical side of Christmas!


You can purchase this Thin Cut on my CTMH site at: www.tonyasheridan.ctmh.com or in my shop at: www.inallsassiness.com if you are ordering custom items.  Whichever your preference, don't wait too long as the set is most certainly while supplies last and August 31st will be upon us before you know it!

The Christmas pinwheel cards are a part of my Card Buffet that is coming up on August 1st.  The Minnie Shaker Pinwheel cards are available in my shop at: www.inallsassiness.com.  The cupcake cake toppers are up to you and your imagination with the paper collection and cupcakes of your choice!  

Supplies used:  (retired) Sweet Safari paper pack, (CC72113) White Pines Cardmaking Stamp Set, (CC5204) Pinwheel Thin Cuts, (CC72110) Bring Back Your Pack - White Pines, (X6038) Candy Apple cs, (X6047) Black cs, (Z3799) Carnation Red Liquid Pearls, (Z3793) Rose Gold Liquid Pearls, (Z2900) Silver Star Confetti, (X6046) French Vanilla cs, (1385) White Daisy cs, (Z6509) Candy Apple Exclusive Ink Pad, (retired) Polka Dot Embossing Folder, (retired) brads.

Sassfully yours,

Tonya


Little Christmas Mouse stamps and card set

When you become one of my VIPS, or make a $75 purchase (before shipping and tax) collectively in my In All Sassiness Designs Shop or at www.tonyasheridan.ctmh.com, you will receive that month’s Little Mouse special as my gift of thanks to you.  The cards are pre-cut, pre-cut & include the embellishments, instructions and a color photo.  I will be teaching the set as a class that will be recorded and may be watched live or in play-back.  

Included in the kit, and on the post introducing each months special set, I will be sharing the non-consumable items that were used to create the cards as well in case you want to order them or you can certainly use the supplies that you have at home.  

For those who would like additional cards, or just want to order the card sets - they will be available for purchase without the exclusive stamp sets here in my shop: these come as a set of 4 - 2 each of two designs in my shop at: www.inallsassiness.com.

Note: a few sales exclusions do apply and I will post those when I share the special each month.  

So now that you know all of the details, here is my July Little Mice collection!


These cards were created with the new Bring Back My Pack - White Pines paper collection.  The paper has been refreshed with colors from Close To My Heart's new color palette.  I adore the Candy Apple with the Glacier and the little interjections of Espresso and Avocado!  Such fun right? The tiny dots of Liquid Pearls add the perfect embellishing touch to complete the cards.  And the mice

Here are the exclusive stamps used:


Additional supplies used in creating the cards:  (Z3793) Rose Gold Liquid Pearls, (Z3799) Carnation Liquid Pearls, (Z2486) Dull Green Blend Tri-Blend Marker, (Z2475) Brown Grey Blend Tri-Blend Marker.

Other Supplies used:  (X978) Glacier cs, (X6046) French Vanilla cs, (CC72110) White Pines - Bring Back My Pack, (X254) Value Cards & Envelopes, (X6038) Candy Apple cs, (Z6509) Candy Apple Exclusive Ink Pad, (Z2805) Black Exclusive Ink Pad, (Z2060) Thin Foam Tape, (Z3372) Adhesive Runner.  All current product can be ordered in my shop at: www.tonyasheridan.ctmh.com.

Sassfully yours,
Tonya


Wednesday, October 21, 2015

White Pines Picture My Life Cards...day 2

 This week, I want to continue to share cards that can easily be made with the White Pines collection, but that focus on the Picture My Life cards.  If you are unfamiliar with Picture My Life cards, these are cards that were originally designed for Pocket scrapbooking at it's very best - each card is either 3" x 4" or 4" x 6" with rounded corners and easily slides into pocket page protectors along with your photos that are also cut to 3" x 4" or 4" x 6".  That being explained, I have found that I love to use these cards in traditional layouts, for little lunch box notes, and to create handmade greeting cards with!  This is what I want to feature on my blog and show you this week.   I have taken the White Pines Picture My Life cards and created Christmas cards that you can easily reproduce or tweak to make your own.


Instructions for merry, merry card:
1.  Cut Cranberry cardstock to create a card base measuring 5 1/2" x 8 1/2".  Score, and fold in half.  Round all four corners.
2.  Using the horizontal side of the snowflake journaling card, cut the border off and adhere to the Cranberry base approximately 1" from the left edge of the card.
3.  Adhere a piece of ribbon, or Red Shimmer trim, to the left of the snowflake border.
4.  Cut the vertical tree 4" x 6" card to 3" x 4 1/2" (note the 4 1/2" edge is directly under the tree trunk).  Round cut corners.
5.  Adhere the tree card to the 3" x 4" December 10th card.  This is about 1/4" to the right and down.  Adhere combined pieces to the card with 3-d foam tape as desired or shown.
6.  Cut a 3/4" x 1 3/4" title piece from Colonial White Cardstock.  Stamp "merry merry" with Cranberry Exclusive Ink onto the piece.  Adhere in the right corner of the tree card.  This is flat over the tree and raised with 3-d foam tape on the non-overlapping right edge.
7.  Adhere a cluster of three Red Enamel Gems in the upper left and lower right corners of the card.  
8.  Use Liquid Glass to accent the snowflakes.


Instructions for Merry Christmas card:
1.  Cut Fern cardstock to create a card base measuring 7" x 10".  Score, and fold in half.  Round all four corners.
2.  Adhere 4" x 6" December Seventh card to the base.  This is positioned about 1/4" from the upper base corner.
3.  Cut a 2 3/4" x 5" piece from Cranberry cardstock.  Adhere to the base so that it is flush with the top and bottom edges and is approximately 1 3/8"  from the left edge of the base.
4.  Cut a second piece of Cranberry cardstock to 4 1/4" x 6 1/4".  Round all four corners.
5.  Using the Sap Green and the Carmine ShinHan Touch Twin markers, color the Merry Christmas card as desired.  Accent with Red Enamel Gems and Bitty Sparkles.
6.  Adhere the Merry Christmas piece to the Cranberry 4 1/4" x 6 1/4" mat.  Adhere the mat to the card with 3-d foam tape.
7.  Tie a bow with Fern Baker's Twine.  Tie knots in the ends of the twine.  Adhere with a mini glue dot to the upper left corner of the matted card.

Supplies used:  G1099 Pines Picture My Life Cards, Z3090 Red Enamel Gems, Cranberry Grosgrain ribbon (retired - could substitute another deep red ribbon from your local craft store, or Z1848 Red Shimmer Trim), 1272 Cranberry Cardstock,  X5777 Fern CardstockX1410 Colonial White Daisy Value Cards, Z1758 Colonial White 5" x 7" Envelopes1388 Colonial White Cardstock, Z3093 Fern Baker's Twine, Z1263 Bitty Sparkles, Z2448 Carmine ShinHan Touch Twin Marker, Z2463 Sap Green ShinHan Touch Twin Marker, Z2116 Cranberry Exclusive Ink Pad, M1128 Double Merry Stamp Set and Z679 Liquid Glass.  If you prefer to create cards that are pre-cut and ready to go, host your own card buffet with me for you and your friends where you can earn free and discounted products, or join one of my card buffets that is already scheduled.  For card buffet dates, click here.

Check back with my blog tomorrow for more PML White Pine Card ideas!  Happy card making!


Monday, October 19, 2015

White Pines Picture My Life Christmas Cards...day 1.

Yesterday, I shared with you CTMH's White Pines Workshop on the Go which is an easy way to create your Christmas cards.  This week, I want to continue to share cards that can easily be made with the White Pines collection, but that focus on the Picture My Life cards.  If you are unfamiliar with Picture My Life cards, these are cards that were originally designed for Pocket scrapbooking at it's very best - each card is either 3" x 4" or 4" x 6" with rounded corners and easily slides into pocket page protectors along with your photos that are also cut to 3" x 4" or 4" x 6".  That being explained, I have found that I love to use these cards in traditional layouts, for little lunch box notes, and to create handmade greeting cards with!  This is what I want to feature on my blog and show you this week.   I have taken the White Pines Picture My Life cards and created Christmas cards that you can easily reproduce or tweak to make your own.


Instructions for Joy to the World card:
1.  Cut Cranberry cardstock to create a card base measuring 5 1/2" x 8 1/2".  Score, and fold in half.  Round all four corners.
2.  Using the vertical side of the December 15th 4" x 6"  PML card, cut card to 4" x 5 1/2".  Round the two corners that were cut.  
3.  Adhere two strips of Cranberry grosgrain ribbon (or substitute other ribbon or red shimmer trim) across the open Dec. 15th space of the PML card.  Secure to the back of the card.
4.  Center, and adhere, to the Cranberry base.
5.  Cut a 3 1/4" x 4 1/4" mat out of Cranberry cardstock.  Round all four corners.
6.  Adhere Joy to the World 3" x 4" PML card to Cranberry mat.  
7.  With 3-d foam tape, center, and adhere, matted card to the Cranberry base.  
8.  Adhere 3 Red Enamel Gems to the bottom of the Joy to the World PML card.
9.  Use Liquid Glass to accent the berries on the PML cards.


Instructions for Joy card:
1.  Cut Fern cardstock to create a card front measuring 5 1/2" x 4 1/4"".   Round all four corners.
2.  Using the vertical side of the December 23rd  4" x 6"  PML card, cut card to 4" x 5 1/4".  Round the two corners that were cut.  
3. Center, and adhere, PML card to Fern front.
4.  Adhere a single piece of Cranberry Grosgrain ribbon (or substitute other ribbon or Red Shimmer Trim) across the PML card - this is just below the center of the card.  Secure to the back of the Fern card front.
5.  Adhere entire Fern front to a White Card base.  Round all four corners of base.
6.  Using the vertical side, cut 4" x 6" Joy PML card to 3" x 4" with Joy in the center.  Round all four corners of Joy card.
7.  Adhere Joy card to Dec. 16th 3" x 4" PML card at an angle.
8.  With 3-d foam tape, adhere Joy card and mat, to the card again at an angle.
9.  Accent Joy card with 3 Red Enamel Gems in the upper left corner and the lower right corner.

Supplies used:  G1099 Pines Picture My Life Cards, Z3090 Red Enamel Gems, Cranberry Grosgrain ribbon (retired - could substitute another deep red ribbon from your local craft store, or Z1848 Red Shimmer Trim),  1272 Cranberry Cardstock X5777 Fern Cardstock, X254 White Daisy Value Cards.  If you prefer to create cards that are pre-cut and ready to go, host your own card buffet with me for you and your friends where you can earn free and discounted products, or join one of my card buffets that is already scheduled.  For card buffet dates, click here.

Check back with my blog tomorrow for more PML White Pine Card ideas!  Happy card making!

Sunday, October 18, 2015

White Pines Card Workshop On The Go

Christmas cards you say?  Why yes, I did.  As we are nearing the end of October, and the air has quite the chill in it, my thoughts are of Christmas Cards!  Actually, my card club ladies have been Christmas card making for several months already, but I know not everyone shares our passion of creating our cards early-early in the season.  This year, Close To My Heart has delivered a beautiful, classic, timeless, and simple-to-create Workshop on the Go for the White Pines paper collection.  In this Workshop On The Go, you will have all the materials that you need to create three card designs with 5 each of those 3 designs for a total of 15 cards.  Your kit will also include Fern Baker's Twine, Clear Sparkles, the adorable must-have exclusive stamp set, card bases and envelopes, and a detailed colored guide with instructions to create these cards.  All that you will need to create the cards are the adhesives of your choice, My Acrylic Blocks, Cranberry, Fern, Black and Cashmere Exclusive Ink Pads -- all of which can be purchased on my website at: www.tonyasheridan.ctmh.com and shipped directly to your home.  If you are type of cardmaker who likes to create lots of different cards and not duplicates, you can also either host your own card buffet with me, or come to one of my upcoming card buffets where you can create by the card.  Whichever option you choose, these cards are certain to delight the recipients on your list!  To find out more details about my card buffets, or hosting your own, where you can earn free and discounted products, e-mail me at: inallsassiness@gmail.com.


Ink colors needed to complete the cards: