Showing posts with label Close To My Heart Cricut Collection. Show all posts

Sunday, August 7, 2022

Strategies of Design Space cutting

Design Space in Cricut can be tricky but the more that you work with it, the easier tasks become and for me much of my learnings come from trial and error.

I am a huge fan of wood grain paper - especially the patterns in the 2021-2022 Paper Packet that is retiring at the end of the month (or when supplies are depleted).  With this particular set of patterns, I have especially found joy creating layouts for pets. Why wood grain you might ask?  Well, first because the patterns are neutral and lend their way for many color combinations in the photographs and second- the colors of the wood grains themselves work so well with the many shades of pet's fur.

So with that being said, one struggle that I have is that there are often lines across the wood grain patterns that I might not want to go through whatever I am cutting.  And, now I have a solution to be able to cut around those lines!

Let me explain. 

Here is the wood grain pattern that I chose to work with.  You will note that there are indeed lines in the paper.  When you place the paper on the Cricut Mat, you can then use the measurements on the left side of the mat to guide you in Design Space.


When strategizing my cuts in Design Space, I can manipulate the images around those lines.  So for i.e., in this sheet, I see that my image is larger than 1" so it will not fit above that first line.  I can then move the image down below the 1 1/2" mark, and still above the 4" mark and the image will cut without having the line move through the image.  

For this cut, I know that Cricut will not cut larger than an 11 1/2" x 11 1/2" space so I created a box, measured it to 11 1/2" x 11 1/2".  I ensured that all of my images were aligned within that box, deleted the box and attached my images all together that way they stayed in the position that I placed them in and would align with the lines of my wood grain.  This is how my screen looks in Design Space.


And here is what my cuts look like after being removed from the Cricut mat - you can see how the wood grain line is in between all of the cuts.


Fun right??  So, now that I have explained how to create these cuts, here is the layout that I created using this design element.  To see a larger picture, click on the image and it will open up with a larger view in a new window.


And here are a few pictures of the details:


This layout kit is now available in my shop.  You can find out more details by clicking here.

Supplies used:  (X8028) Wood Grain Paper Pack, (X6047) Black cs, (1385) White Daisy cs, (Z5022) Adhesive Paper, (Z6018) Wood Arrows, (Z2060) Thin Foam Tape, (Z3372) Adhesive Runner, (Z341) Mini-Glue Dots.  Supplies that are current can be ordered here on my CTMH website.

Sassfully yours, 
Tonya


Tuesday, February 1, 2022

Cricut Layouts converted to cards!

One of the amazon advantages to Cricut images is that they can be manipulated, reshaped or resized to fit a variety of projects - often ones completely different than the original purpose.  Case in point - the cards that I have created below were all created from a Cricut file that was designed as an 8 1/2" x 11" scrapbooking page!  Go figure!

Let me explain.  

Close to My Heart introduced a new digital Cricut Collection in November called Love Each Day.  The collection has cards and layout designs in various sizes.  This is the layout that I worked with.  It was originally designed as an 8 1/2" x 11" one page layout.  I deleted some of the images and elements and resized it to fit an A-2 card (4 14" x 5 1/2").  


This is what the layout design looked like after my alterations:


From this original design, I created the first card which I used the Cricut design and added additional stamped images to complete my sentiment.  The banner and the sentiments are all popped up with Thin Foam Tape.


I then took the same design and left off the White Daisy circle top layer.  I loved how the stripes formed a pattern so this worked great for me.  I created a circle based on a technique that I learned during the January Album Retreat with CTMH, popped the circle up on foam and accented it with the adorable little stamped images from the Under the Weather Stamp and Thin Cuts set.


Here is the stamp set, with Thin Cuts, that I used.  So many possibilities right?


Finally, I took the layout image one step farther and created this acrylic card.  Here, I used just the circle overlay from the original design.  I again used the Under the Weather stamp set and Thin Cut set.


Here is what the card looks like open.


This new, and exciting, Cricut collection in only available through CTMH Makers.  You can order this collection by clicking here and I will receive a small compensation (and my thanks).

The card kit for these cards, plus one additional card, are available in my In All Sassiness Designs Shop.


The supplies used in this projects are:  (Z4401) Under the Weather stamp and Thin Cuts, (X5968) Lagoon cs, (Z2895) Lagoon Exclusive Ink, (X6059) Shortbread cs, (Z6530) Shortbread Exclusive Ink, (X5978) Glacier cs, (1385) White Daisy cs, (X6042) Mint cs, (X254) Value Cards and Envelopes, (Z3314) Black and White Dots, (Z341) Mini Glue Dots, (Z3440) Dual Glue Pen, (Z3372) Adhesive Runner, (Z2060) Thin Foam Tape, (Z5024) Red Line Tape.  All supplies that are current may be purchased at: www.tonyasheridan.ctmh.com.

Sassfully yours,
Tonya


Sunday, December 5, 2021

Sassy 25 Days of Christmas - Day 5. Distress Oxide Inks.

Sassy 25 Days of Christmas - Distress Oxide Inks 2/$10. 


We offer over 15 colors of Distress Oxides!  Click here to see that Close To My Heart features.

________________________________________________________

To showcase the Distress Oxide Inks today, I created this layout using the Peacock Feathers Ink.  I am so delighted with how it turned out!


1.  Using the Peacock Distress Oxide and the Mini Ink Blending Tool, ink a piece of White Daisy cs with the Blending Tool in a circular motion/pattern.  Cover 2 pieces of White Daisy cs.  Note: Using the All Purpose Mat underneath your cardstock allows you to successfully ink the edges as well.


2.  Load the overlay from CTMH's new cartridge "Love Each Day" into Design Space.  

3.  Unlock the "lock" and change the image size to 11.5" x 11.5".  Cut the overlay twice out of White Daisy cs.

4.    Center, and adhere, the overlay to the inked cardstock.  (Look at how the circle pattern underneath brings texture to the artwork!)


5.  Cut desired title.  Ink title with the Blending Tool and ink.


6.  Adhere pieces, mats and titles as desired.

Supplies used:  (Z3866) Mini Ink Blending Tool, (Z3833) Peacock Feathers Distress Oxide Ink, (Z3293) Clear Shimmer Brush,  (1385) White Daisy cs, (Z2060) Thin Foam Tape, (Z1836) Non-Stick Micro Tip Scissors, (Z3372) Adhesive Runner, (Z3235) 4" Flip Flaps.

Back by request, welcome to the Sassy 25 Days of Christmas!  Each day, from now until Christmas, I will be sharing a special of some sort.  Some might be product, other might be class kits, but either way, this is a great way to celebrate your love of scrapbooking and paper crafting all December long!  

The days specials will be posted each day around 3PM and will be only good until 2:59PM on the following day.  There is be a special link in my www.inallsassiness.com shop for that days special.  The special price is the final price - there is nothing additional for tax.  Visit here on my blog, or my shop each day to check out the special and order the ones that you like!  The shipping will be set to pick up so that shipping charges are not assessed.

During the week between Christmas and New Years, I will be sending out all orders from the collective 25 days.  If shipping is needed, you will then be sent an invoice for the actual shipping to you (for most customers this is right around $10 per box) although depending on the weight, it might be a little more.  Once you pay the invoice on a secure site, your box of all your happiness will be mailed to you.

Anyone who takes advantage of 5 of the 25 days will receive a special gift in their box.

Additionally, all VIP's that take of advantage of 5 of the 25 days will receive a free pack of the Smitten Paper with Sticker sheet with their box!  VIP's will also receive VIP Credit for the purchase price of their special orders all month.

Until tomorrow,

Sassyfully yours,

Tonya

Saturday, December 4, 2021

Sassy 25 Days of Christmas (2021) - December 4th. 100 Sheets of White Daisy cs!!

Sassy 25 Days of Christmas - December 4th.  Bulk White Daisy cs - 100 sheets! 


---------------------------------------------------------------------------------------------

Here is a card that I created with our White Daisy cs and the Cricut.  I L-O-V-E how it turned out!!  


Supplies used:  (1385) White Daisy cs, (X6030) Evergreen cs, (X6062) Harbour cs, (X6045) Sage cs, (X6038) Candy Apple, (retired) Holly & Ivy Paper, (X254) Value Cards & Envelopes.

----------------------------------------------------------------------------------------------

Back by request, welcome to the Sassy 25 Days of Christmas!  Each day, from now until Christmas, I will be sharing a special of some sort.  Some might be product, other might be class kits, but either way, this is a great way to celebrate your love of scrapbooking and paper crafting all December long!  

The days specials will be posted each day around 3PM and will be only good until 2:59PM on the following day.  There is be a special link in my www.inallsassiness.com shop for that days special.  The special price is the final price - there is nothing additional for tax.  Visit here on my blog, or my shop each day to check out the special and order the ones that you like!  The shipping will be set to pick up so that shipping charges are not assessed.

During the week between Christmas and New Years, I will be sending out all orders from the collective 25 days.  If shipping is needed, you will then be sent an invoice for the actual shipping to you (for most customers this is right around $10 per box) although depending on the weight, it might be a little more.  Once you pay the invoice on a secure site, your box of all your happiness will be mailed to you.

Anyone who takes advantage of 5 of the 25 days will receive a special gift in their box.

Additionally, all VIP's that take of advantage of 5 of the 25 days will receive a free pack of the Smitten Paper with Sticker sheet with their box!  VIP's will also receive VIP Credit for the purchase price of their special orders all month.

Until tomorrow,

Sassyfully yours,

Tonya


Sunday, October 17, 2021

All My Heart Layout

The Close To My Heart Art Department never disappoints with absolutely beautiful artwork, and this the piece that this was inspired by was of course no exception!  As with other artwork in year's past, I selected this layout for my "How did they do that?" Class and taught this layout at my recent Scrap Pink Crop.  The layout was just too fabulous not too and represented so much of what I wanted to share, and empower with, at my event.


The layout is perfect for a single page layout, a cover or back page for an album, or a shadow box layout.  Of the attendees present, I believe several plan to do both options.

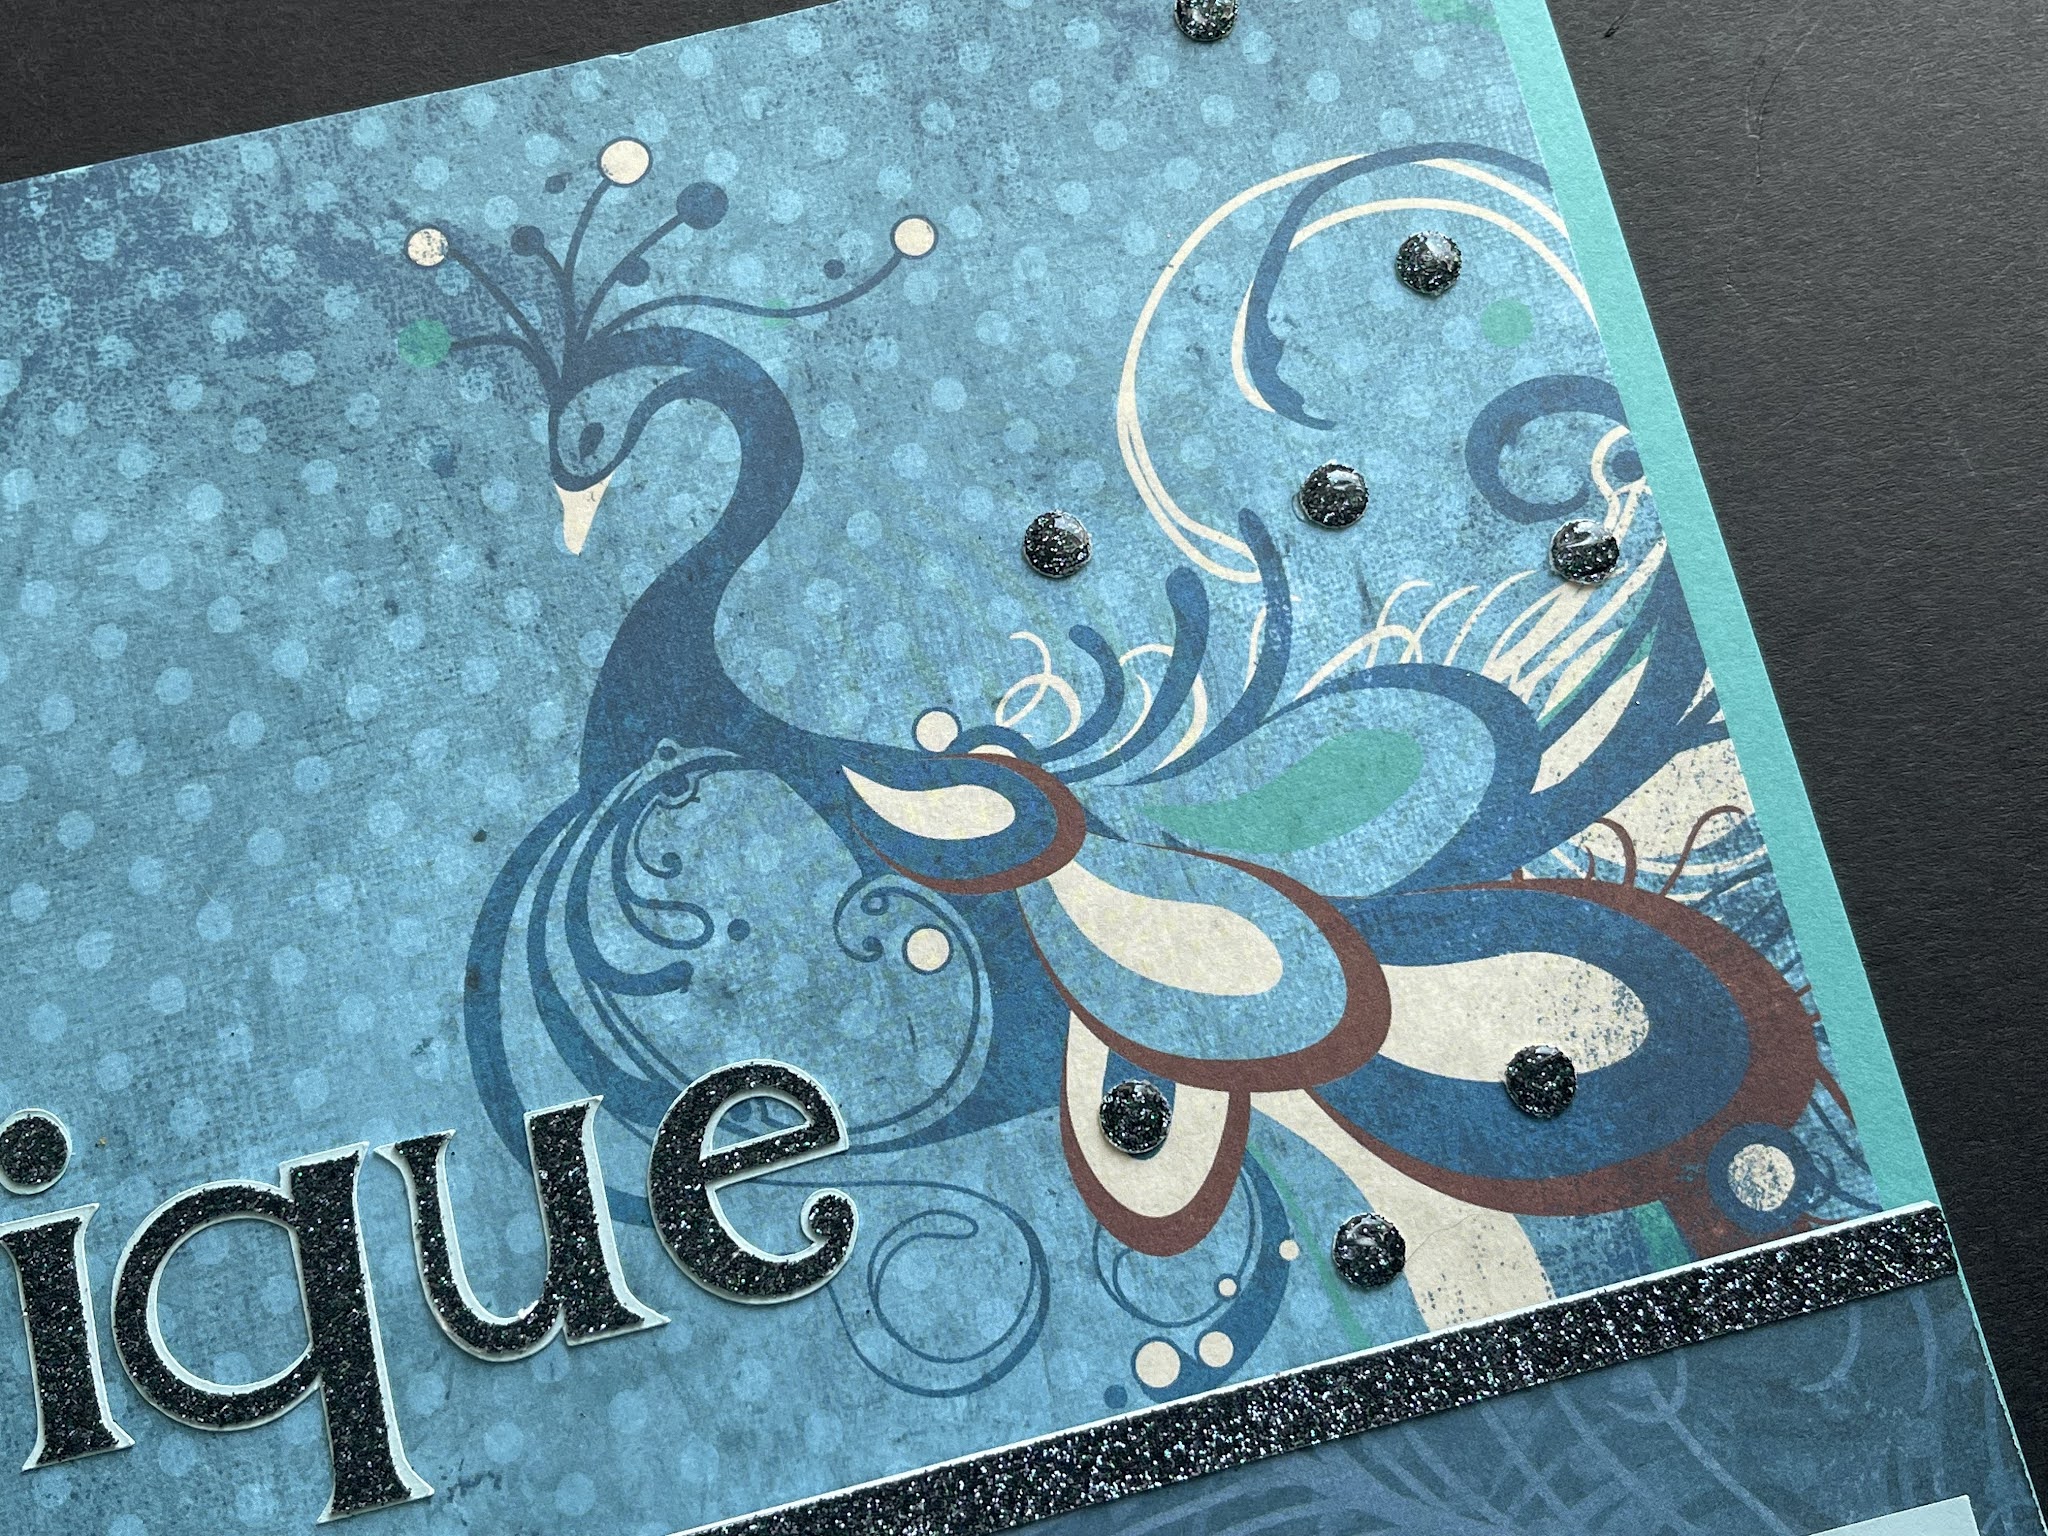
You will note that the title is created with glitter letters that are the same font as our wooden letters - and even though they are different mediums - they are the same font.  How awesome is that?  The font in Cricut is called DTC Spring Break and it is almost an exact match to the font of our letters.  So what does it mean for you? It means that you now have the opportunity to mix the wood shapes with letters that you cut out on the Cricut.  To ensure that they are the same height, change the height of each individual letter to 1.0.  So, for this layout, if you prefer the wood letters, you could switch them out.  Click see here to see an i.e. of how I have used both the wood and the Cricut cut in the same layout.
Once the title is positioned in place, the remaining space is filled with an assortment of our wooden and black acrylic shapes.  You could use the exact ones that I have used, or mix and match ones that work best with your pictures and personal style.  Each type of shape is available from Close To My Heart in wood, Black Acrylic and White Acrylic.


Photo sizes:  3” x 3”.  Additional 3” x 3” may be added with Flip Flaps.

Adhesive Note:  The wooden, and acrylic shapes, adhere best to cardstock with Mini Glue Dots, Liquid Glass or Tombow Dual Permanent Glue Pen (clear).

Special note:  This class was taught to my Scrap Pink attendees.  The directions were written to correspond with the kits they were given.  For those who would like to make this layout not using the kits I created for my attendees, you will need the following cardstock and Glitter papers:  1 sheet of Black cs, 1 sheet of Papaya cs, 1 sheet of Wild Berry cs,  a 4" x 4" piece of Black Glitter Paper,  a 3 1/2" x 3 1/2" piece of either Papaya or Wild Berry cs, a 3 1/4" x 3 1/4" piece of either Papaya or Wild Berry cs, (3) hearts cut out of Shortbread cs, a 3" piece of Papaya Shimmer Trim and a 3" piece of Wild Berry Shimmer Trim.

Preparation:

1.  Determine if you prefer the Papaya cs on top matted on the Wild Berry or the Wild Berry on top matted on the Papaya.

2.  Cut the “mat” (Wild Berry shown in sample) to 11 1/2” x 11 1/2”.  Center, and adhere, to the Black cs base.

3.  Cut the top color (Papaya shown in sample) to 11 1/4” x 11 1/4”.  Center, and adhere, to the cs mat.

4.  Using a journaling pen, doodle a design, or hand journal, around the edge of the top cs.

5.  Adhere the three Shortbread hearts together and adhere to the top cs at desired angle.  The thickness of layering these will provide stability for the embellishments.

6.  Using a journaling pen, doodle a design, or hand journal, around the outer edge of the heart.

7.  Stamp heart of choice with Black Exclusive Ink below the lower left curvature of the heart and adhere Black Acrylic Hearts around the stamped image.

8.  Adhere two additional Black Acrylic Hearts above the right upper curvature of the left side of the heart.

9.  Adhere the Black Glitter square to the right mid-lower section of the heart.  Where this overlaps the Shortbread cs heart, this is adhered flat.  Where it extends to the right of the heart, adhere with Thin Foam Tape.

10.  Dovetail the two pieces of Papaya and Wild Berry Shimmer Trim.  Leave the film on the back of the Shimmer Trim.  Attach these to the back of the chosen bottom cs mat with Red Line Tape.  Anchor the dovetail ends of the Shimmer Trim to the base with Thin Foam Tape.

11.  Cut the chosen bottom cs mat to 3 1/2” x 3 1/2” and adhere to the Black Glitter mat with Thin Foam Tape.

12.  Cut the chosen top cs mat to 3 1/4” x 3 1/4” and adhere the bottom cs mat.  

13.  Stamp heart of choice with Black Exclusive Ink below the Black Glitter mat and add Black Acrylic Hearts around the stamped image.

14.  Add an additional Black Acrylic Heart to the right of the Black Glitter Mat.

15.  Position, and adhere the glitter letters, or optional font.  Position, and adhere, the glitter “x” and “o” in the upper  right curvature of the heart.

Adding the embellishments to the layout:

 1.  When adhering the embellishments to the layouts, the thinking process is similar to that of random stamping.  Start with the larger Wooden & Black Acrylic embellishments, then move to the medium and finally the smaller ones: filling and balancing the empty spaces as you go.   For balance, I recommend positioning the pieces before adhering them down.

2.  Once the acrylic and wooden pieces are adhered down, adhere the sequins, dots, and Glitter Gems.  I find it works best to work in a triangle format adding one type of embellishment at a time, then moving to the next type then the next and so on.  Once all embellishments have been adhered, go back and see if additional ones of the various types should be added to fill in the spaces and for balance.

Special Note: there is a wooden * and a Black diamond shown in the picture that are not included in the kits.  And, some of the buttons might have a different design than what is shown.

Supplies used: (X6059) Shortbread cs, (X6063) Papaya cs, (X6047) Black cs, (X6056) Wild Berry cs, (Z2543) Papaya Glitter Paper, (Z2538) Wild Berry Glitter Paper, (Z3236) Black Glitter Paper, (Z5014) Papaya Shimmer Trim, (Z5012) Wild Berry Shimmer Trim, (Z5008) Wild Berry Dots, (Z5018) Wild Berry Glitter Gems, (Z5021) Wild Berry Loose Sequins, (Z679) Liquid Glass, (Z3547) Piercing Tool, (Z3515, Z3516 or Z3517) Black Journaling Pen, (Z6014) Black Acrylic Hearts, (Z6023) Black Acrylic Brackets, (Z6011) Black Acrylic Buttons, (Z6020) Black Acrylic Arrows, (Z6026) Black Acrylic Flowers, (Z6009) Wood Buttons, (Z6012) Wooden Hearts, (Z6021) Wooden Brackets, (Z6018) Wooden Arrows, (Z6024) Wooden Flowers, (Z2805) Exclusive Black Ink Pad, (Z2060) Thin 3-d Foam tape, (Z3341) Thin 3-d Foam Dots, ((Z3372) Adhesive Runner, (Z5014) Red Line Tape, (Z341) Mini Glue Dots, (Z3340) Dual Tip Permanent Glue Pen. All of the current items may be purchased on my Close To My Heart website at: www.tonyasheridan.ctmh.com.

Sassfully yours,
Tonya


Friday, October 8, 2021

Falling For Fall Layout

Fall is upon us!  The brisk breeze, the falling leaves, the breathtaking colors!  I love every moment of it!  This layout was created to capture those precious moments.  The overlay with cut from Close To My Hearts digital art file Pumpkin Spice (see below for the images included in this file).

To see more details, click on the layout and it will open in a larger window.

details of the leaf and overlay


Our new Wooden Arrows were used when creating this layout.  The packs include a variety of arrows in different shapes and sizes.  The arrows were inked with the Harbour Exclusive Ink.  

Although not included in the kit (but can be added to the kit), the wooden letters were used for the title.  They too were inked with Harbour ink.  These can be added to your kit, should you desire.  Here is a picture of the letter assortment that are included for those who want to design a title -- this allows you to determine if you need one or two sets of the alphas.  My kits do include a glitter cut version of the title I chose.


Close To My Heart's digital Art Pumpkin Spice images:

Supplies used:  (X7272F) Pumpkin Spice Digital Art, (Z6018) Wood Arrows, (X8028) Woodgrain Paper Pack, (X6062) Harbour cs, (X6044) Peach cs, (X6063) Papaya cs, (X7272S) Pumpkin Spice Paper Pack, (Z6533) Harbour Exclusive Ink Pad, optional (Z6027) - Wooden Alphabet, (Z2542) Harbour Glitter Paper, (Z2543) Papaya Glitter Paper, (Z5017) Rose Gold Shimmer Trim, (Z2060) Thin 3-d Foam tape, (Z3341) Thin 3-d Foam Dots, ((Z3372) Adhesive Runner, (Z341) Mini Glue Dots, (Z3340) Dual Tip Permanent Glue Pen.   All of the current items may be purchased on my Close To My Heart website at: www.tonyasheridan.ctmh.com.

The kit can be ordered in my shop at: www.inallsassiness.com.

Sassfully yours,
Tonya


Tuesday, August 17, 2021

Series of Blues Series: Magnifique part two

One cannot go wrong with flip flaps!  They create engagement and interaction with your layout but most importantly, they provide the opportunity to add more photos - photos to help tell your story!  Love it right!  This layout combination does just that!  All in all, as designed, this combination allows for 22 photos - of course, additional flip flaps can be added to include even more photos.

As with the first layout in this series, this layout pairs the old with the new.  I have used the long-ago-retired magnifique paper suite with some current colors of Lagoon and Glacier and then splashes on our new Harbour (to be released on September 1st) Glitter Paper.  I love the addition of the Harbour - it is the perfect balance!


Here are a few close up photos of the little details that make the layout so unique!

The embellishments are made by adding Liquid Glass to small circles cut out of the scraps of the glitter paper.  Once they dry, they become beautiful epoxy-like embellishments!


Title details - the Harbour Glitter paper is the top layer and the Glacier cs is the bottom layer for the title.  Combined, the two create an elegant title piece.


subtitle details


The "all time favorite" subtitle - this can be overlapping the vertical 4" x 6" photo or dropped to overlap the 4" x 6" horizontal photo.


glitter square details


The feather details - an exquisite detail to this layout.  The stem of the feather is flat and the top of the feather is supported by Thin Foam Tape to give it dimension over the photos that they overlap.


scalloped border details

Supplies used:  (retired) Magnifique paper, Scallop Border Thin Cuts.  (Z2542) Harbour Glitter Paper, (X5978) Glacier cs, (X5968) Lagoon cs, (Z3268) 6" x 12" Flip Flaps, (Z679) Liquid Glass, (Z3372) Adhesive Runner, (Z341) Mini-Glue Dots, (Z2060) Thin Foam Tape.  Current items may be ordered at: www.tonyasheridan.ctmh.com.

This exclusive kit can be ordered at: www.inallsassiness.com.

Sassfully yours,

Tonya