Wednesday, December 6, 2023

Sassy 25 Layouts of Christmas - 2023. Layout 4. Tis The Season (Silver Bells)

Welcome to my Sassy 25 Layouts of Christmas 2023!  I will be celebrating the art of scrapbooking during the next 25 days leading up to Christmas and I invite you to join me!

So how does this work? For the next 25 days, I will share a layout here on my blog, in my In All Sassiness Scrapbooking Facebook Group and in my In All Sassiness Shop.  The layout will be available in kit form and quantities will be while supplies last.  Because many of the layouts are created with retired product, the quantities will vary from day to day so if you see one that you want, you will want to order it sooner verses later.  Additionally, there will be a product special that will compliment the Layout which will just be available for 24 hours. Grab, and order, the kits, and product deals that you love, select pick up at check out and then the items will be collectively at conclusion of the 25 days! Which saves you on individual shipping cost AND gives you a very happy box to open!!  A special note:  due to the roll-a-coaster ride of CTMH's inventory last December, I will be very pro-active and will placing one collective order at the end of each day to ensure I can get the product ordered. And of course, if you are one of VIP's you will receive VIP credit for all specials and layout kits that you order.

So with all of that being said, here is day four!!!
---------------------------------------------------------------

My fourth layout sports a new technique that I absolutely love: mosaics with acetate!  The technique was originally shared by Laura Beacham, from Australia, I find fun to create, and once done, it creates a wow-factor!  If you take note of the 1/2" strip of little squares towards the top of the layout, you will see the technique that I am speaking about.


This layout is created with the new Silver Bells paper suite which is a current collection.  My absolutely favorite part of this collection is the sweet Thin Cut set that comes in the Silver Bells Card Making workshop.  While I adore how the Thin Cuts were used in the cards, those Thin Cuts are amazing and are perfect for layouts as well!!

Additionally, for the title, I used the Tis The Season stand alone Thin Cut set.  This little Thin Cut set has quite the wow factor!  As I didn't want the title to get lost within the patterns of the papers, I adhered it to White Daisy, popped the title pieces up and adorned the spaces between the words with the silver enamel glitter dots from the Silver Bells collection.


Today's product special will be shared in a separate post.

Have a sassy day!
Tonya

Sunday, December 3, 2023

Sassy 25 Layouts of Christmas - 2023. Layout 3. The Best Memories: Claire.

Welcome to my Sassy 25 Layouts of Christmas 2023!  I will be celebrating the art of scrapbooking during the next 25 days leading up to Christmas and I invite you to join me!

So how does this work? For the next 25 days, I will share a layout here on my blog, in my In All Sassiness Scrapbooking Facebook Group and in my In All Sassiness Shop.  The layout will be available in kit form and quantities will be while supplies last.  Because many of the layouts are created with retired product, the quantities will vary from day to day so if you see one that you want, you will want to order it sooner verses later.  Additionally, there will be a product special that will compliment the Layout which will just be available for 24 hours. Grab, and order, the kits, and product deals that you love, select pick up at check out and then the items will be collectively at conclusion of the 25 days! Which saves you on individual shipping cost AND gives you a very happy box to open!!  A special note:  due to the roll-a-coaster ride of CTMH's inventory last December, I will be very pro-active and will placing one collective order at the end of each day to ensure I can get the product ordered. And of course, if you are one of VIP's you will receive VIP credit for all specials and layout kits that you order.

So with all of that being said, here is day three!!!

-------------------------------------------------------------------

My third layout partners the beloved retired and new product all in one layout!  The two compliment each other so much that you would have thought they were created at the same time instead of several years apart.

This layout, "the best memories" was created with the Claire Suite.   I then added the current Freshly Baked Dots and the Wood Grain Die Cut Titles to compliment the paper. I adore the softness of the Freshly Baked Dots and there are several colors, sizes, and sparkabilty to choose from!  Additionally, in this layout, I used the beautiful Papaya Shimmer Trim which is truly one of my favorite all time Shimmer Trims!  There is just something about it that pop, pop, pops!!!!  Here is pops the colors from the Claire papers so well.

Because the wood grain titles include multiple different titles, you could change the title to work with your own photos if desired.


This layout, and the coordinating product special, are now available for purchase in my shop!  Click here for the layout.

Product Special for December 2nd.  Acrylic Title Sets $6.00 each.  Wood Grain & Black Die Cut Title Sets $3.00 each.  This special is repeatable.  Available until 10am on Sunday, December 3rd.

Product details: 

Cozy Up Dots:  • 108 adhesive-backed enamel dots in Scarlet glitter, Scarlet, Paprika glitter, Paprika, Toffee glitter, and Toffee.  • 4 mm–8 mm.

Freshly Baked Dots • 112 adhesive-baked enamel dots in French Vanilla, Toffee, Honey Butter, Flamingo, Scarlet, and Seabrook glitter.  • 4 mm–8 mm.

Click here to order the product special!

Have a sassy day!

Tonya

Saturday, December 2, 2023

Sassy 25 Layouts of Christmas - 2023. Layout 2. The Best Memories: Make Waves.

Welcome to my Sassy 25 Layouts of Christmas 2023!  I will be celebrating the art of scrapbooking during the next 25 days leading up to Christmas and I invite you to join me!

So how does this work? For the next 25 days, I will share a layout here on my blog, in my In All Sassiness Scrapbooking Facebook Group and in my In All Sassiness Shop.  The layout will be available in kit form and quantities will be while supplies last.  Because many of the layouts are created with retired product, the quantities will vary from day to day so if you see one that you want, you will want to order it sooner verses later.  Additionally, there will be a product special that will compliment the Layout which will just be available for 24 hours. Grab, and order, the kits, and product deals that you love, select pick up at check out and then the items will be collectively at conclusion of the 25 days! Which saves you on individual shipping cost AND gives you a very happy box to open!!  A special note:  due to the roll-a-coaster ride of CTMH's inventory last December, I will be very pro-active and will placing one collective order at the end of each day to ensure I can get the product ordered. And of course, if you are one of VIP's you will receive VIP credit for all specials and layout kits that you order.

So with all of that being said, here is day two!!!

-------------------------------------------------------------------

My second layout also partners the beloved retired and new product all in one layout!  The two compliment each other so much that you would have thought they were created at the same time instead of several years apart.

This layout, "the best memories" was created with the Make Waves Suite.   I then added the current Teal Enamel Dots and the Teal Acrylic Titles to compliment the paper. I love how using the enamel dots between the diamond-squares - they certainly "pops".  The paper collection was originally featuring a mermaid and sea theme but with the way I used the papers, you would never know.  Not that I don't love mermaids, but I think it fascinating to create with a paper collection in an entirely different direction that how it was originally created.

Because the acrylic titles include multiple different titles, you could change the title to work with your own photos if desired.


This layout, and the coordinating product special, are now available for purchase in my shop!  Click here for the layout.


Product Special for December 2nd.  Acrylic Title Sets $6.00 each.  Wood Grain & Black Die Cut Title Sets $3.00 each.  This special is repeatable.  Available until 10am on Sunday, December 3rd.

Product details:  47 teal acrylic titles.  • ⅝" – 1⅛".  The acrylic product is available in the following colors:  Teal, Pink, Red, Orange, Yellow, Blue and White.  The die cuts are available in Black and Wood Grain.


Have a sassy day!

Tonya


Friday, December 1, 2023

25 Layouts of Christmas - 2023. Layout 1.

Welcome to my Sassy 25 Layouts of Christmas 2023!  I will be celebrating the art of scrapbooking during the next 25 days leading up to Christmas and I invite you to join me!

So how does this work? For the next 25 days, I will share a layout here on my blog, in my In All Sassiness Scrapbooking Facebook Group and in my In All Sassiness Shop.  The layout will be available in kit form and quantities will be while supplies last.  Because many of the layouts are created with retired product, the quantities will vary from day to day so if you see one that you want, you will want to order it sooner verses later.  Additionally, there will be a product special that will compliment the Layout which will just be available for 24 hours. Grab, and order, the kits, and product deals that you love, select pick up at check out and then the items will be collectively at conclusion of the 25 days! Which saves you on individual shipping cost AND gives you a very happy box to open!!  A special note:  due to the roll-a-coaster ride of CTMH's inventory last December, I will be very pro-active and will placing one collective order at the end of each day to ensure I can get the product ordered. And of course, if you are one of VIP's you will receive VIP credit for all specials and layout kits that you order.

So with all of that being said, here is day one!!!

My first layout partners the beloved retired and new product all in one layout!  The two compliment each other so much that you would have thought they were created at the same time instead of several years apart.

This layout, "Priorities" was created with the Clementine Paper Suite which included the Paper pack and canvas stickers.  I then added the current Papaya Shimmer Trim (which is so beautiful) and the Toffee Glitter Dots from the Silver Bells Dots.  I adore the Toffee glitter dots with the paper - they dots bring out the pinks and peaches for complete fantasticness!  The stickers are made from canvas so the many mediums truly compliment one another.


This layout, and the coordinating product special, are now available for purchase in my shop!  Click here for the layout.


Product Special for December 1st.  (X7298D) Silver Bells Glitter Dots.  Available until 10am on Sunday, December 2nd.

Product details:  • 90 adhesive-backed enamel glitter dots.  Includes one sheet each of White, Silver & Toffee.  Sizes are:  4mm, 6mm and 8mm.

Click here to order!

Have a sassy day!

Tonya


Friday, November 24, 2023

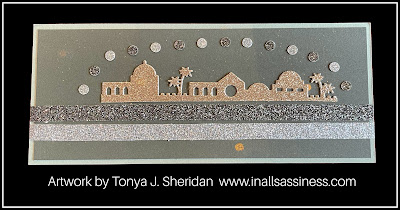
Glitter Bethlethem Card

As we have now "officially" entered the Christmas season, I wanted to share a card that I created that I just adore! Simple.  Elegant. And made with glitter!


This is the stamp set and Thin Cut set that includes the Thin Cut for Bethlehem.  
How to create the card:
1.  Cut a piece of Sage cs to 3 1/2" x 8 1/2".
2.  Cut a piece of Pine cs to 3 1/4" x 8 1/4".
3.  Splatter the Pine cs with the Gold Shimmer Brush.  Allow a few minutes to dry.
4.  Center, and adhere, the Pine cs to the Sage cs.  
5.  Adhere a piece of Seabrook Shimmer Trim to card front. This extends across the horizontal width to the card and is about 1/2" to 3/4" above the bottom edge of the card.  Trim the edges of the shimmer trim off where it exceeds the card.
6.  Adhere a piece of Pine Shimmer Trim to the card front.  This extends across the horizontal width to the card and is approximately 1/4" above the Seabrook Shimmer Trim.
7.  Adhere the gold glitter cut of Bethlehem to the base.  This is just right of centered and is 1/8" above the top of the Pine Shimmer Trim.  This piece is quite fragile so adhere with care. I found the CTMH Adhesive Runner worked the best for not tearing the cut.
8.  Using a hand held hole punch, cut out circles from the Pine and Seabrook Glitter Paper.
9.  Arrange the glitter circles in a half-circle from the left side of Bethlehem, around and over, the piece, to the right side of the of Bethlehem.  Alternate the two colors and adhere with Mini Glue Dots.
10.  Adhere the card front to a Slimline Card.

Supplies used:  (Z7093) Nativity Scene Stamp & Thin Cuts, (Z4659) Pine Shimmer Trim, (Z4660) Seabrook Shimmer Trim, (Z4610) Pine Glitter Paper, (Z4611) Seabrook Glitter Paper, (Z3316) Gold Shimmer Brush, (X6070) Pine cs, (X6045) Sage cs, (Z3238) Gold Glitter Paper, (X257) Slimline Cards & Envelopes, (retired) Mini Glue Dots, (Z7010) CTMH Adhesive Runner.  Current items can be ordered on my Close To My Heart website at:  www.tonyasheridan.ctmh.com.

For those who would prefer For those who would prefer a pre-cut, & pre-stamped set of this card, I have added it to my card buffet.  You can order the cards for $2.50 each or 7/$15.  (click on the quantities for the associated links) I will also be hosting a few pop-up card buffets over the next few weeks so be on look-out for those as well.

Create with sass,

Tonya

Wednesday, November 22, 2023

Triangle Tree Inspiration #3.

I just can't stop creating with this fantastic Triangle Tree set!!  Hope you are loving it too!  This collection includes a stamp set, a Thin Cut set and a dual stencil set that can all be purchased, and used, independently of one another, or used together, and when they are, they are a statement of  beauty!  I am in love with this collection so over the next few days, I will be sharing some artwork that I have created with the elements independently and collectively.

(D2204) Triangle Trees stamp set 

(Z8064) Triangle Trees Thin Cuts

(z8065) Triangle Trees Stencil duo

(Z8066) Triangle Trees Bundle

The Triangle Tree collection is only available until the end of December, or while supplies last.  They can be ordered here:  https://tonyasheridan.closetomyheart.com/retail/search.aspx?searchvalue=triangle+trees

The third card that I wanted to share uses one of the stamped trees as an embellishment.  Being quite the music lover, I especially liked how this one turned out.


Here are the directions to create the card:

(optional) Splatter the music note paper wit the Gold or Clear Shimmer Brush before creating. 

1.  Cut a 4 1/4" x 5 1/2" piece of Sage cs.
2.  Cut a 4" x 5 1/4" piece from the music note paper.
3.  Cut (2) 1 1/2" squares from the Pine Glitter paper and (1) 1 1/2" square from the Seabrook Glitter Paper.
4.  Position the three squares so that they make a diamond pattern.  There is a slight space between the pieces.  Adhere to the card front with Thin Foam Tape.
5.  Cut the tree out of the light side of the Pine cs.
6.  Using the Pine Exclusive Ink, and the Triangle Tree stamp set, stamp the tree design onto the tree.
7.  Adhere the tree in the bottom right corner of the card so that the top overlaps the Seabrook Glitter Square.  Where the tree overlaps the square, one layer of Thin Foam Tape is used.  Where the tree extends over the music note paper, adhere with two layers of regular Foam Tape.
8.  Using a hand-held hole punch, adhere (3) glitter dots in a vertical row down the center of the tree.  The top one is Seabrook, followed by Pine, and then a 2nd Seabrook.
9.  Adhere an additional Pine glitter dot to the music paper under the center of the tree for the trunk.
10.  Cut a piece of Sage cs to 3/4" x 1 7/8".  
11.  Using the Pine Exclusive Ink, stamp the "Season's greetings" sentiment onto the light side of the Sage cs.  Trim the edges off of the left and right edges so that the sentiment is centered.
12.  Cut a piece of Pine cs to 1" x 2 3/4".
13.  Adhere the sage cs with sentiment to the right side of the Pine piece leaving 1/8" border on the upper, lower and right edges.
14.  Adhere (2) glitter dots in a vertical row to the right of the sentiment.  The Seabrook is on the top and the Pine is at the bottom.
15.  Adhere the combined sentiment piece to the card front.  The left edge is flush with the left card edge and is popped up with Thin Foam Tape.  The right overlaps the glitter squares and is adhered flat.  Red Line Tape, or a Mini-Glue Dot will work best to adhered this to the glitter surface.
16.  Adhere the card front to the card base.

Supplies used:  (Z8064) Triangle Tree Thin Cut, (D2204) Triangle Tree Stamp Set, (Z7088) Silver Bells Cardmaking Stamp & Thin Cuts, (X6045) Sage cs, (Z4610) Pine Glitter Paper, (Z4611) Seabrook Glitter Paper, (Z6540) Pine Exclusive Ink, (X6070) Pine cs, (X7299B) Evergreen Paper Pack, (Z2060) Thin Foam Tape, (Z7010) Adhesive Runner, (retired) Mini-Glue Dots, (retired) Red Line Tape. Optional:  (Z3316) Gold Shimmer Brush, (Z3293) Clear Shimmer Brush.   The current supplies can be found on my website at:  www.tonyasheridan.ctmh.com.

For those who would prefer For those who would prefer a pre-cut, & pre-stamped set of this card, I have added it to my card buffet.  You can order the cards for $2.50 each or 7/$15.  (click on the quantities for the associated links) I will also be hosting a few pop-up card buffets over the next few weeks so be on look-out for those as well.

In all that you do, create with sass!

Tonya

Saturday, November 18, 2023

Triangle Tree Inspiration #2

 Are you in love with the Triangle Tree Collection yet?  This collection includes a stamp set, a Thin Cut set and a dual stencil set that can all be purchased, and used, independently of one another, or used together, and when they are, they are a statement of  beauty!  I am in love with this collection so over the next few days, I will be sharing some artwork that I have created with the elements independently and collectively.

(D2204) Triangle Trees stamp set 

(Z8064) Triangle Trees Thin Cuts
(z8065) Triangle Trees Stencil duo
(Z8066) Triangle Trees Bundle

The Triangle Tree collection is only available until the end of December, or while supplies last.  They can be ordered here:  https://tonyasheridan.closetomyheart.com/retail/search.aspx?searchvalue=triangle+trees

The second card is a gold threaded tree card and here are the directions to how I created this card:

1.  Cut a 4 1/4" x 5 1/2" piece of Sage cs. 

2.  Cut a piece of 4" x 5 1/4" of French Vanilla cs.  

3.  Position the 2nd largest tree Thin Cut over the French Vanilla cs in the desired position.  Cut the tree out.

4.  Stamp the sentiment "happy holidays" from the Silver Bells Card Making Stamp Set in Pine Exclusive Ink Pad to the French Vanilla cs. This is stamped above where the tree was cut out.

5.  Using the Gold Shimmer Brush, splatter the front of the French Vanilla cs.  Allow a few minutes to dry.

6.  Flip the French Vanilla over to the backside.  Adhere Thin Foam tape directly beside where the tree was cut out.  Remove the film from the tape.

7.  In a crisscross pattern, take the thread back and forth adhering it to the foam tape before between each turn.

8.  Adhere Thin Foam Tape around the outer edge of the French Vanilla.

9.  Remove the film around the bordering foam tape.  Center, and adhere, to the Sage cs.

10.  Cut a smaller tree from the Pine cs.  Cut an even smaller tree from the Pine Glitter Paper.

11.  Stamp the tree image with the Pine Exclusive Ink Pad onto the light side of the pine cut tree.

12.  Position, and adhere, the stamped tree, to the left side of the empty tree space with Thin Foam Tape.  

13.  Position, and adhere, the glitter tree, to the right side of the empty tree space with Thin Foam Tape.

14.  Cut the Gold Shimmer Trim at an angle and tuck under each of the trees.  Note: if you don't have Gold, Pine works well too.

15.  Add Gold Stickles to the stamped tree for ornaments or create "dots" using the tip of the Gold Shimmer Brush.

Supplies used:  (Z8064) Triangle Tree Thin Cuts, (D2204) Triangle Tree Stamp Set, (C1995) Silver Bells - Card Making Stamp Set, (retired) Gold Embellishing Thread, (retired) Gold Shimmer Trim, (retired) Golden Rod Stickles, (Z3316) Gold Shimmer Brush, (Z4610) Pine Glitter Paper,  (Z6540) Pine Exclusive Ink Pad, (X6046) French Vanilla cs, (X6045) Sage cs, (X6070) Pine cs, (X254) Value Cards & Envelopes.  These items can be ordered on my website at: www.tonyasheridan.ctmh.com.

For those who would prefer For those who would prefer a pre-cut, & pre-stamped set of this card, I have added it to my card buffet.  You can order the cards for $2.50 each or 7/$15.  (click on the quantities for the associated links) I will also be hosting a few pop-up card buffets over the next few weeks so be on look-out for those as well.

In all that you do, create with sass!

Tonya